
This post contains affiliate links. As an Amazon Associate I earn from qualifying purchases, at no extra cost to you. Thank you for supporting Diynify!
Handmade Christmas gift tags can do more than identify who gets which package. The best ones also solve a small wrapping problem: they hold a private note, stay put on an awkward bottle, keep ribbon centered, reveal a message, or become a tiny keepsake after the paper is gone.
Most of these ideas use cardstock or decorative paper, scissors or a craft knife, a ruler, adhesive, and ribbon or cord. A few need extra supplies such as acetate, foam tape, lightweight paper for origami, a printed photo, or a perforating tool. If you are making a full batch, choose the construction before the motif. Flat layered tags are easier to stack and transport, while sliders, shaker windows, folded cards, and corner sleeves make more sense when the interaction is part of the gift.
1. Layered Evergreen Branch Name Tag

Instead of centering one large Christmas icon, build the tag as a small botanical composition. Cut a sturdy cream or kraft base, then overlap two or three narrow evergreen sprigs so their stems meet near the punched hole. A tiny berry cluster or metallic paper strip can cover that join while leaving most of the writing surface quiet. The shallow layers cast enough shadow to read against busy wrapping paper.
Keep branch tips inside the tag’s footprint if the gift will travel in a bag. Long unsupported needles are the first parts to bend. For extra dimension, attach only the stem ends and let the outer sprigs lift slightly; for mailed gifts, glue the branches flatter and rely on contrast rather than height.

2. Fold-Open Mini Christmas Card Tag

When a name on the front is not enough, shrink the logic of a greeting card into the gift tag. A folded cardstock base gives you a clean front for the recipient and a protected inside panel for a short note, clue, or message that would otherwise crowd the wrapping.
- Cut a narrow rectangle twice the finished width and score it down the center.
- Fold it sharply, then punch the ribbon hole through both layers near the top so the halves stay aligned.
- Add the recipient’s name to the front before decorating.
- Keep the inside embellishments nearly flat so the tag closes without springing open.
The hinge does more work than the decoration here. If the tag wants to gape, the paper is either too heavy for the small fold or the inside layers are too thick. Reduce the interior build-up before adding a closure; a tiny sticker should not have to fight the cardstock.

3. Accordion Christmas Tree Pull-Out Tag
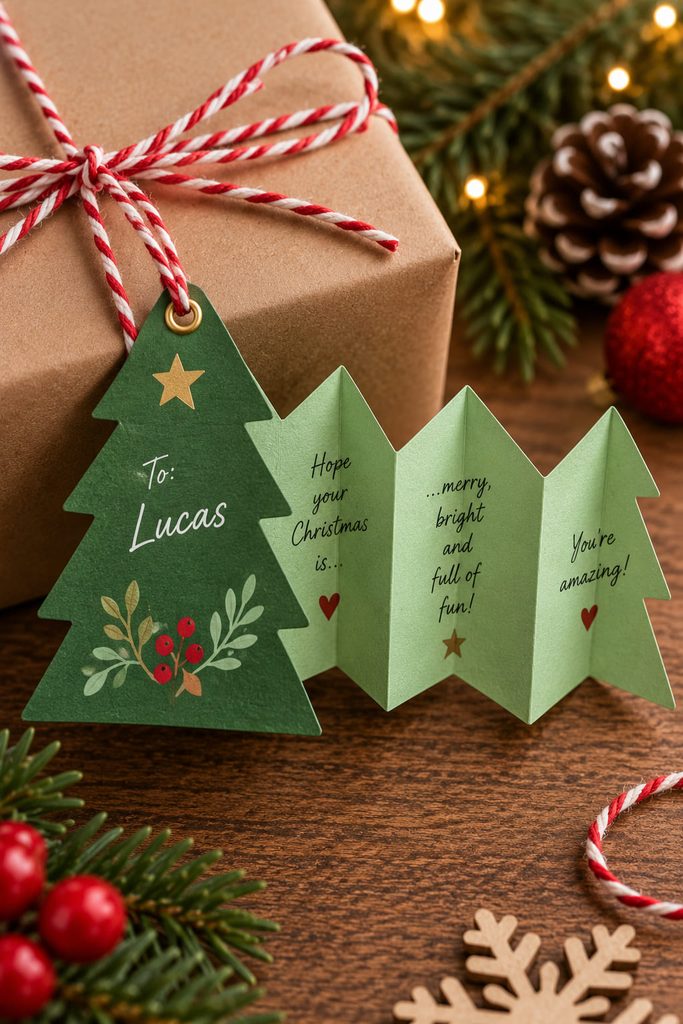
A narrow accordion can turn a tiny package label into a longer message without making the wrapped gift look busy. Start with a strip of light cardstock, score three or four equal panels, and fold it back and forth. Trim the closed stack into a simple tree silhouette, keeping the folds intact along alternating edges so the strip remains connected. The outside panel carries the name; opening it reveals a row of short notes, tiny stars, or a message that reads across the folds. Because the tag expands sideways, tie the hanging loop through the top of the first panel rather than through the full stack. Check the closed shape before decorating every panel—anything that crosses a fold line can buckle when the accordion is compressed.

4. Shaker Snow Globe Gift Tag
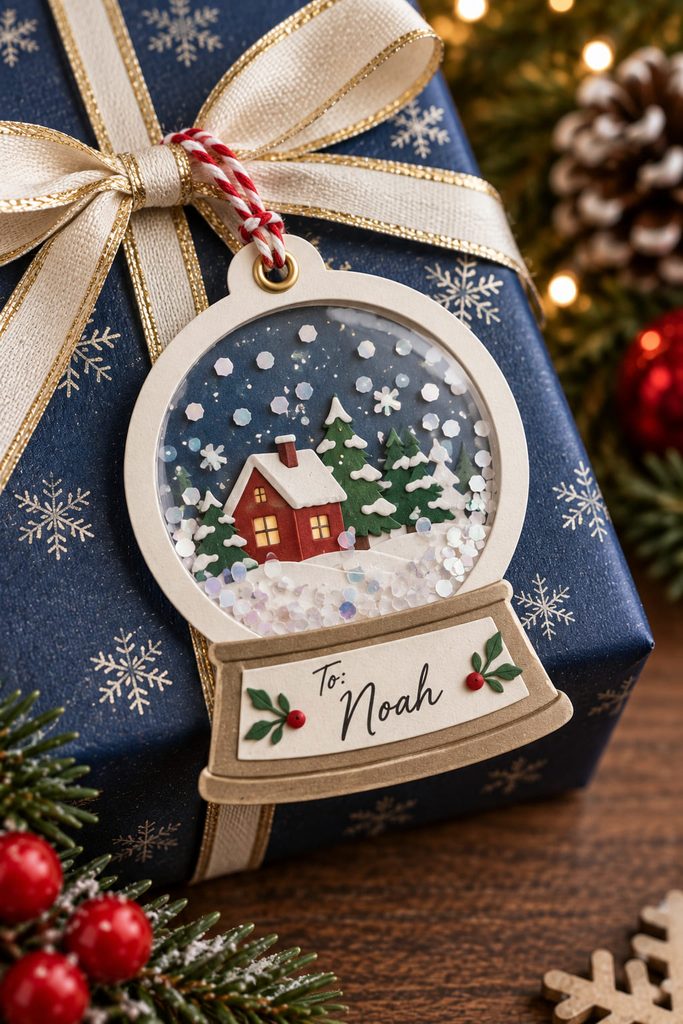
Movement is the reason to choose a shaker tag over a flat label. The paper frame acts like a shallow container: a clear window holds a small amount of loose paper confetti, while foam tape or narrow cardstock spacers create the cavity that lets those pieces move. A snow-globe silhouette works naturally because the clear center already has a reason to exist.
Useful supplies: sturdy cardstock, a small piece of clear acetate, narrow foam tape or layered paper spacers, paper confetti, and ribbon or cord.
Build the sealed window before attaching decorative outer layers:
- Cut the window opening in the front frame and glue acetate behind it.
- Create a continuous spacer wall around the opening with no gaps at the corners.
- Add only a light scattering of confetti to the cavity.
- Seal the cavity with a solid backing panel, then add the name area and hanging loop.
Shaker Seal Check: Hold the unfinished tag upright and tap each edge. If confetti catches in a corner, the cavity is too tight; if pieces leak, repair the spacer wall before covering the back. The punched hanging hole should sit in solid cardstock above the window, not through the sealed chamber. Too much filler is another common failure: it turns a moving detail into a packed opaque layer.
5. Mini Envelope Message Tag

Need room for a private note without putting it on display? A miniature envelope keeps the message removable instead of permanently written on the tag. Fold a small envelope from medium-weight paper, glue only the side and bottom seams, then attach a ribbon loop to the back or punch through a reinforced flap area. Slip in a tiny card with the recipient’s name on one side and a private note on the other.

There are two useful closure routes. Tuck-in flap: leave the flap unglued and cut it long enough to slide behind the front panel; this keeps the envelope reusable and gives the recipient an obvious way to open it. Sticker seal: use a small paper sticker when the note should feel more like a reveal, but place it where the paper can open without tearing the hanging point. The tuck-in version is better for thicker cardstock; the sticker version works more cleanly with lighter paper. In either case, the insert needs enough clearance to slide out after the envelope is tied to the gift.
6. Sliding Name-Reveal Gift Tag
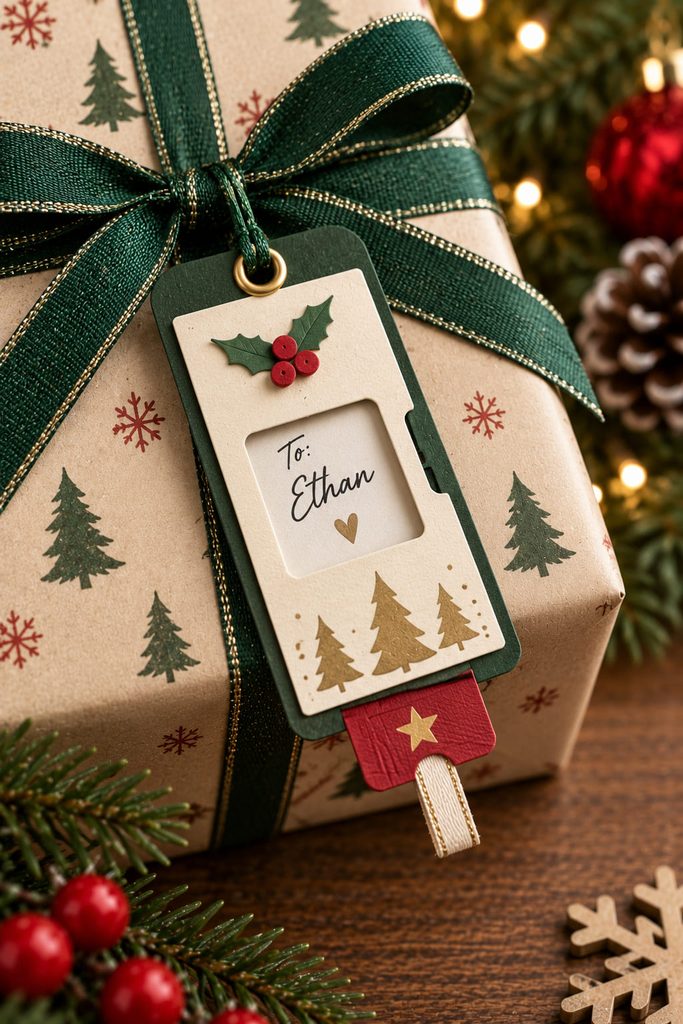
Pull a narrow paper tab and the recipient’s name or a second message appears while the outer tag stays graphic. Make the front from two cardstock layers with a straight channel between them. The inner strip travels through that channel, and a small stop tab on the hidden end prevents it from being pulled completely free. Cut the reveal window only after you know where the written name will land at full extension.
Slider Clearance Check
- If the strip jams halfway, widen the channel or remove adhesive that has squeezed into the travel path.
- If the strip pulls out, enlarge the hidden stop or shorten the opening at the exit.
- If the name sits off-center, mark the fully open position first and write or attach the name after that test.
- If the tag twists on the package, move the hanging hole away from the moving edge so the cord loads the fixed outer frame.
A good slider should move with a light fingertip pull but should not slide open under its own weight. That balance comes from channel clearance, not from making the pull tab larger.
7. Woven Paper Stocking Tag

Use actual over-under weaving when you want the surface itself to be the decoration. Cut narrow strips in two colors, weave them into a small rectangle, and secure the perimeter before trimming the piece into a stocking silhouette. Mount the woven stocking on a plain backing card so the strip ends cannot lift and so there is a dependable place for the name and ribbon hole.

The visual rhythm comes from the crossing pattern, so keep the extra details restrained. A narrow cuff cut from solid cardstock is useful because it hides the top trimmed edges and reinforces the area that carries the cord. If the weave bows, the strips were pulled too tightly; flatten the panel before backing it rather than forcing it down with heavy glue. For batch-making, weave one larger sheet first and cut several small stocking fronts from it, preserving enough margin to seal every cut edge.
8. Origami Star Loop Tag

For a gift that already has strong patterned wrap, a folded star can replace the usual flat label entirely. Use crisp, relatively light paper so the creases lock without becoming bulky, then add a small blank paper tab behind one point for the recipient’s name. The hanging loop should pass through a reinforced fold or a small backing tab rather than a fragile star tip.
Before tying it on, check three things:
- the star hangs face-forward instead of rotating edge-on;
- the name tab stays readable without covering the folded geometry;
- the attachment point does not pull one point out of shape.
This works best as a small ornament-like tag on boxes and gift bags that will be handed over in person. If the package will be tightly packed or mailed, use a flatter folded star with fewer raised layers so the creases are not crushed.
9. Photo-Frame Keepsake Gift Tag
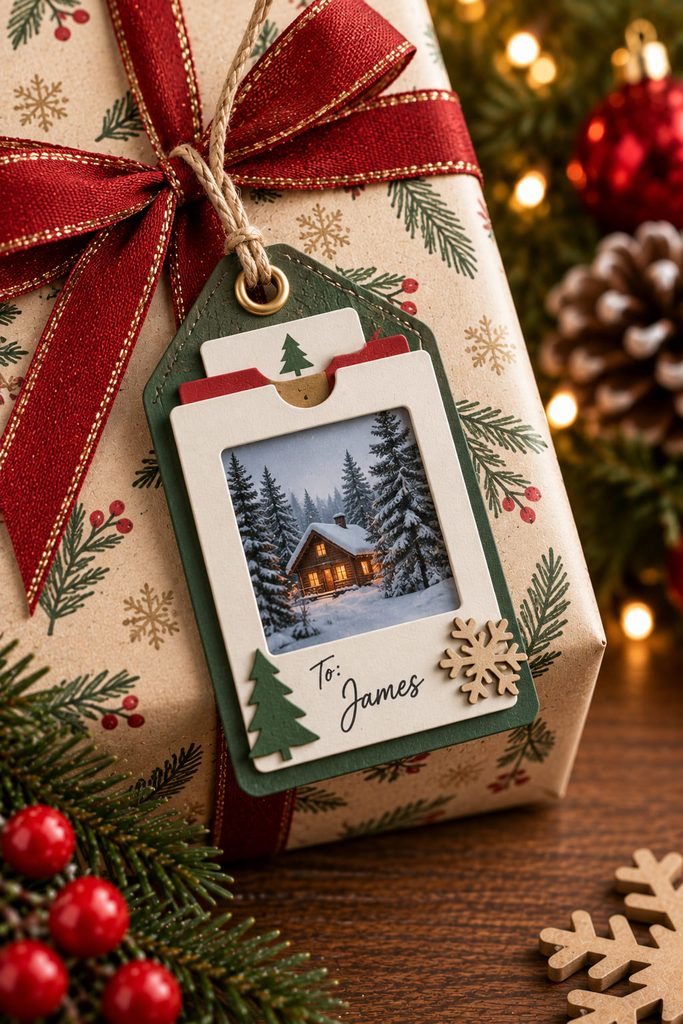
If the tag should become a keepsake after the wrapping is gone, let a tiny photo do the work. Build a cardstock frame with a window slightly smaller than the image, then add a backing layer that is attached along three sides only. The open fourth side becomes the loading slot, allowing a small printed photo to slide in without gluing over the image. Put the recipient’s name on the lower frame edge or on a separate narrow banner.
For a removable keepsake, the photo needs to stay captured while the gift is carried. The window overlap should cover all four photo edges, and the loading slot should face upward when the tag hangs. A semicircle thumb notch in the backing makes removal easier without exposing the photo corners.
Photo Retention Check: Load the photo, hold the tag by its ribbon, and gently turn it upside down. If the image shifts toward the slot, deepen the overlap or add a small paper stop at the opening. Do not solve the problem by gluing the photo unless permanence is actually the goal.
The finished piece is thicker than a basic label but still lies flatter than a shaker. That makes it a better keepsake option when you want a personal image without loose filler or moving parts.
10. Bottle-Neck Wreath Collar Tag

Bottles and jars do not always give ribbon a good place to sit, so use the neck itself as the attachment point. Cut a wreath-shaped tag from firm cardstock with a center opening large enough to pass over the cap but small enough to stop at the shoulder. Add a short radial slit if the collar needs to wrap around a wider stopper instead of dropping over the top. Put the written name on a lower extension so it remains visible against the glass. Test the opening on the actual container before decorating: it should settle around the neck without interfering with the cap, cork, lid, or handle.
11. Package-Corner Sleeve Gift Tag

Skip the hanging loop entirely by turning the tag into a shallow paper sleeve that grips one corner of a rectangular box. The visible front can be a simple angled label, while two folded wings wrap over adjacent sides of the package. Because the sleeve uses geometry rather than string, it stays in a fixed position and can become part of the wrapping composition.
- Make a paper template that covers the top corner plus narrow strips down two side faces.
- Score both fold lines against the actual box dimensions.
- Fold the wings down and join their overlapping ends on the underside with a small tab or removable adhesive.
- Slide the sleeve on before adding bows or thick ribbon that might block the corner.
Corner Fit Test: The sleeve should resist a light sideways nudge but still slide off without tearing the wrapping. If it buckles, the folds are too close together or the cardstock is too stiff. If it falls off, extend the side wings rather than tightening the top panel until it dents the box.
12. Perforated Tear-Away Wish Tag

For a message the recipient can detach and keep, divide the tag into a fixed upper section and a tear-away lower strip. Start with a long cardstock tag divided by a horizontal tear line. Put the recipient’s name and attachment hole above the line; use the lower section for a short wish, clue, coupon-style note, or tiny handwritten promise that is meant to detach.
There are two ways to make the tear line. Short cut perforations made with a craft knife produce a cleaner, more predictable separation, but they need a cutting mat and even spacing. A deeply scored fold line is easier to make with basic tools, but it bends more readily than it tears and works best with lighter cardstock. Test one sample before writing a batch. The tear should travel across the intended line without pulling into the name section; if it wanders, shorten the uncut bridges or switch to a lighter sheet.
13. Ribbon-Lock Bell Gift Tag

Let the tag help control the ribbon instead of simply hanging from it. Cut a bell, ornament, or shield-shaped cardstock tag with two horizontal slots near the upper third. Thread one ribbon segment in through the first slot and out through the second so the paper sits flat against the package; on a crossed-ribbon wrap, the slots can capture the vertical ribbon while the bow is tied above. The tag stays centered because the ribbon passes through its body rather than pulling from a single punched hole.
Slot width is the key decision. It should be just wider than the ribbon so the material slides without bunching but still lies flat enough to resist sideways drift. Reinforce the area around the slots if the cardstock is soft, and keep layered decorations away from the ribbon path. This construction is especially useful on neat rectangular boxes where a dangling tag would cover the bow or swing under the package.
How to Make Handmade Christmas Gift Tags Look Intentional
The easiest way to make a batch feel coordinated is to repeat one structural choice instead of repeating every decoration. Keep the same base paper, ribbon width, corner shape, or writing style across several different mechanisms. A woven stocking, photo-frame tag, and folded mini card can still belong to the same wrapping set if they share one or two visual rules.
Scale matters just as much. A tag should be large enough for the recipient’s name to read against the wrapping, but not so large that it covers the bow or hangs below the package edge. Make one finished sample and tie it onto the actual gift before cutting the rest. That quick test shows whether the hole position twists the tag, whether a raised detail catches on ribbon, and whether the writing disappears into patterned paper.
For batch work, group operations: cut all bases, score all folds, prepare all windows, then write names before final assembly. That sequence reduces the chance of decorating a tag beautifully and then discovering there is no clean place left for the recipient’s name.
Choose the Tag by How the Gift Will Be Handled
Start with the package, not the Christmas motif. A mailed box benefits from a flatter layered or folded tag; a bottle is easier with a collar; a gift that will be handed over in person can support a shaker, slider, or keepsake photo frame. If you need many tags, make one complete sample first and use it to settle the paper weight, attachment point, and finished size before batch-cutting.
For a broader set of seasonal paper projects beyond gift wrapping, continue with the Diynify Christmas craft hub: Christmas Paper Crafts, DIY Ideas & SVG Projects – Diynify.








