
This post contains affiliate links. As an Amazon Associate I earn from qualifying purchases, at no extra cost to you. Thank you for supporting Diynify!
Handmade Christmas cards feel most worth keeping when the paper construction gives the recipient something a flat printed greeting cannot: depth, movement, texture, a small display moment, or a detail that rewards a closer look. These 14 elegant ideas focus on that kind of lasting appeal rather than adding more decoration for its own sake.
Most can be built with cardstock, paper, scissors or a craft knife, a ruler, and adhesive. A few call for vellum, embroidery thread, quilling strips, or a simple paper slider. Choose by the finished experience first: a card that folds flat for mailing, a card that can stand on a shelf, or a card with an interactive element that invites the recipient to open, pull, or unfold it.

1. Recessed Paper-Cut Wreath Window Card
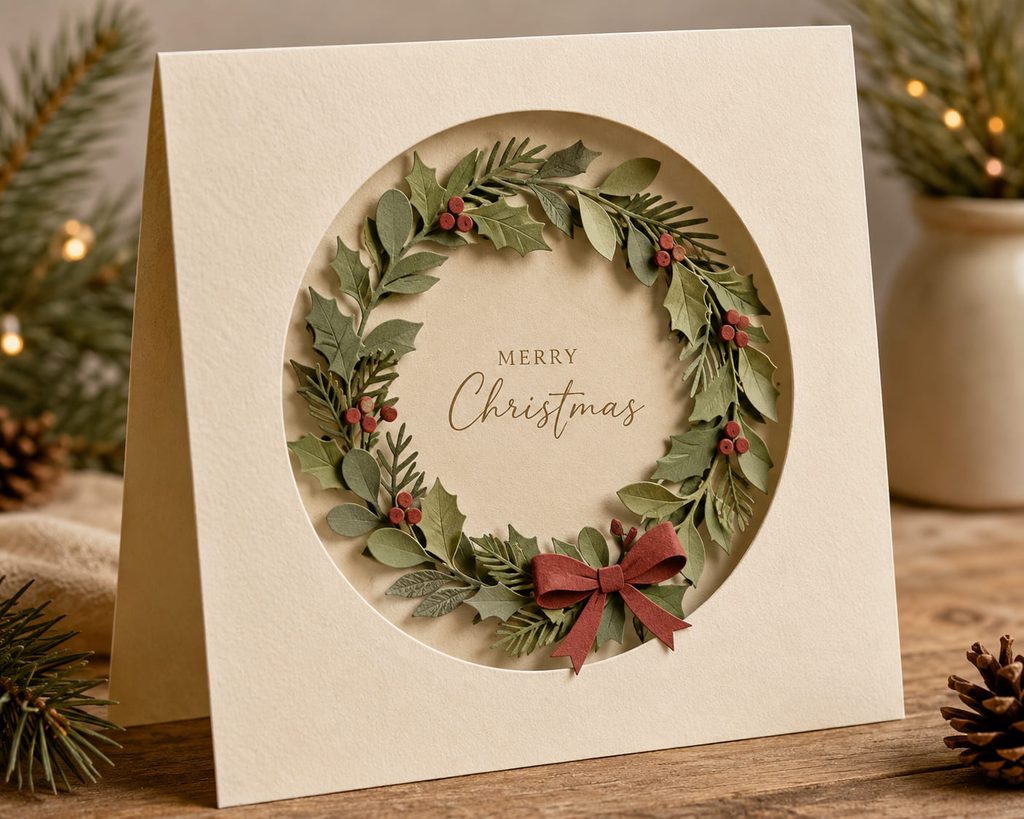
A recessed wreath window gives a simple folded card the visual weight of a tiny framed piece. Cut a generous circular opening in the front panel, then place a second cardstock layer behind it with a paper wreath arranged around the opening rather than across it. That preserved center creates calm negative space for a short greeting or an untouched field of warm paper.
Keep the wreath pieces shallow if the card needs to travel in an envelope. Small overlaps among leaves, berries, and ribbon shapes create enough shadow to separate the forms without turning the front into a thick stack. Before gluing, close the card and check that no foliage crosses the fold or pushes the front panel outward; the clean frame is what makes this version feel finished rather than crowded.

2. Accordion Winter Village Panorama Card
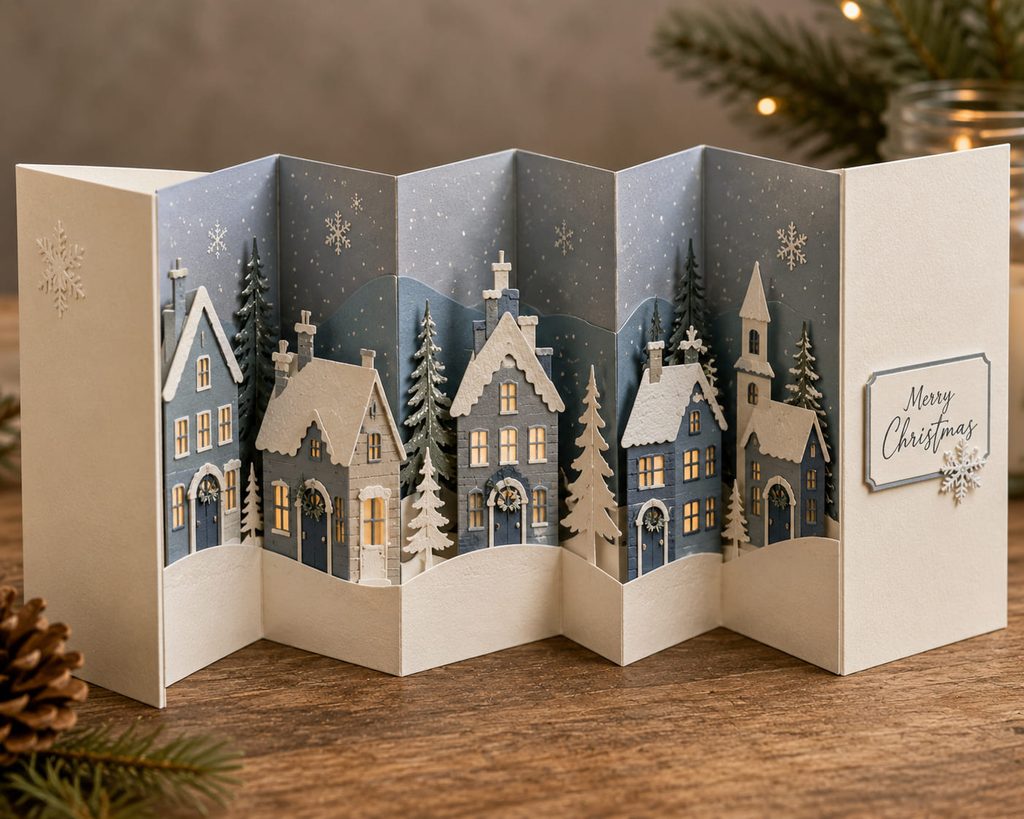
The appeal of a winter village panorama comes from changing one ordinary card fold into a small standing scene. Use one long strip of cardstock for the village base, score it into even accordion panels, and keep the tallest rooflines away from the outer edges so the folded stack stays protected.

- Score the strip into alternating mountain and valley folds before adding buildings.
- Cut or layer a different house silhouette on each visible panel, keeping doors and windows large enough to read after folding.
- Attach the two end panels inside a folded card base, leaving enough slack for the accordion to open without pulling the covers inward.
- Close the card fully and trim any roof, tree, or chimney that collides with the edges.
When opened, the folds create natural spacing between buildings and let the village stand with its own depth. When closed, every panel should return inside the card without buckling; that closed-state test matters more than adding one more tiny house.
3. Vellum Botanical Wrap Card
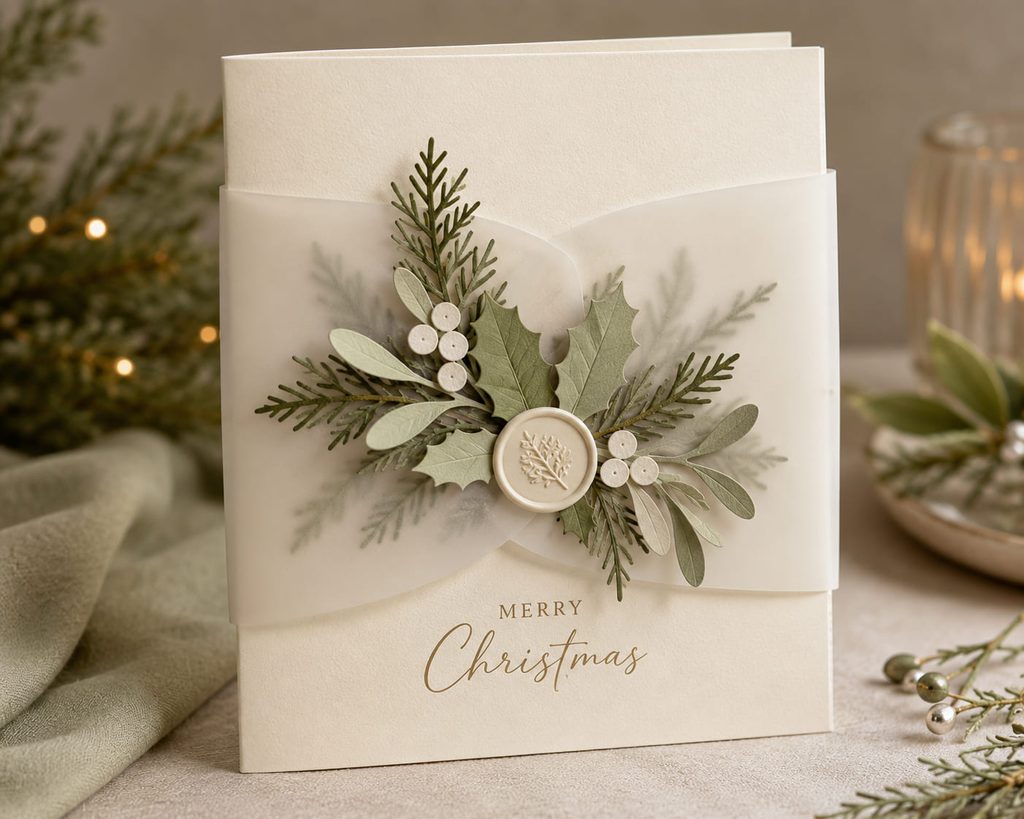
Seen over warm white cardstock, vellum turns a narrow wrap into a soft translucent layer rather than another opaque decoration. Wrap the sleeve around a folded card and place a restrained paper botanical cluster—holly leaves, cedar-like sprigs, or mistletoe shapes—where the ends overlap. Hide adhesive beneath the foliage or a paper seal, since glue and tape can remain visible through vellum. The sleeve also creates a small unwrapping gesture: it slides off before the message is opened and can return around the card when the greeting is stored.
4. Deckle-Edge Monogram Christmas Card
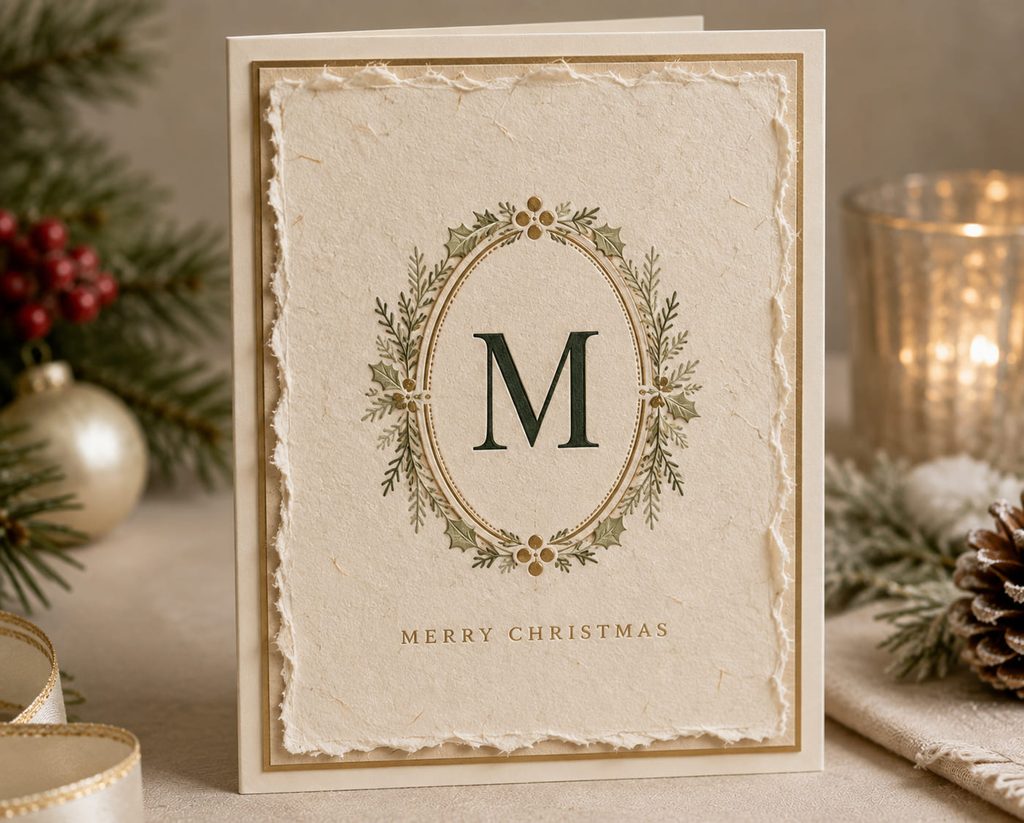
For a quieter kind of luxury, choose the edge treatment before designing the monogram. The same single initial or family mark can feel soft and tactile on handmade paper or crisp and architectural on a precisely cut panel.

| Route | What It Does Best | Build Decision |
|---|---|---|
| Deckle edge | Makes visible fibers the main texture | Tear the panel first, then size the monogram to leave generous irregular margins |
| Clean cut | Emphasizes alignment and formal spacing | Cut precise margins and use a narrow metallic-paper border if the card needs one accent |
In either route, blank space is doing real design work. One centered monogram with room around it reads more deliberately than a small initial surrounded by unrelated holiday motifs.
5. Box-Fold Poinsettia Pop-Up Card
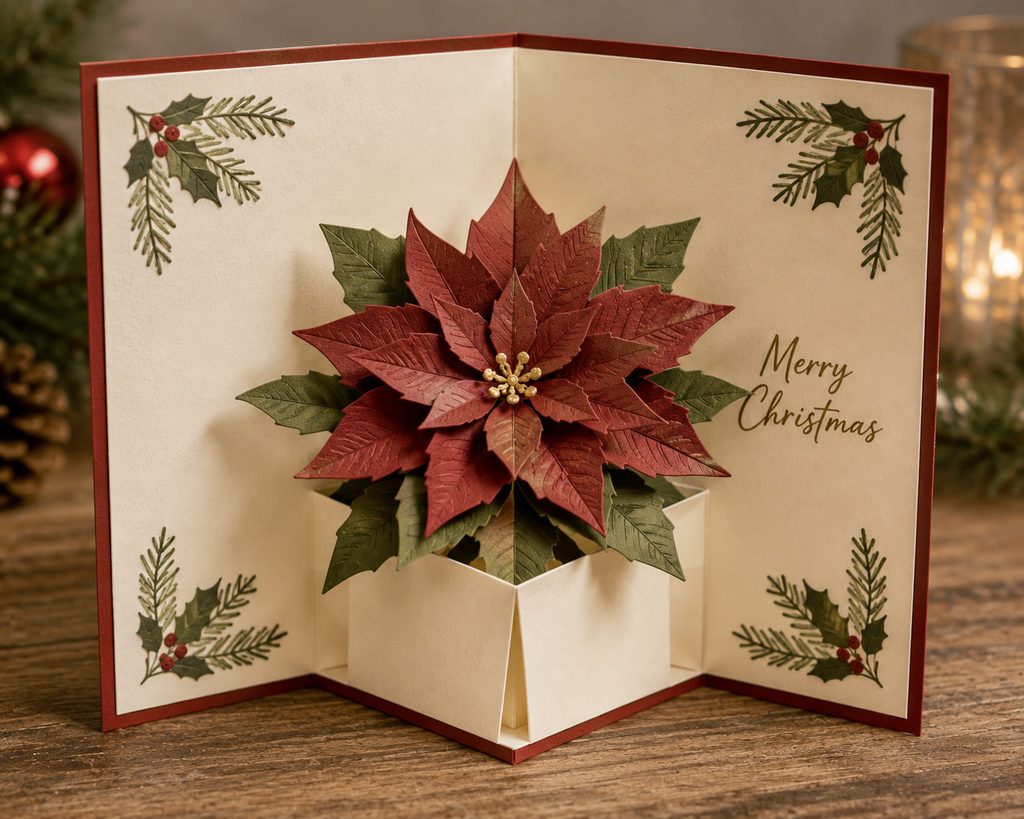
The keepsake moment happens when a flat card opens and a poinsettia rises on a small box-fold platform. The flower itself can be layered from pointed paper petals, but the mechanism underneath deserves more attention than the decoration because it controls both the open display and the closed profile.
Start with a rectangular pop-up box cut into or attached across the center fold. The two vertical side creases should be parallel, and the platform must fold inward as the card closes. Dry-fit the flower on top only after the box moves cleanly; petals that extend too far toward the outer edges can strike the card covers before they meet.
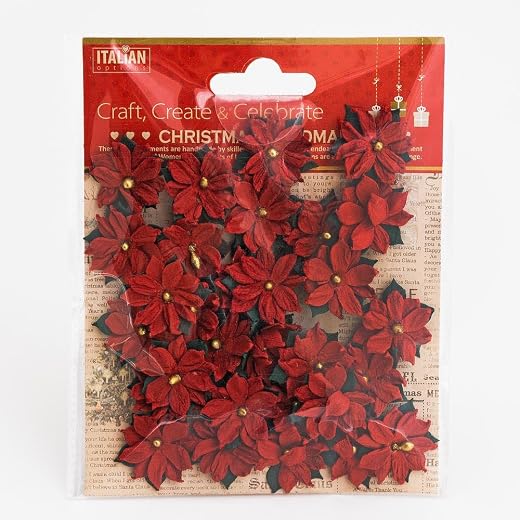
A useful sequence is mechanism first, flower second, leaves last. Once the platform works, build the poinsettia with larger lower petals and a smaller upper layer so the center stays legible without excessive thickness. Keep the back of the flower clear of the hinge line.
Closed-State Check: Close the card slowly with no force. If the center resists, shorten the platform or reduce the flower diameter rather than sharpening the fold harder. A successful pop-up disappears inside the card when closed and rises without catching when opened.
6. Hand-Stitched Snowflake Card
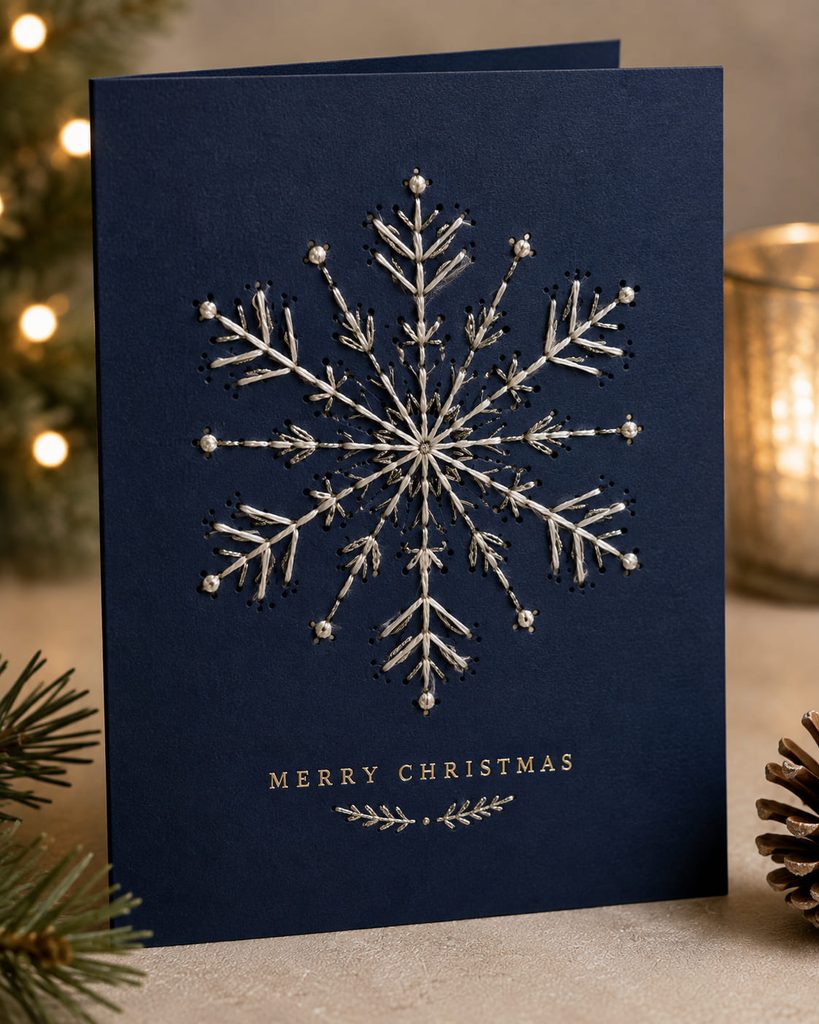
With a small radial field of pierced holes, embroidery thread can turn a snowflake into a tactile detail that feels closer to a textile keepsake than a conventional card front. Mark the pattern on sturdy cardstock and pierce every hole before folding the card; then stitch with embroidery thread or fine metallic cord using a light, even pull. Excess tension can bow the paper between holes or tear a narrow bridge near the center, so the goal is flat cardstock rather than drum-tight thread. Add a second paper panel inside the cover to hide knots and keep them from snagging the written message.
7. Quilled Poinsettia Medallion Card
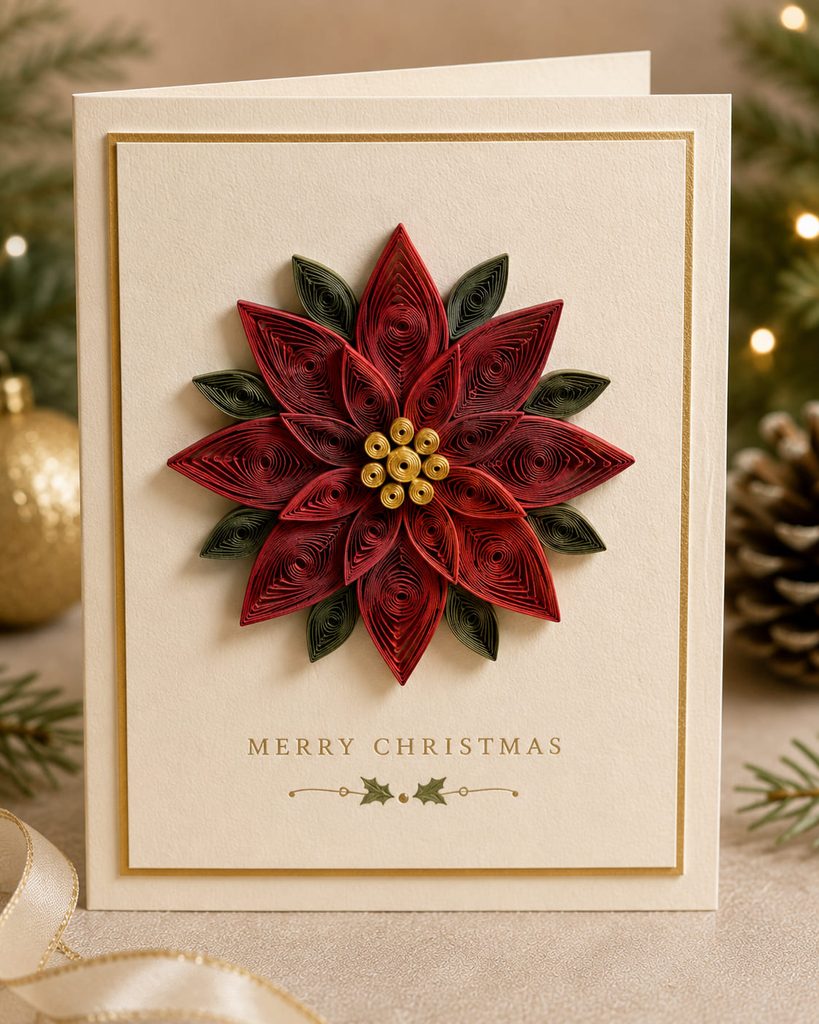
If quilling feels bulky or uneven on a Christmas card, diagnose the coil before changing the motif. A poinsettia medallion works when similarly sized loose coils are pinched into marquise petals and arranged around a small center.

- Petals spring open: let every coil relax to the same diameter before gluing the end.
- The flower looks lopsided: place opposite petals first, then fill the spaces between them.
- The center sits too high: use tighter, smaller coils instead of stacking several layers.
- The card needs to mail flatter: keep one main petal layer and use a roomier envelope rather than crushing the quilling.
- The design still feels busy: remove extra leaves or flourishes; controlled repetition is the visual strength here.
8. Minimalist Evergreen Branch Card
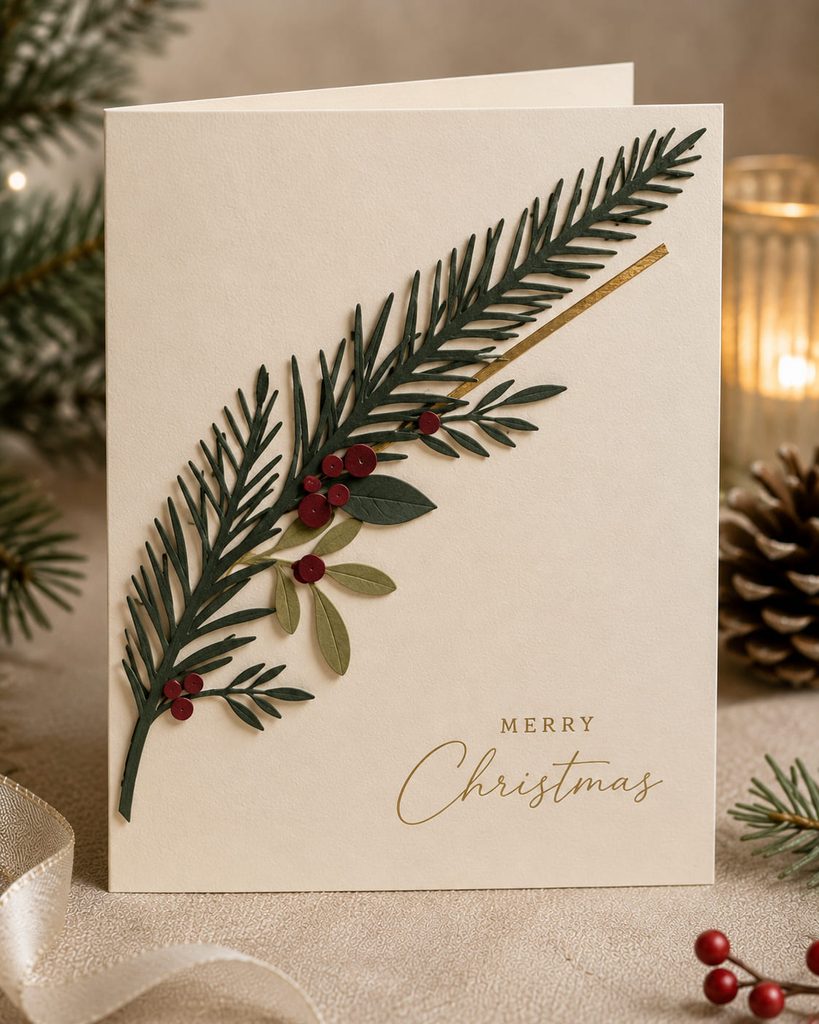
For a card that still needs to slip neatly into an envelope, let silhouette and contrast do the work. Cut one sweeping evergreen or mistletoe branch from dark cardstock, place it diagonally across a pale front panel, and add only a few berry circles or one narrow metallic-paper accent. The long line creates movement without foam or bulky embellishments, while a generous quiet area opposite the branch leaves room for handwritten lettering. Because the design is nearly flat, the recipient can store it without the front catching on other cards.

9. Pleated Fan Christmas Tree Card
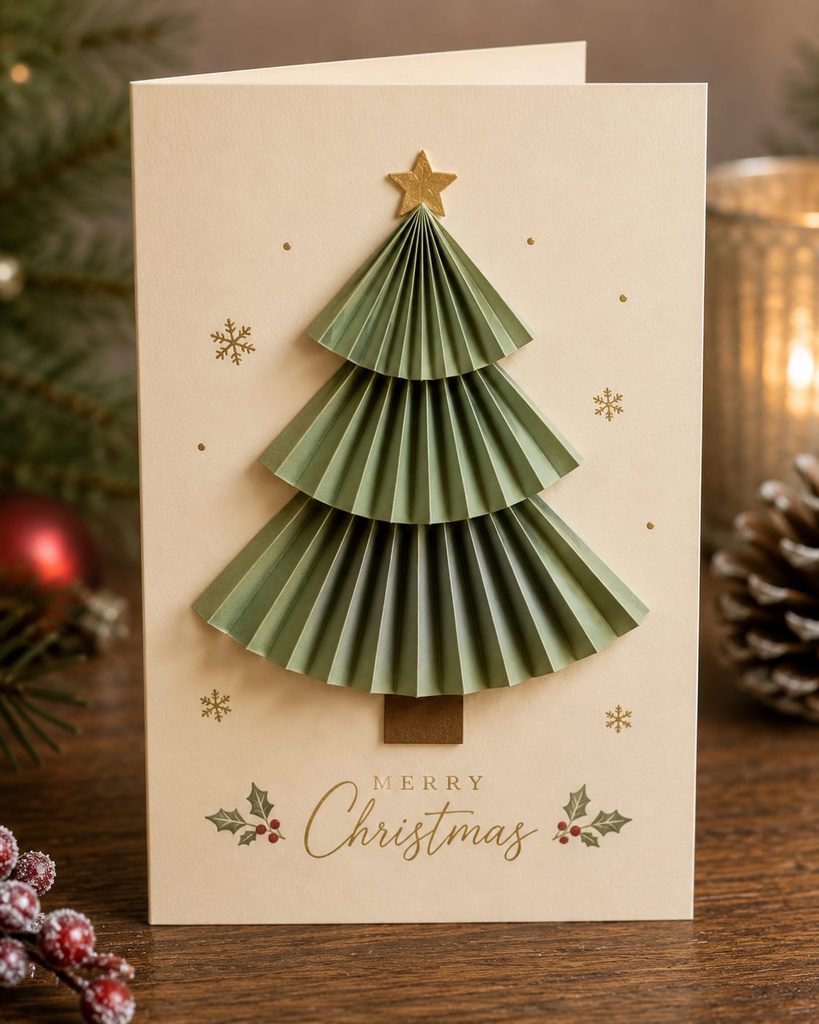
Fold first, size second: a pleated tree gets its shape from the accordion rather than from a drawn outline.
- Score one strip into equal parallel pleats, then compress the folds sharply.
- Divide the pleated strip into two or three lengths and secure one end of each section.
- Open the free edges into shallow fans, stacking the widest tier at the bottom and the narrowest at the top.
- Align the ridges before adding a flat trunk or star; solid or lightly textured paper keeps the fold geometry readable better than a busy print.
The result is dimensional enough to catch side light but still structurally simple: the pleats are both the construction and the ornament.
10. Layered Tunnel Forest Display Card
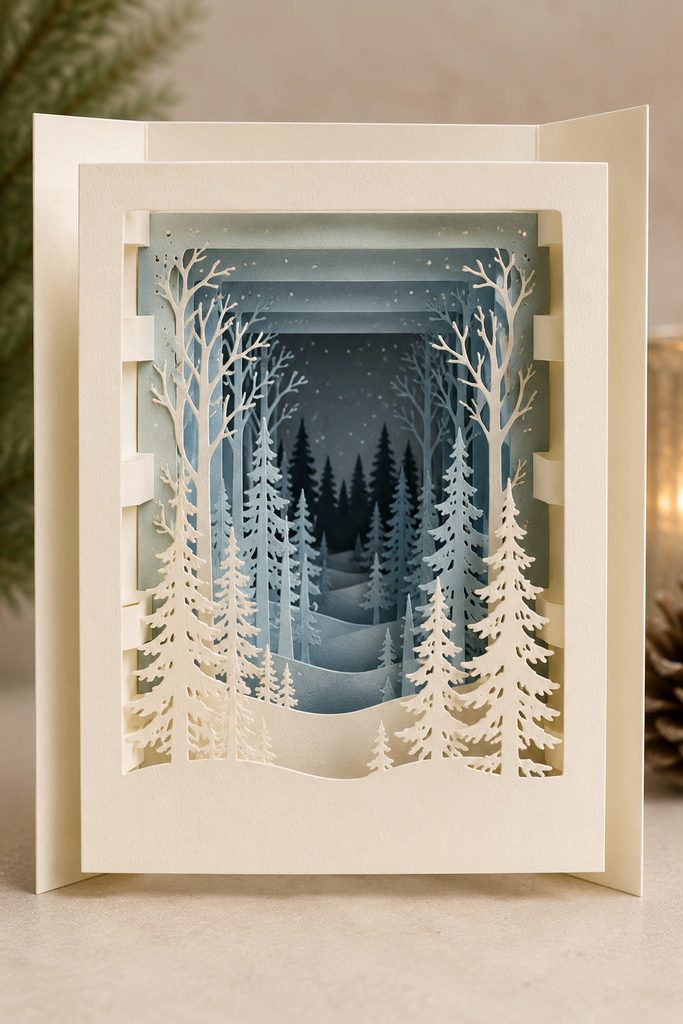
How much depth should a Christmas card carry? A tunnel forest can be built as a deeper shelf-style display or as a shallower card that closes more easily, and choosing that use before assembly prevents the layers from fighting the envelope later.
| Route | Best Use | Construction Trade-Off |
|---|---|---|
| Deeper tunnel | Small seasonal display | More layers and wider folded side spacers create stronger distance but a thicker closed card |
| Shallow tunnel | Greeting that needs easier storage | Fewer layers and slimmer spacers reduce bulk but leave less shadow between tree lines |
Cut a progression of window openings into the cardstock layers and vary the tree line slightly from one layer to the next. Join the sides with folded spacer strips, keeping the front opening clean and unobstructed. If the layers bow inward, correct uneven spacer width or attachment; if the card closes poorly, remove a layer before shrinking every gap until the depth disappears.
11. Pull-Tab Ornament Slider Card
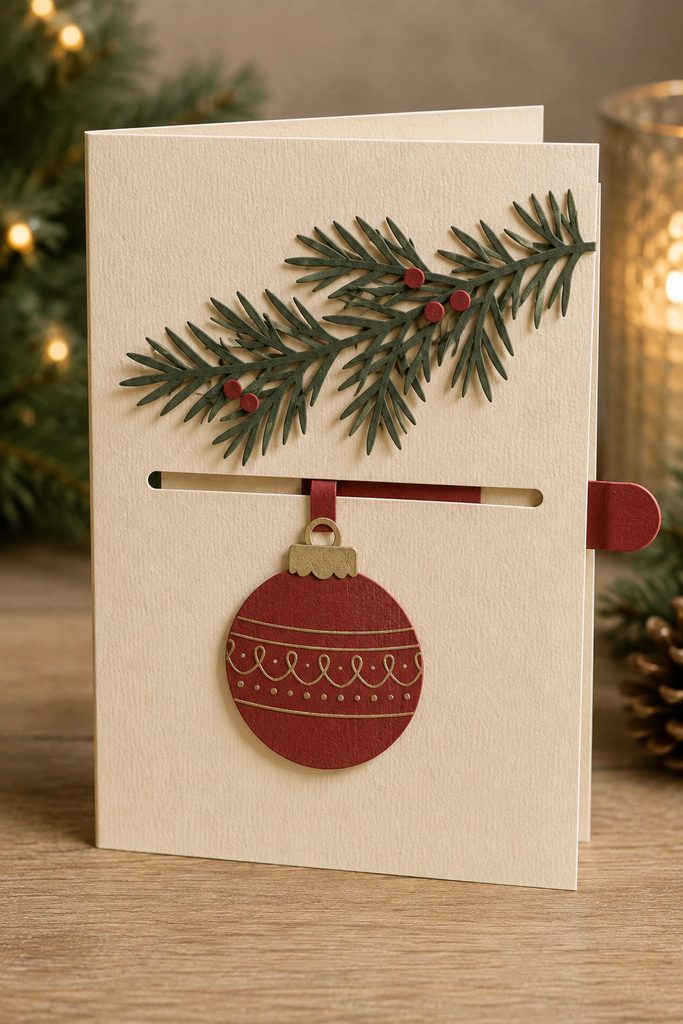
Pull one small tab and an ornament can slide across a branch, reveal a hidden greeting, or move into a framed window. That controlled motion makes a slider card memorable without requiring a large pop-up, but the track has to be treated as a mechanism rather than a decorative slit.
Cut a straight slot in the front panel and attach the ornament to a narrow paper stem that passes through it. On the back, connect the stem to a wider pull tab so it cannot slip through. Cover the mechanism with a second panel, leaving a clean channel where the stem can travel without touching adhesive.
Before sealing the back, check the motion as a system: the ornament must stop before either slot end, the pull tab must stay accessible, and the stem must clear the card fold. If the movement drags, widen the channel slightly; pushing harder usually bends the stem rather than fixing friction. Set the resting position so the ornament frames the greeting when the tab is fully retracted, giving the card a composed default view before the recipient moves anything.
12. Keepsake Pocket Christmas Card
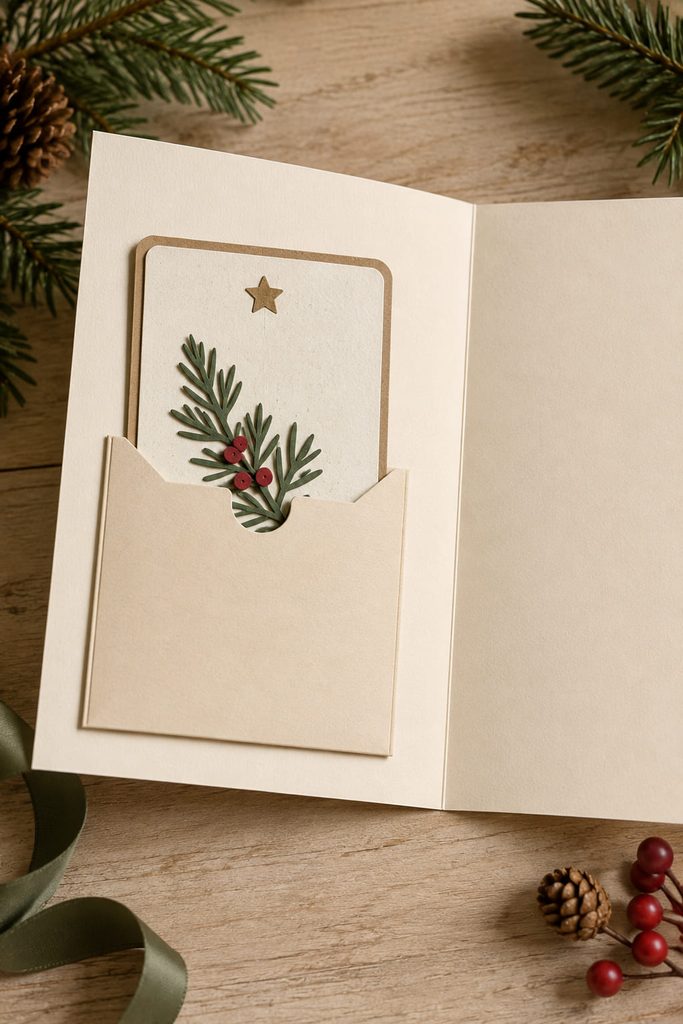
When the recipient likes to save small notes, recipes, photos, or gift cards, a pocket card gives the keepsake a useful second life. Build the pocket from a separate cardstock panel with side and bottom flaps folded behind it, then glue only those flaps to the inside cover. The open top remains visible and easy to reach.
The important part is clearance. Make the pocket slightly wider than the removable insert and keep bulky decoration away from its opening, so the insert can slide out without catching. A thumb notch in the pocket edge can make the contents obvious without adding printed instructions.
Decorate the removable piece as a matching gift tag or miniature note card rather than treating it as hidden filler. That turns the inside of the card into an organized little set while preserving the main fold and message area.
13. Iris-Folded Ornament Window Card
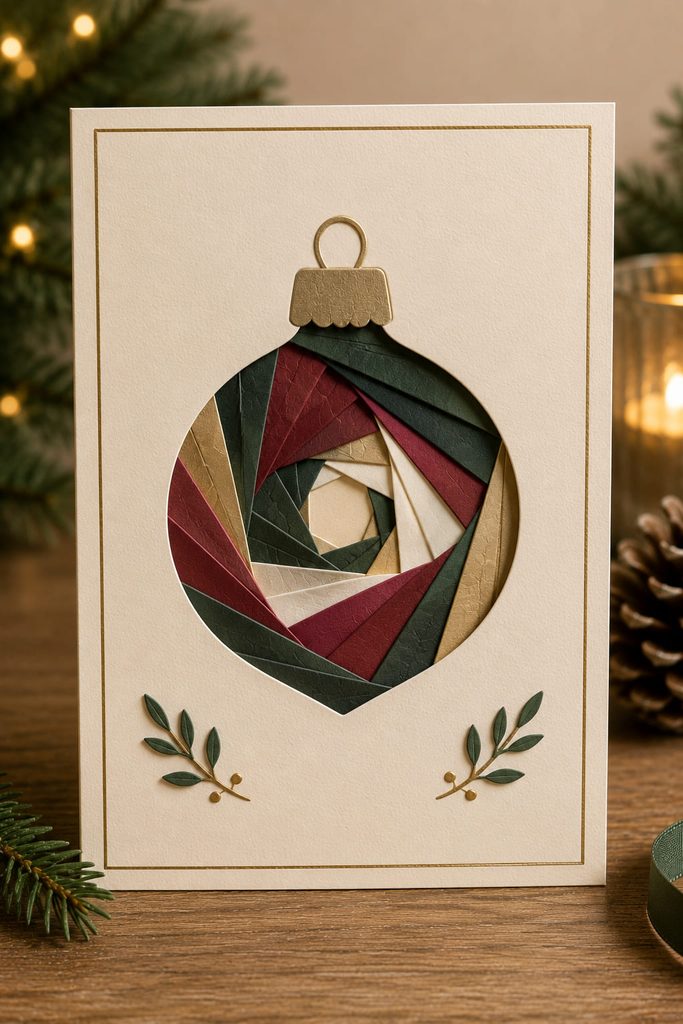
Before gluing the first strip on an iris-folded ornament, check the aperture from the front and the working order from the back. The technique depends on folded paper strips overlapping in a consistent spiral behind a cut window, so the tidy result is controlled from the hidden side.
- Cut one clean ornament-shaped window in the card front.
- Center a guide on scrap paper and secure the card face-down over it.
- Fold each decorative strip lengthwise so the visible edge stays crisp.
- Add strips in the same direction, overlapping them consistently as the opening narrows.
- Finish the center with one small contrasting piece instead of forcing in another full strip.
- Cover the taped construction with an inner liner before writing.
- If the center begins to drift, correct the next overlaps gradually rather than pulling one strip sharply out of sequence.
14. Woven Paper Ribbon Tree Card
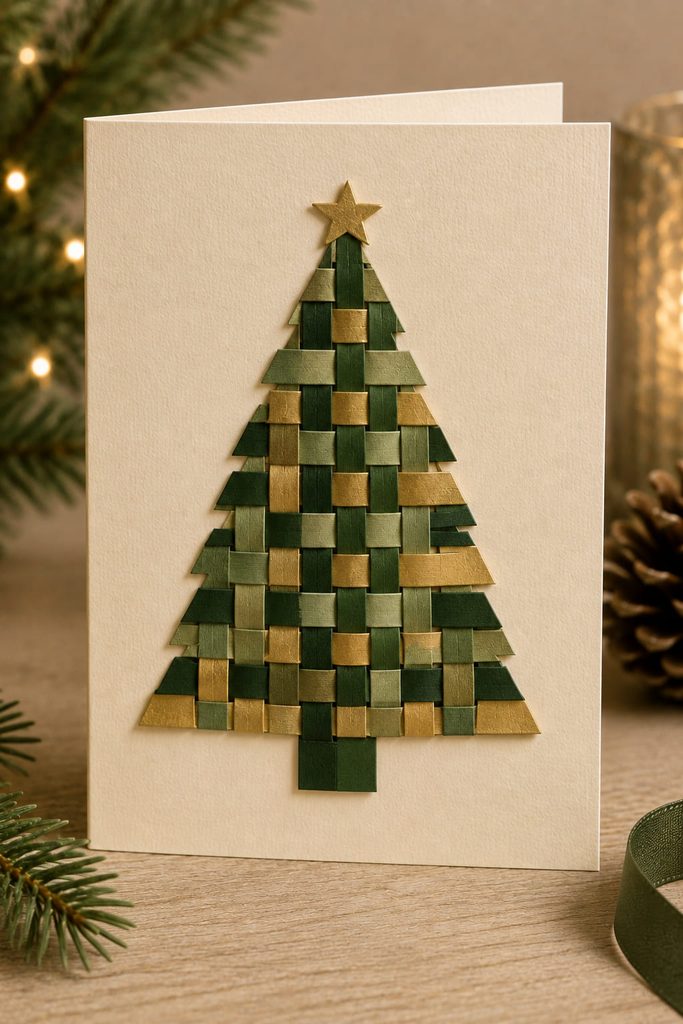
Not every keepsake card needs moving parts. A woven ribbon-tree front can feel richly made using narrow paper strips passed over and under one another on a triangular backing. The true over-under path matters: alternating each strip creates the textile-like surface and prevents the design from reading as glued stripes. Once the weave is secure, trim it to a clean tree silhouette and mount it on a plain card with a narrow border. The crossing pattern already supplies texture, shadow, and detail, so extra ornaments are more likely to hide the construction than improve it.
Choosing Paper for Handmade Christmas Cards That Last
A card that is meant to survive beyond December needs paper chosen for both appearance and handling. Medium-to-heavy cardstock suits folded bases, tunnel frames, slider covers, and pop-up mechanisms because it holds a crease without behaving like thin printer paper. Vellum is useful as a translucent sleeve or overlay, while lighter paper is easier to pleat, quill, iris-fold, and weave.
The useful distinction is not “premium” versus “ordinary” paper. It is stiffness versus flexibility. Put the stiff material where the card must support, hinge, or protect; put the lighter material where it must curl, fold repeatedly, or layer without too much bulk. Before committing to a full batch of handmade Christmas cards, build one closed sample and check the envelope fit, the fold, and any moving or dimensional part.
Choose the Keepsake Moment First
If the goal is a card someone may keep, start with the interaction you want them to remember. Choose the vellum sleeve or monogram for quiet restraint, the stitched or woven front for tactile detail, the pocket for practical reuse, or one of the pop-up, tunnel, accordion, and slider designs when opening the card should feel like a small event.
For more ways to compare layered, pop-up, and dimensional card structures beyond Christmas, see Greeting Card SVG. The page and title were verified on Diynify.








