

This post contains affiliate links. As an Amazon Associate I earn from qualifying purchases, at no extra cost to you. Thank you for supporting Diynify!
Toilet paper roll Christmas crafts are at their best when the tube does more than act as a cylinder to decorate. The cardboard can become a rigid core, a pocket, a radial ornament unit, a tiny tray, a luminary sleeve, or one cell in an advent calendar. That makes saving a few clean tubes genuinely useful: you can choose projects by what the finished piece needs to do, not just by whether you want a Santa, reindeer, angel, or tree motif.
Most of these ideas use clean, dry cardboard tubes, colored paper or cardstock, scissors or a craft knife, a ruler, and glue or double-sided tape. A few also need rigid backing board, vellum or tissue paper, string, a lightweight bead, wrapped treats, a gift card, or a cool battery-powered LED tea light. Start with the function you want—ornament, favor, table detail, display piece, or countdown—and the right tube construction becomes much easier to choose.

1. Fringed Tube Christmas Tree
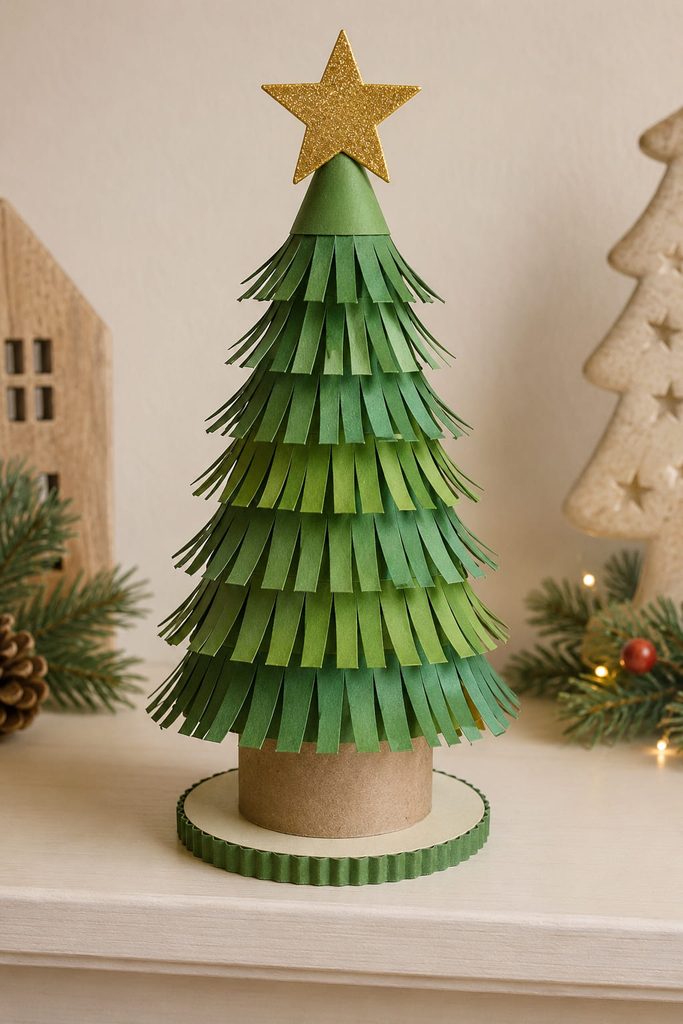
A bare cardboard tube already has what a small paper tree needs most: a stiff vertical core. Stand it on a slightly wider cardstock circle, then wrap it with overlapping green paper cuffs cut into fringe. Starting at the bottom lets each new layer cover the glued edge below, so the surface reads as branches rather than stacked bands.
Shorten each fringe tier as you climb, then cap the exposed top with a narrow paper cone and star. The hidden core keeps the finished tree upright on a shelf, mantel, or place setting without asking thin decorative paper to support itself.

2. Flattened-Tube Snowflake Ornament
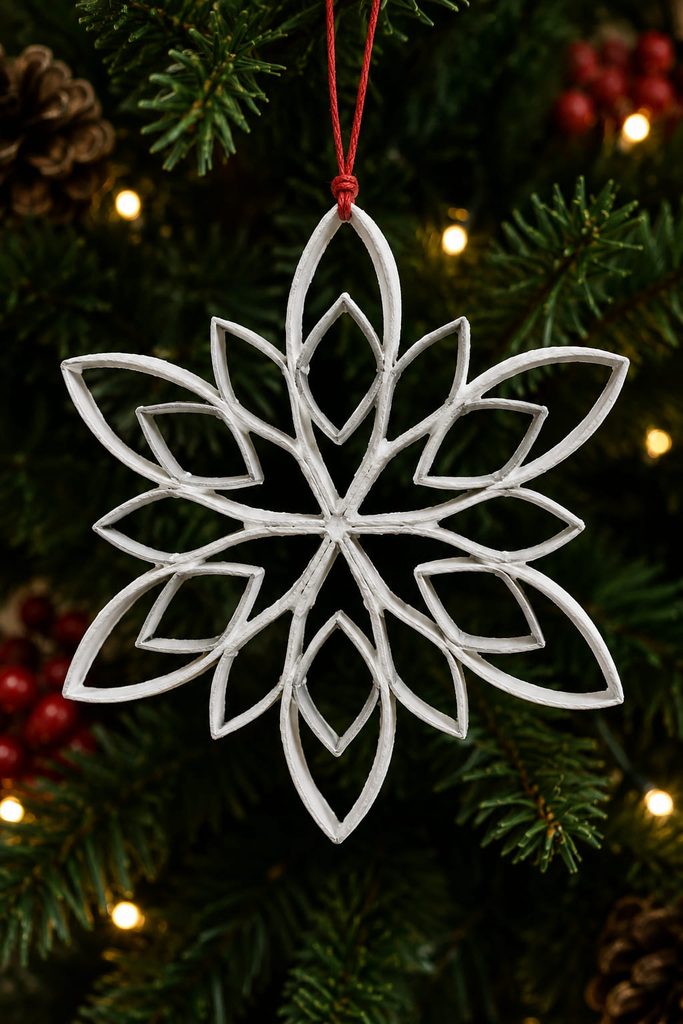
Flatten the tube before you cut it; the two creased edges turn each slice into a pointed oval that can act like one arm of a snowflake. The useful part is repeatability: equal-width slices meet more cleanly around a center than pieces trimmed by eye after assembly.
- Cut the flattened tube into narrow, even rings.
- Pinch or fold selected rings again to create smaller diamonds for inner details.
- Glue the large loops into a radial six- or eight-point arrangement, then add smaller loops only after the center has set.
- Thread the hanger through a reinforced upper joint rather than through a single thin cardboard wall.
If the ornament twists when lifted, the hanger is off the snowflake’s centerline; move it one joint to either side until the shape hangs face-forward.
3. Santa Chimney Treat Holder
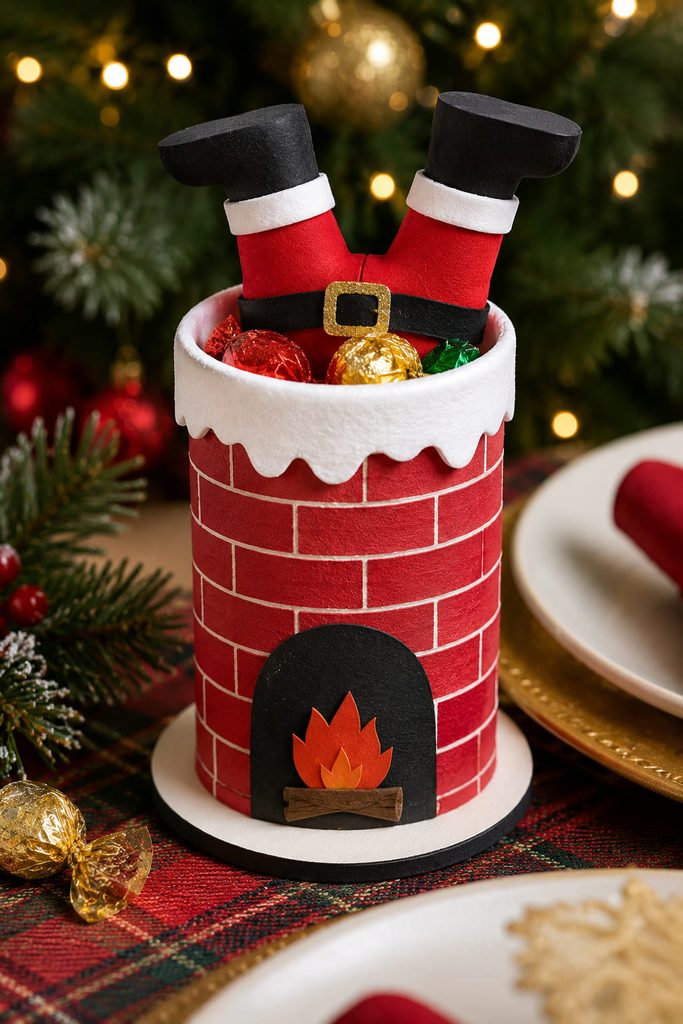
If you want a tube craft that earns its space on a Christmas table, turn the cylinder into a small open-top chimney that actually holds a few wrapped candies. Glue a cardstock circle under the tube first, with a small overlap around the edge, and cover the outside with brick-red paper. The base matters more than the Santa detail: without it, treats simply drop through when the holder is moved.
Add a black paper “fireplace” opening low on the front and a pair of red-and-black Santa legs peeking from the top rim. Keep the legs attached to the outside so they do not block the opening. Fill the chimney from the top and leave at least a finger-width of clearance around the treats; that makes the favor easy to reload instead of turning it into a one-use decoration.

4. Christmas Tree Advent Calendar With Tube Cubbies
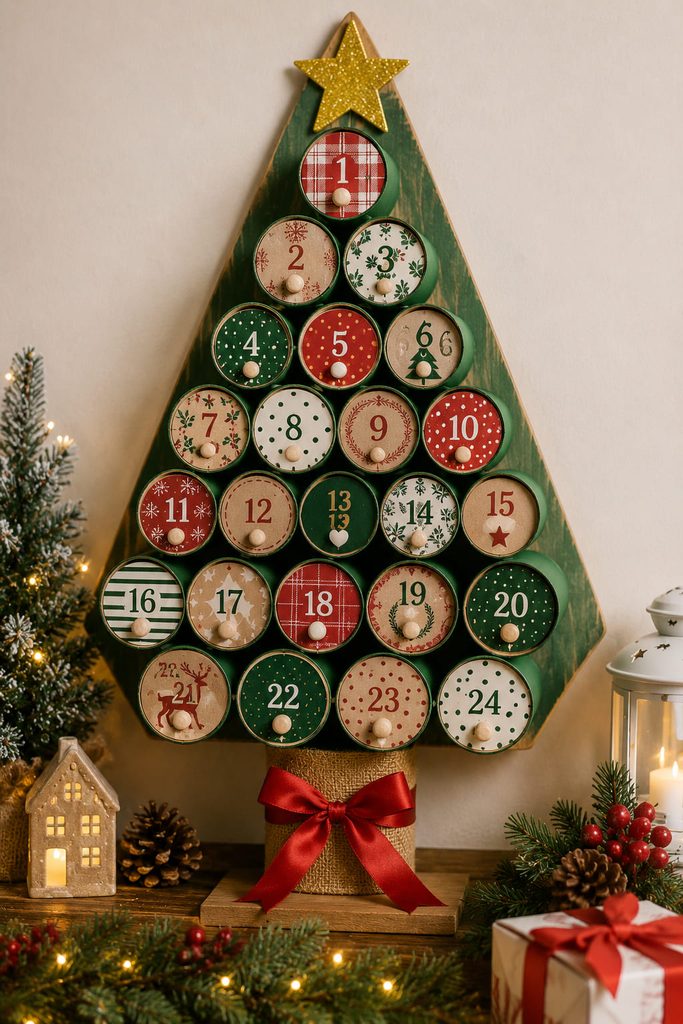
With 24 openings to align, a tube-based advent calendar needs more planning than decoration. Cut the tubes to a common depth, arrange the circles or slightly flattened cells into a tree silhouette on a rigid backing board, and trace the layout before gluing anything. A shallow cell is easier to reach into, while a deep cell can hide a small wrapped sweet or rolled activity note.

Build from the bottom row upward so each new row rests against an established reference line. Mount every tube with its open end facing forward. For contents that could slide out, add light paper doors, folded cardstock flaps, or small tissue caps that can be opened without tearing the tube from the backing.
Batch Order That Saves Rework: Cut all 24 cells first, dry-fit the full tree, mark positions, then decorate and attach. Numbering or embellishing each piece before the layout is settled makes it much easier to discover too late that the tree silhouette has drifted or a row no longer fits.
Before filling it, press gently on several outer cells. If the backing flexes or a tube peels away, reinforce those joints now; once the calendar is loaded, the extra weight makes weak edges more obvious.
5. Mini Christmas Village House Luminary
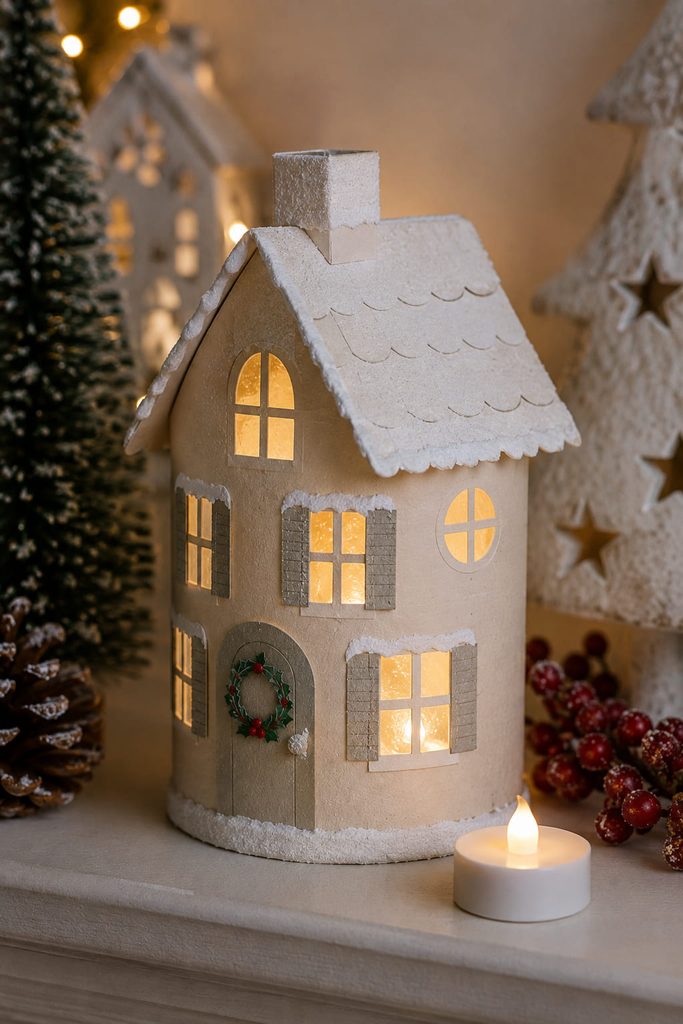
To make a tiny house glow, the light needs a clear path through the tube. Crease the cardboard into a four-sided sleeve, cut windows before adding the roof, and back the openings with vellum or thin white tissue. A folded cardstock roof can bridge the top while the bottom stays open, allowing the finished house to lift on and off a cool battery-powered LED tea light. Never use an open flame inside a cardboard tube.
Keep the Light Path Open: Do not glue decorative shutters, snow trim, or roof tabs across the window openings. The glow comes from the negative space, not from adding more surface detail.
If the house looks bright at the bottom but the windows stay dark, the LED is sitting too low or the vellum is too opaque. Raise the light on a small cardstock platform or swap in a more translucent window layer. If the roof buckles, reduce the overhang or add a narrow interior roof brace rather than piling on more glue.

6. Wrapped Christmas Cracker Favor
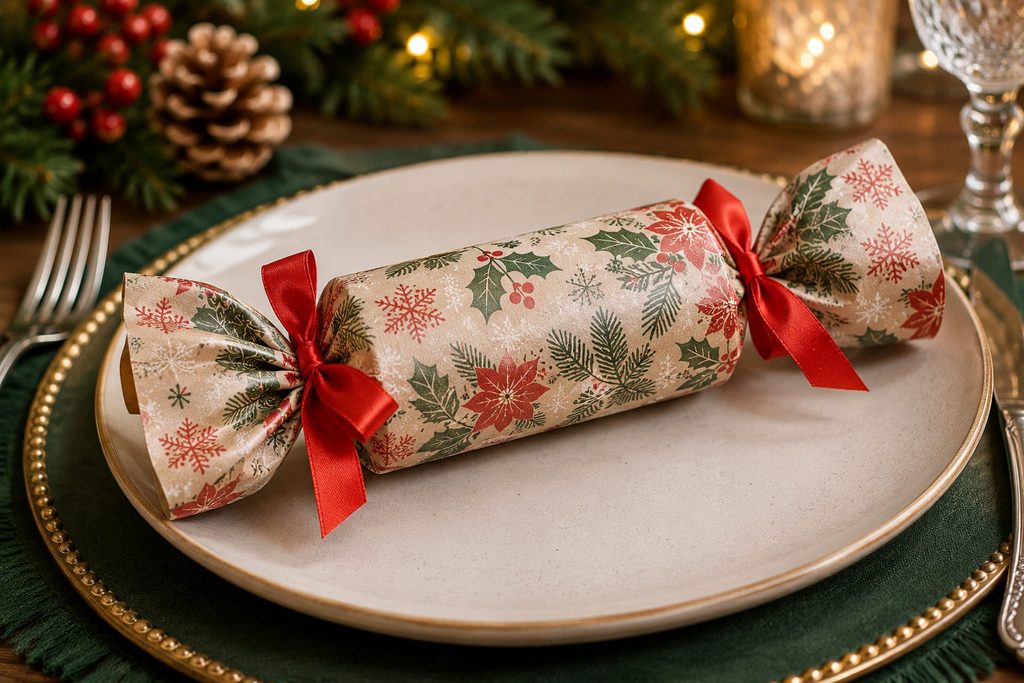
Because a homemade cardboard cracker does not create a snap by itself, treat the tube as the core of a decorative table favor unless you add a purpose-made cracker snap. Center the tube on a wider sheet of tissue or lightweight wrapping paper, place the small favor inside before wrapping, roll the paper around the core, and twist or tie the excess at both ends. The cardboard keeps the middle crisp while the paper creates the familiar tapered ends. This version still pulls apart and looks festive at each place setting, but it should not be presented as a traditional snapping cracker.

7. Holly-Trimmed Napkin Rings
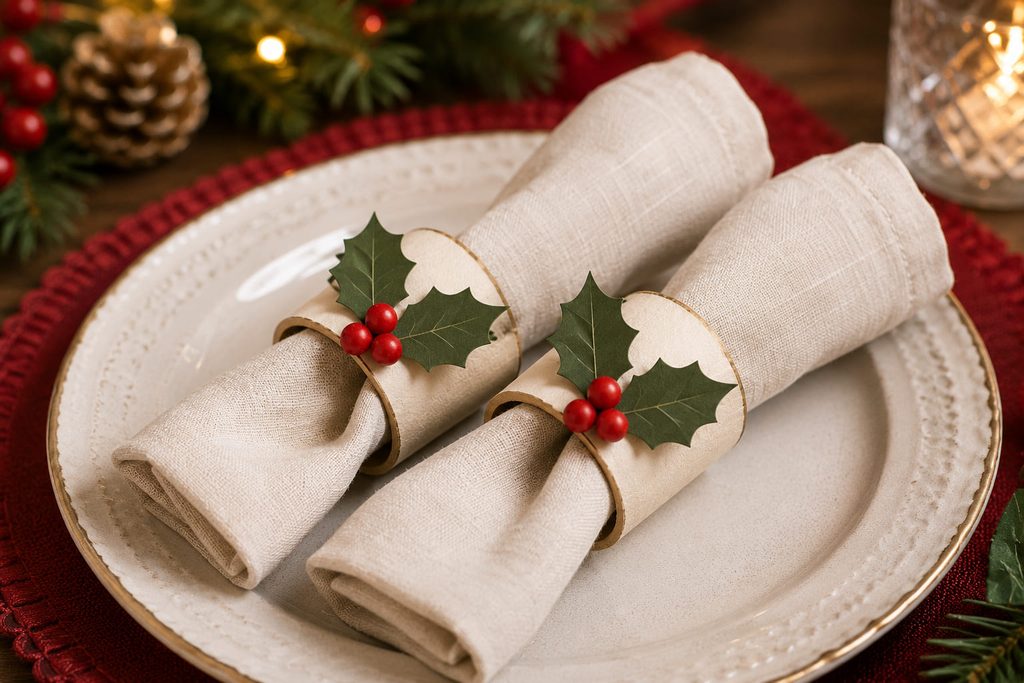
Cutting one tube into several short bands gives you a batch of napkin rings with almost no structural work. Wrap each band in cardstock or narrow ribbon so the raw cardboard edge is covered, then add one small holly cluster where the seam meets. Keep leaves and berries shallow rather than building a bulky topper; a napkin ring has to slide over folded fabric without snagging neighboring place settings. Test one ring around the thickest napkin fold you plan to use before finishing the batch—if it grips too tightly, slit the hidden underside and bridge the gap with a slightly wider paper wrap.
8. Reindeer Gift Card Pocket
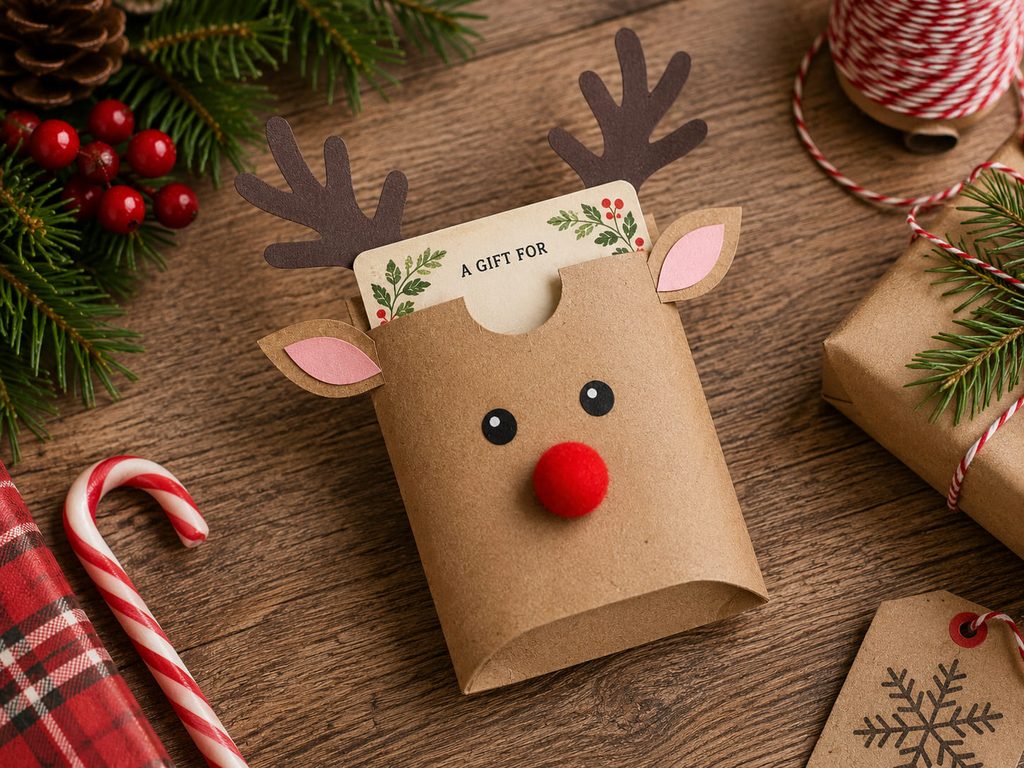
For gift cards, a flattened tube works better as a pocket than as a miniature box. Press the tube flat, trim it slightly longer than the card, and close one short end so the card cannot slide through. Add a shallow thumb notch at the open end before covering the front with kraft paper, antlers, ears, and a red or black nose.
There are two sensible ways to close the bottom. A folded-and-glued flap keeps the pocket thinner, which is useful if it will go inside a greeting card. A separate cardstock cap is stiffer and better if the pocket will be handed over on its own. Whichever route you choose, test with the actual gift card before decorating: it should slide out with two fingers, not require bending the card or tearing the reindeer face.
9. Layered Tube-Ring Christmas Wreath
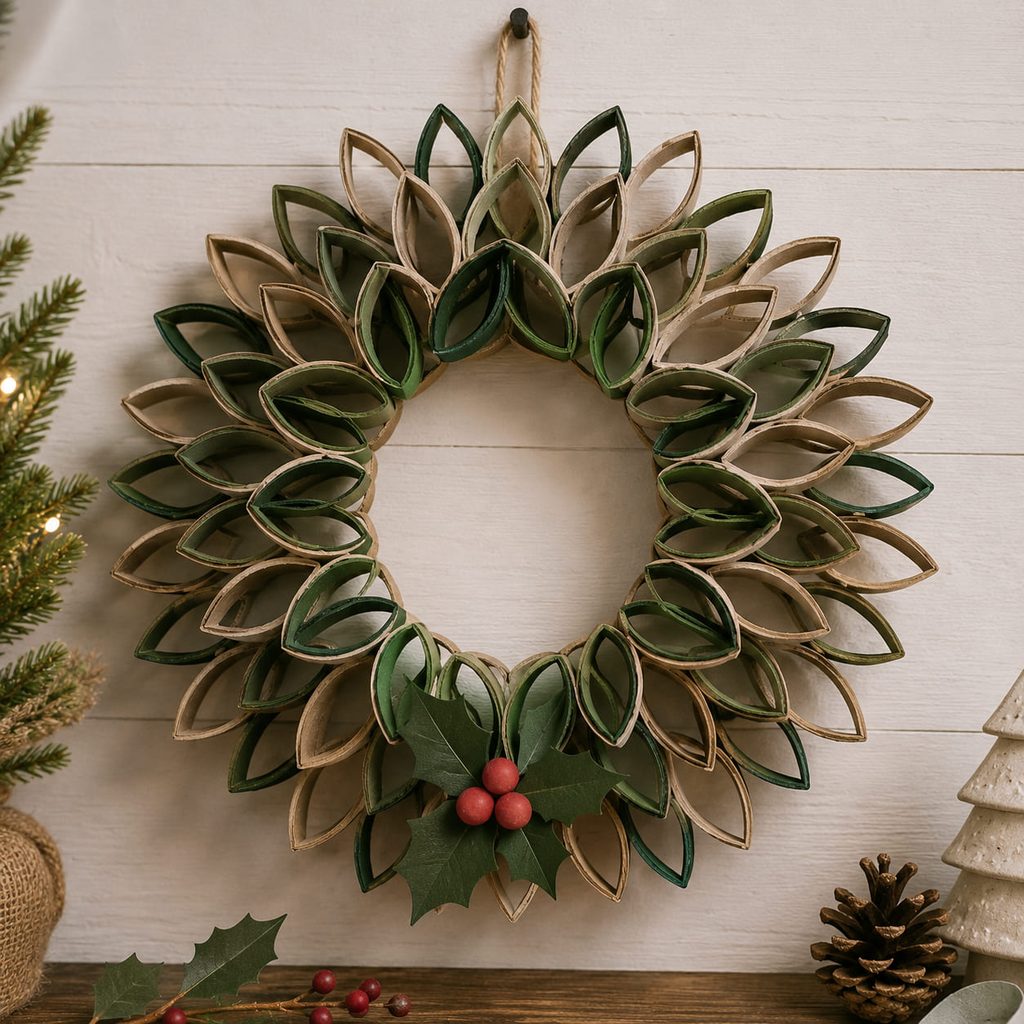
From across the room, a wreath made from tube slices succeeds or fails as one bold circle; tiny leaf details barely register. Flatten and cut several tubes into equal rings, then use the resulting pointed ovals as leaf units. Build them around a cardstock or chipboard ring so every piece has a real carrier instead of relying on edge-to-edge glue alone.
Angle the first layer outward, overlap a second layer toward the center, and leave a clean opening in the middle. A few smaller loops or paper berries can break the repetition without hiding the geometry. Mount the hanging loop to the backing ring, not to one cardboard “leaf,” because the backing is what distributes the load. Before adding the last accents, prop the wreath up at its intended viewing distance; if the center hole looks pinched, remove a few inner pieces rather than adding more.
10. Tapered Cardboard Bell Ornament
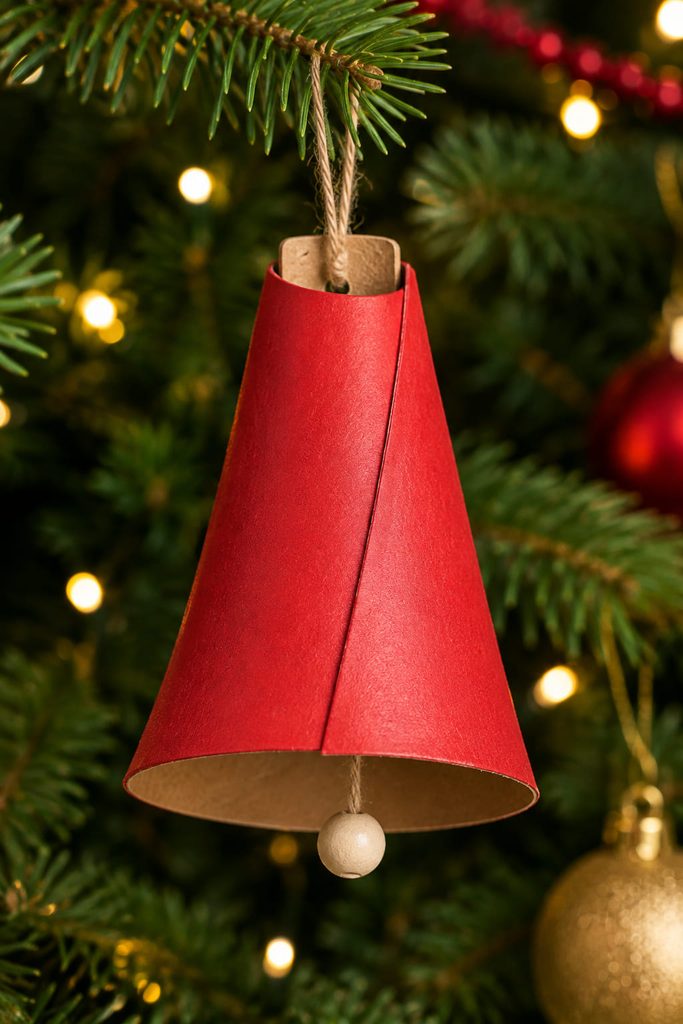
Slit the tube lengthwise so the fixed cylinder can overlap into a bell shape. The overlap creates the taper; the lower rim should stay wider while the top closes enough to hold a hanging loop.
- Overlap the cut edges more at the top than at the bottom.
- Glue the overlap, then trim the lower edge level so the bell hangs straight.
- Add a small cardstock circle or folded tab inside the top as an anchor for string.
- Suspend a lightweight paper bead or small wooden bead as the clapper, keeping it clear of the rim.
Lift the ornament by its string before decorating it. If the bell tilts, shift the top anchor toward the high side; correcting the load point is easier than trying to disguise a crooked hang with trim.
11. Looped Cardboard Gift Bow

Once a cardboard ring is flattened, it springs back just enough to behave like a structured bow loop. Slice a tube into narrow rings, pinch each into a pointed oval, and nest several at crossing angles around one small center loop. Glue only where the pieces overlap so the raised sides keep their depth. Because corrugated-looking raw edges can read rustic rather than polished, cover the tube with patterned paper before slicing if the bow is going on smooth gift wrap. Four or five loops suit a small box; a larger package needs wider rings or two staggered layers so the bow does not disappear on the lid.
12. Mini Sleigh Treat Tray
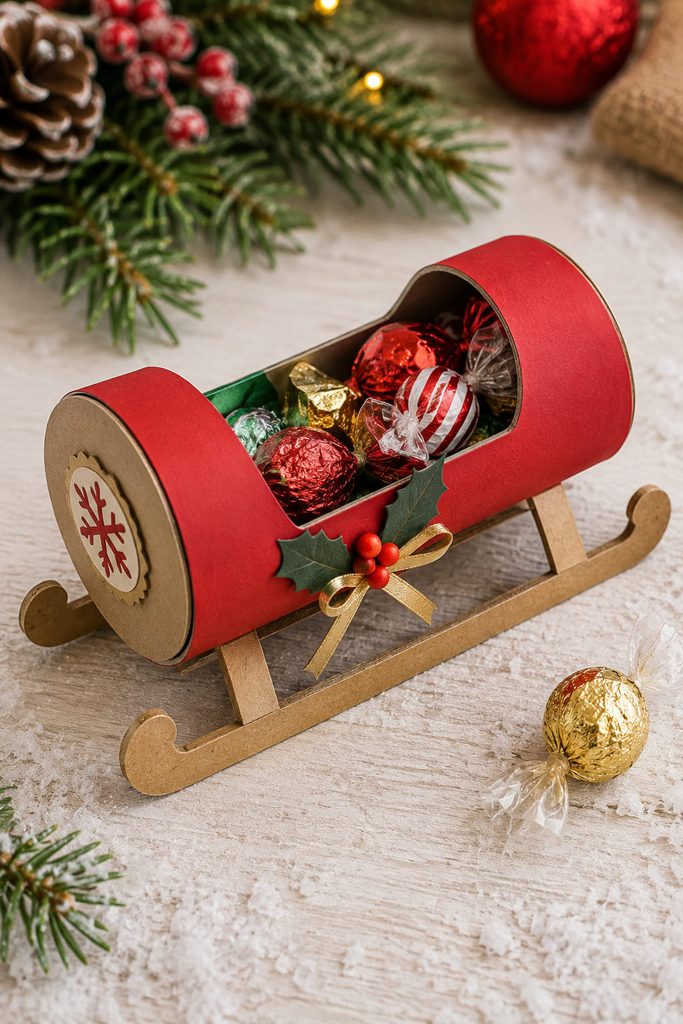
Before the sleigh gets runners or trim, its tube body needs to work as a tray. Lay the tube horizontally and cut away a wide section from the top to create the cargo opening, leaving enough sidewall at both ends to keep wrapped candies from rolling out. Close the circular ends with cardstock disks or shaped panels, then glue the body to two cardstock runners that extend past the front and back.
The runners do more than create the sleigh silhouette: they widen the footprint so a loaded tube does not roll. If the sleigh still rocks, add a narrow crosspiece between the runners under the tube or flatten a small contact area along the bottom of the cardboard body. Keep heavy decorations off the upper sidewalls, where they raise the center of gravity.
Runner Stability Check: Put the empty sleigh on the table, press lightly on one side, and release. It should settle back flat instead of staying tipped. Test again with the intended treats before adding bows or greenery.
For easiest access, keep the cargo opening larger than the treats and leave the top completely unobstructed. This is a tray, not a sealed favor box, so the contents should lift out without pulling apart the decoration.
13. Little Drum Hanging Ornament
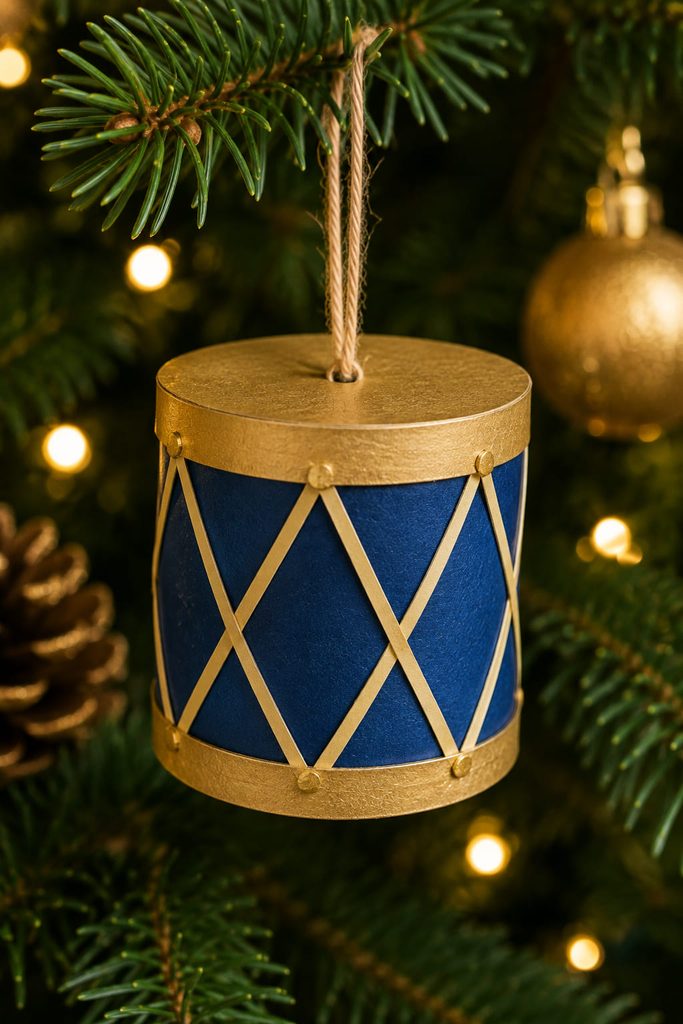
To read as a drum, the round body, flat ends, and crossed “lacing” need to work as one object. Cut a tube down to a squat cylinder, cap both ends with cardstock circles slightly wider than the cardboard, and wrap the sidewall in colored paper. Thin paper strips can cross diagonally between the two rims to suggest tension cords without adding much weight.
Before hanging it, check three things:
- both end circles are centered, so the drum does not look skewed;
- the diagonal strips meet the rims cleanly instead of floating away from the surface;
- the hanging cord is anchored through the top cap or an internal tab, not glued only to the decorative side wrap.
A shorter, wider-looking drum generally reads more clearly among tree branches than a full-height tube with tiny details.
14. Angel Tree Topper Sleeve

Will the angel actually fit the tree tip? Keep the bottom of the tube open so it acts as a sleeve over the top branch or narrow artificial-tree tip. Wrap the tube in white or cream paper, add broad folded-paper wings to the back, and place the head and halo above the rim rather than sealing the opening.
Make the wings light and symmetrical; thick layered wings pull the sleeve backward. If the tree tip is much narrower than the tube, tuck a removable rolled-paper shim inside rather than gluing the topper permanently to the tree.
Topper Fit Check: Slide the angel on, step back, and rotate it gently. It should stay upright without crushing the branch, and it should lift off again without tearing the tree or the cardboard sleeve.
How to Prep Tubes for Toilet Paper Roll Christmas Crafts
Trim away loose paper and flatten only the tubes that need creased shapes; intact cylinders are more useful for holders, drums, sleeves, and luminaries. If a tube is crushed or damp, recycle it instead of trying to hide the damage under decorative paper. Paper towel tubes cut to size are an easy substitute when you need more consistent cardboard.
For food-adjacent favors, keep candy wrapped so it does not touch the cardboard directly. Before batch-making any project, make one complete test piece and check the part that carries the real job:
- Standing projects: confirm the base does not rock.
- Hanging projects: lift them from the actual hanger point.
- Holders and pockets: load and remove the real contents.
- Luminaries: test the window openings with a cool battery-powered LED, never an open flame.
Start With the Tube’s Job
If you only have one or two tubes, the snowflake ornament, napkin rings, bell, drum, or gift bow give you a finished Christmas piece without needing a large batch. Save a bigger stack for the wreath or advent calendar, where repeated tube cuts are part of the design rather than a shortcut.
For the most useful next project, choose by interaction: make the Santa chimney or sleigh when the craft should hold treats, the reindeer pocket when it should carry a gift card, the village house when light is part of the effect, or the angel when the tube itself needs to fit over something. That keeps the material doing real construction work instead of serving as a hidden prop. For more holiday formats beyond cardboard tubes, browse Christmas Paper Crafts, Ideas & SVG Projects.








