
This post contains affiliate links. As an Amazon Associate I earn from qualifying purchases, at no extra cost to you. Thank you for supporting Diynify!
Handmade Christmas cards can feel playful without becoming complicated novelty projects. The best details usually do one clear job: a mouse peeks from behind a paper stocking, a penguin swings from a tiny pivot, a Santa face changes when a hidden wheel turns, or a folded bow gives a gift card front just enough dimension to invite a second look.
Most of these ideas use folded cardstock, paper scraps, scissors, a scoring tool, and paper-safe adhesive. A few need extras such as a small paper fastener, thin cord or ribbon, a hole punch, narrow paper strips for quilling, or tiny pom-poms. If you plan to mail the cards, favor low-profile loops, curls, and folds; save the deeper pop-up and easel constructions for cards that will be hand-delivered or placed with a gift.

1. Peeking Mouse Christmas Stocking Card
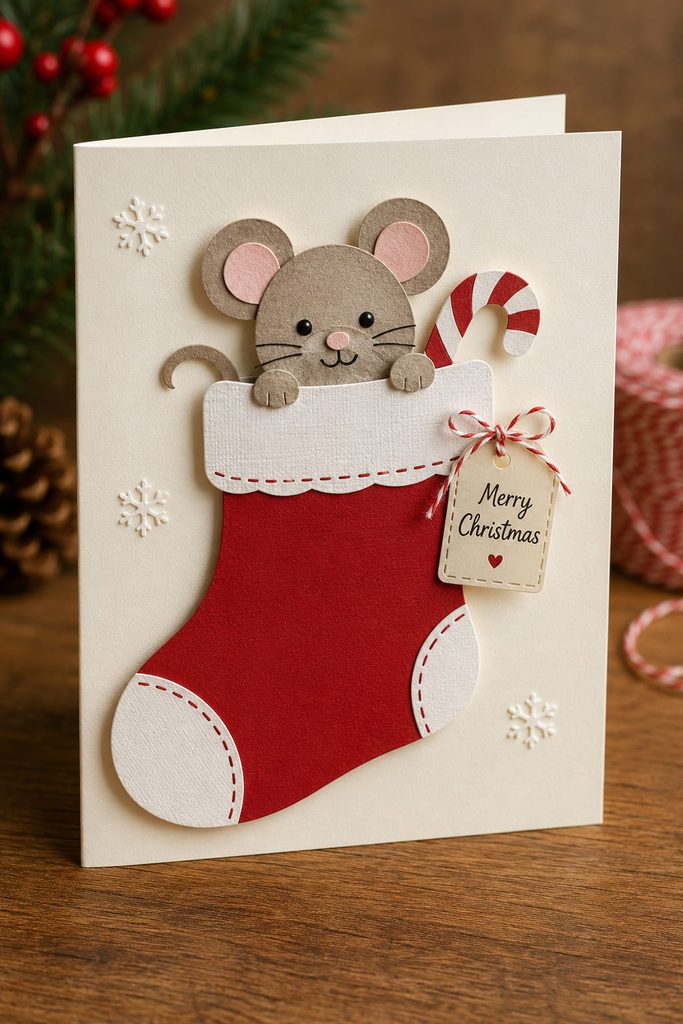
The joke comes from overlap rather than extra moving parts. Cut a large paper stocking for the card front, then tuck only the top half of a small mouse behind the cuff so its ears, face, and paws appear to be climbing out. The stocking should hide enough of the body to sell the peekaboo effect, while the mouse needs a strong silhouette that still reads when the card is viewed from a few feet away. A tiny paper candy cane or gift tag in one paw can add character without crowding the scene.
2. Curled-Paper Reindeer Antler Card
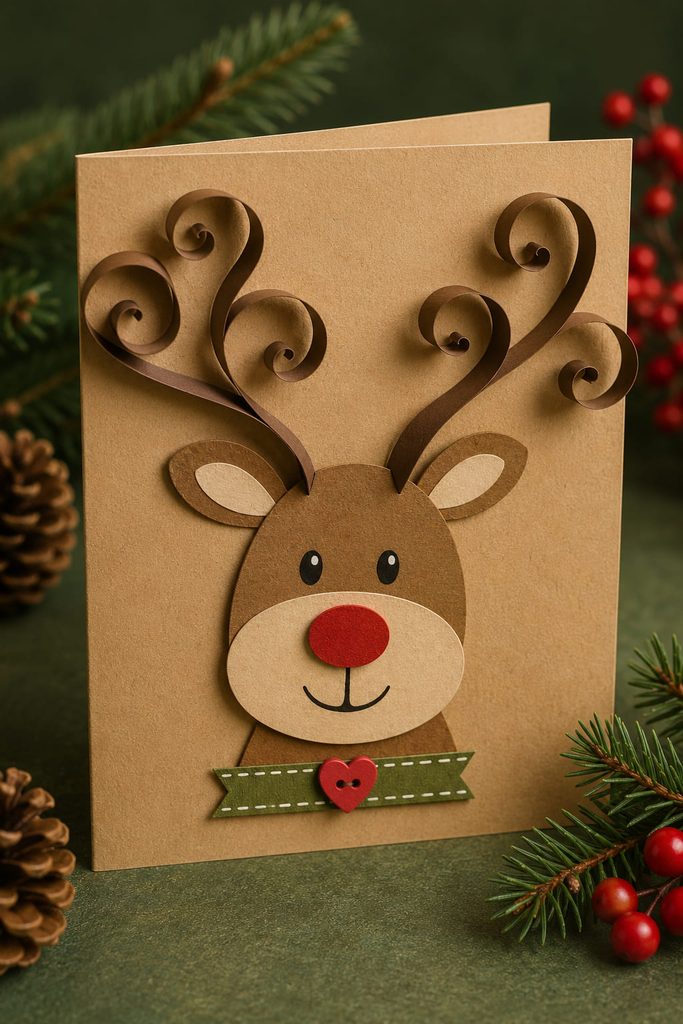
Curled antlers deserve to lead the design instead of the face. Narrow strips of brown paper can be curled around a pencil or scoring tool, released slightly, and glued only at their bases so the curves cast small shadows above a simple reindeer head. The springy line gives the card personality with fewer pieces than a heavily layered face.

Keep the muzzle, eyes, and ears flat so the curls remain the obvious detail. If the card is going into an envelope, make the antler coils broad and shallow rather than tight corkscrews; the aim is a soft raised curve that can compress, not a rigid tower of paper.
3. Swinging Penguin Ornament Card
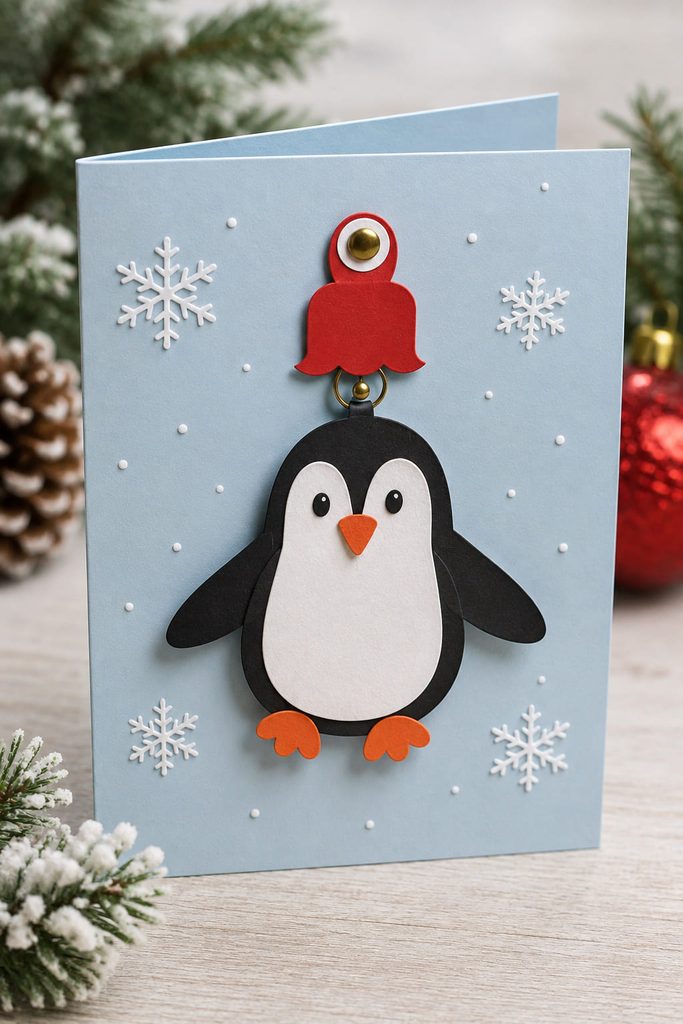
A tiny pivot turns a flat penguin into a card that moves when it is picked up. Build the penguin as one firm paper silhouette, punch a small hole near the top, and attach it to a separate ornament cap or hanging loop with a miniature paper fastener. The body should hang freely rather than being glued along its back.
- Dry-position the penguin and mark the pivot before punching.
- Leave open space around the belly, wings, and feet so the silhouette can swing without catching nearby decoration.
- Tighten the fastener only enough to keep the layers together; pinching it hard against the cardstock can stop the motion.
- Close the card once and make sure the moving piece stays inside the front edges.
Pivot Clearance Check: Nudge the lower edge sideways. If the penguin returns to a hanging position without scraping another layer, the pivot has enough room.
4. Pom-Pom Snowball Toss Card
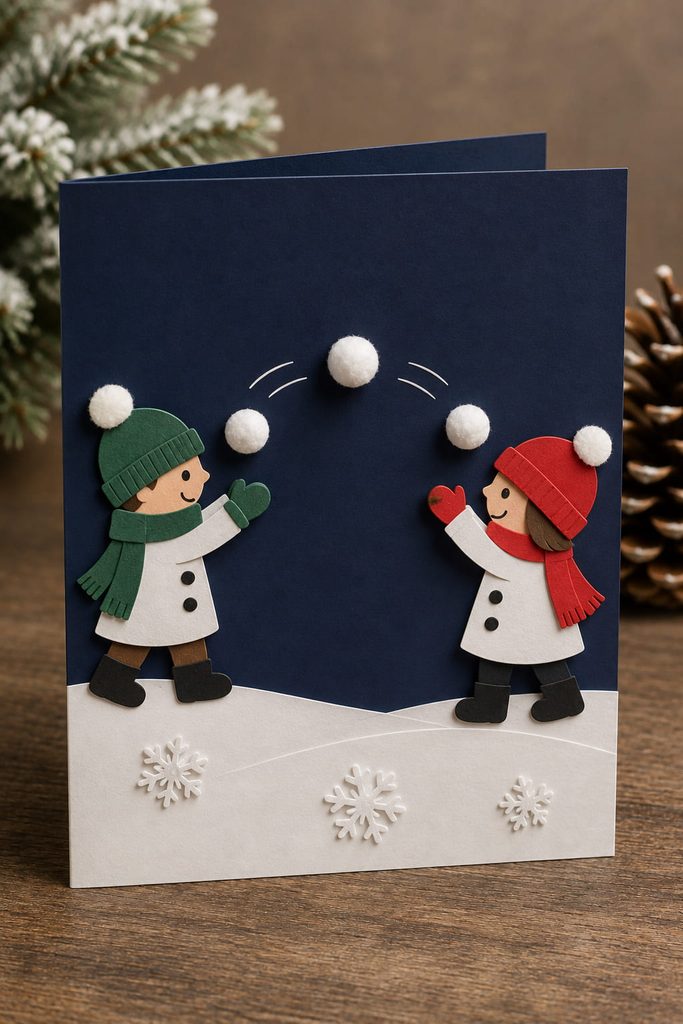
For a soft, tactile snowball scene, choose the texture according to how the card will travel.

| Snowball Detail | Best Fit | Trade-Off |
|---|---|---|
| Tiny craft pom-poms | Hand-delivered cards | Roundest and softest, but noticeably thicker |
| Gently crumpled tissue-paper balls | Envelopes or flatter cards | Lighter and easier to compress, but less perfectly round |
Arrange the “snowballs” in an arc between two simple paper characters so the motion reads before any facial detail does. One raised snowball near a mitten and two or three smaller ones crossing the center is usually clearer than covering the card with white dots.
5. Mini Paper Chain Garland Card
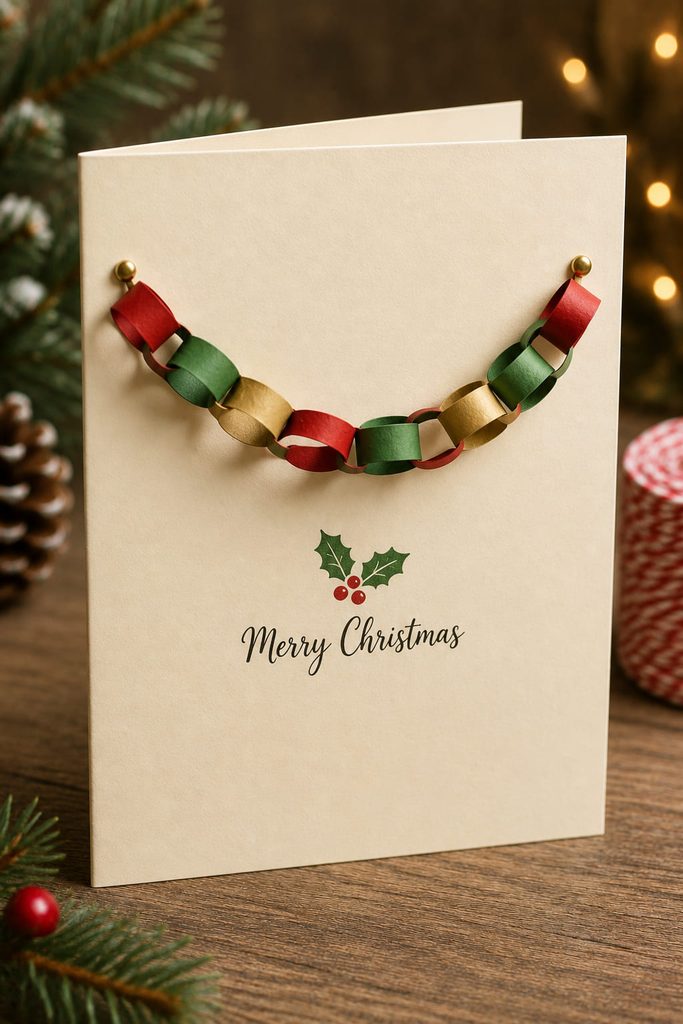
Actual linked loops make this tiny garland behave like the full-size version. Cut very narrow strips, close each one into a ring, and link the next strip through it before gluing. A short chain of five to seven loops can drape across the upper half of the card without turning the front into a bulky craft project.
Anchor only the two end loops to the cardstock and let the center hang slightly loose. That shallow curve is what separates the chain from a row of flat paper circles. Use small loops and thin paper so the card can close; heavier cardstock is better reserved for the card base.
6. Paper-Spring Snowman Nose Card
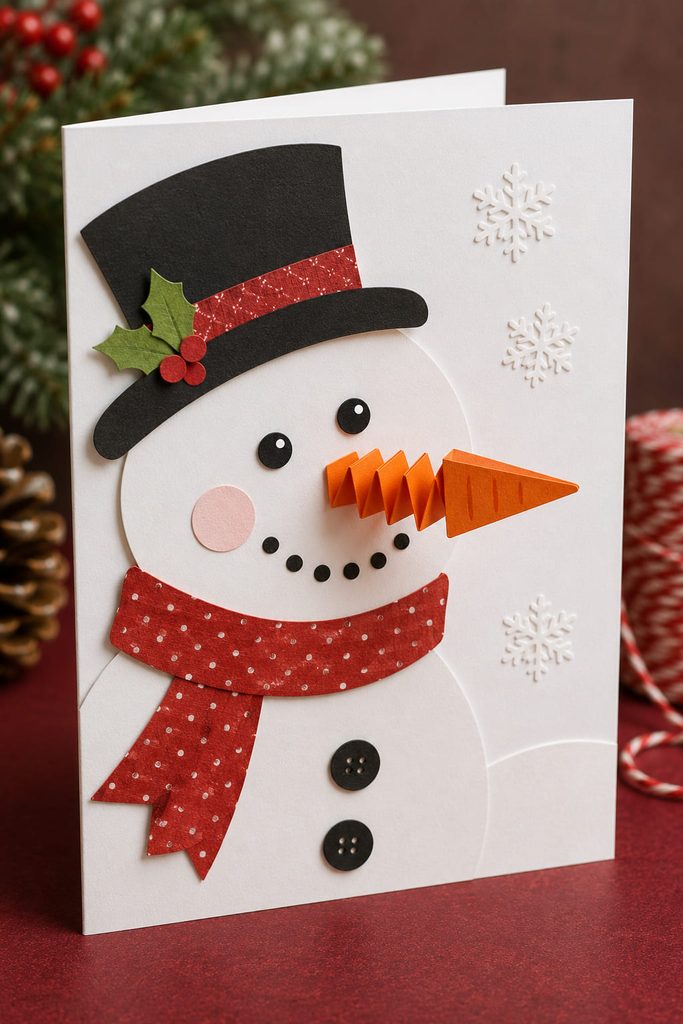
The playful part of this snowman is a carrot nose that pushes forward and springs back. Fold a narrow orange paper strip into a compact zigzag, glue one end to the snowman face, and attach a simple carrot-shaped triangle to the other. The folds act like a paper spring, so the nose gains movement without a slider track or loose hardware.
If The Nose Droops: The spring is probably too long or the carrot tip is too heavy. Shorten the folded strip first. If the folds collapse sideways, make them wider and more even rather than adding more glue. The card should still close without forcing the nose flat at an awkward angle.
7. Gingerbread House Card With Puffy Paper Icing
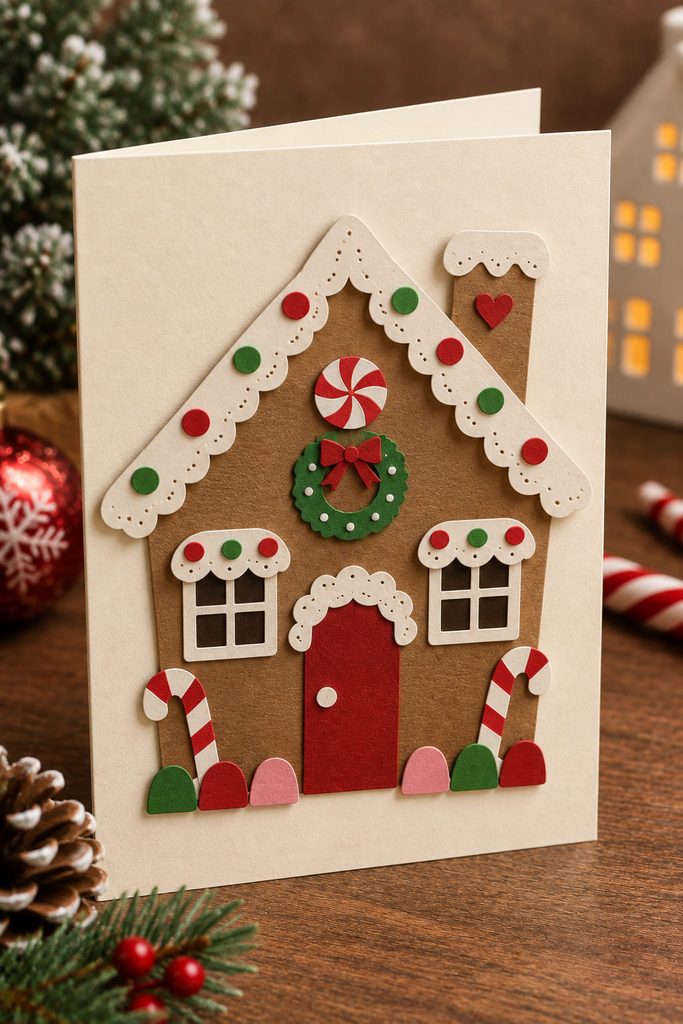
Raised paper icing gives a flat gingerbread house its playful depth without turning the whole front into stacked layers. Cut narrow cream paper strips with scalloped or softly wavy edges, then curve them slightly with a bone folder before attaching them along the roof and window tops. Gluing mainly through the center of each strip lets the edges lift enough to catch light. The house itself can stay graphic: one main brown silhouette, two windows, a door, and a few candy-colored paper dots. Because the “icing” supplies the texture, extra layers should be restrained; a dark or muted background also helps the pale scallops stay readable.
8. Rotating Santa Expression Wheel Card
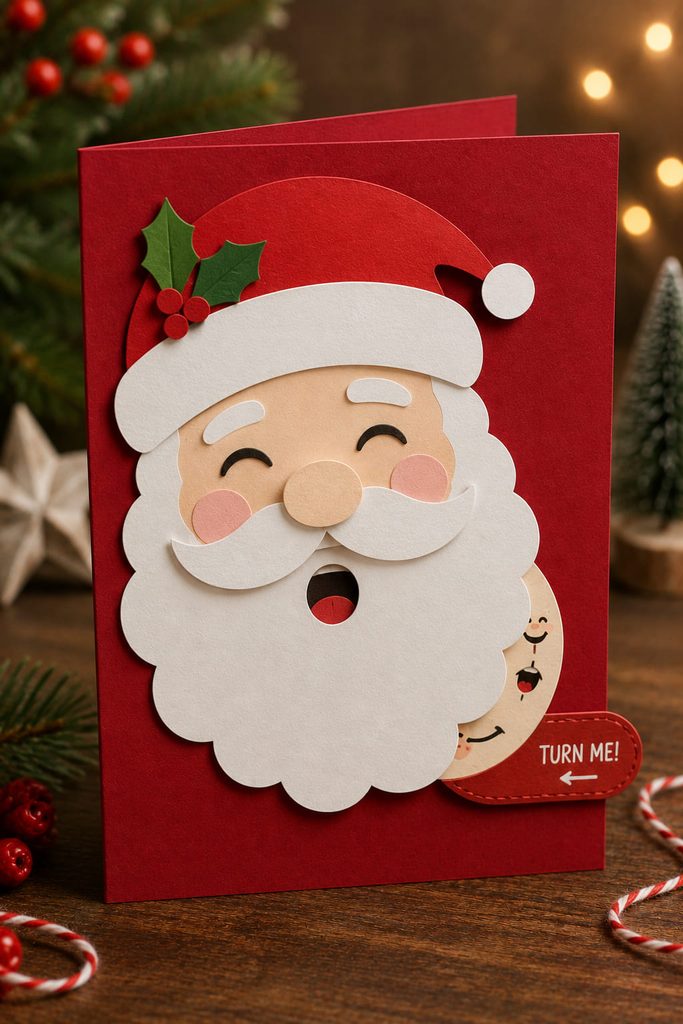
A hidden wheel can change one small part of Santa’s face while the rest of the card remains still. Cut a circular paper wheel larger than the viewing opening, divide the rim into three expression zones, and draw or layer a different mouth or beard detail in each zone. Place the wheel behind the face panel and join both layers with a paper fastener at the center.

The order matters here:
- First cut the viewing opening in the face panel.
- Position the wheel behind it and mark the pivot while the chosen expression is centered.
- Punch both layers together, then fasten them loosely enough to rotate.
- Add a small exposed tab at the edge of the wheel so the recipient has somewhere to push.
Before gluing the face panel to the card, rotate through every position. Nothing on the back should collide with the fold or adhesive zones, and each expression should stop with the intended feature visible.
Wheel Test: If the wheel shifts sideways instead of rotating cleanly, the center hole is too loose or the fastener is not sitting square. Recutting a sturdier wheel is usually cleaner than trying to trap a wobbly one with extra glue.
9. Fold-Flat Gift Bow Card
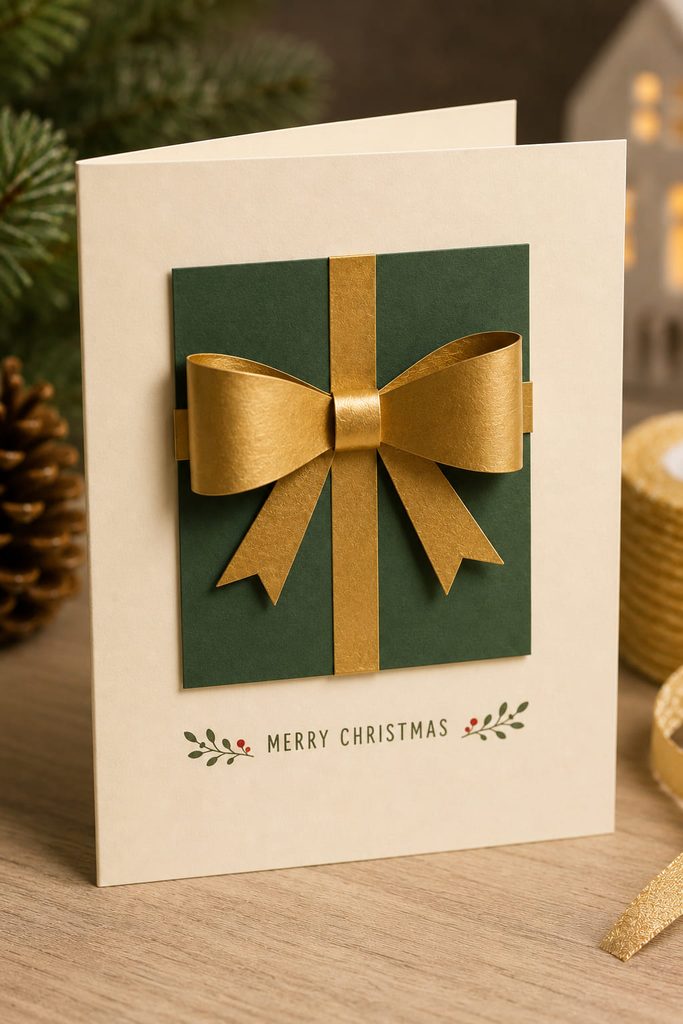
The useful trick is making the bow collapse gently instead of standing rigidly above the card. Form two broad loops from lightweight paper, flatten each loop gently at the center, and capture both with a narrow paper band. Mount the bow over a simple rectangular “gift” panel so the raised shape has a clear visual reason to be there.
Before committing to the whole batch, check three things:
- the loops flatten without creasing sharply;
- the center band holds both loops without squeezing them into a knot;
- the closed card lies reasonably flat under light hand pressure.
Mailing Check: If the bow immediately springs the card open, reduce loop depth rather than adding more adhesive. A lower bow usually looks cleaner than a bulky one compressed inside an envelope.
10. Quilled Candy Cane Heart Card
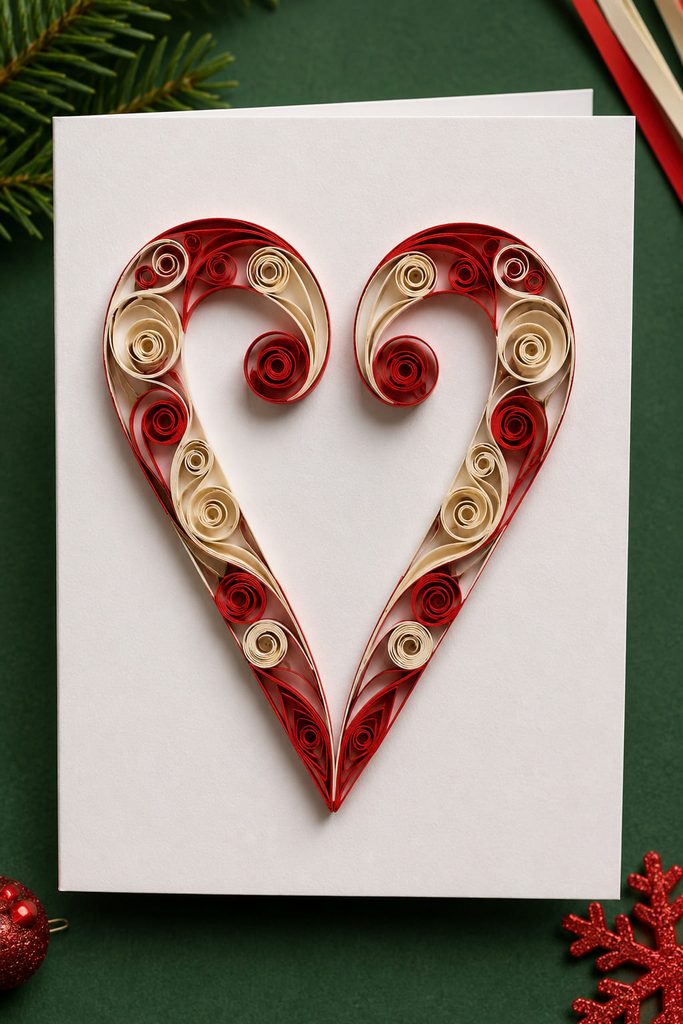
Two candy-cane curves can become a heart when their hooks face inward. Roll narrow red and white paper strips into loose coils, pinch and guide them into elongated curves, then arrange the mirrored shapes so the upper hooks meet and the lower ends taper toward one point. The quilling does the decorative work, so the rest of the card can stay almost bare.
Glue only the points that touch the base and neighboring coils. Flooding the curls with adhesive flattens the negative spaces that make quilling readable. For a simpler version, use one red strip and one cream strip per side; for a fuller heart, add a second nested curve while keeping the center opening visible.
11. Rolled Paper Bead Christmas Tree Card
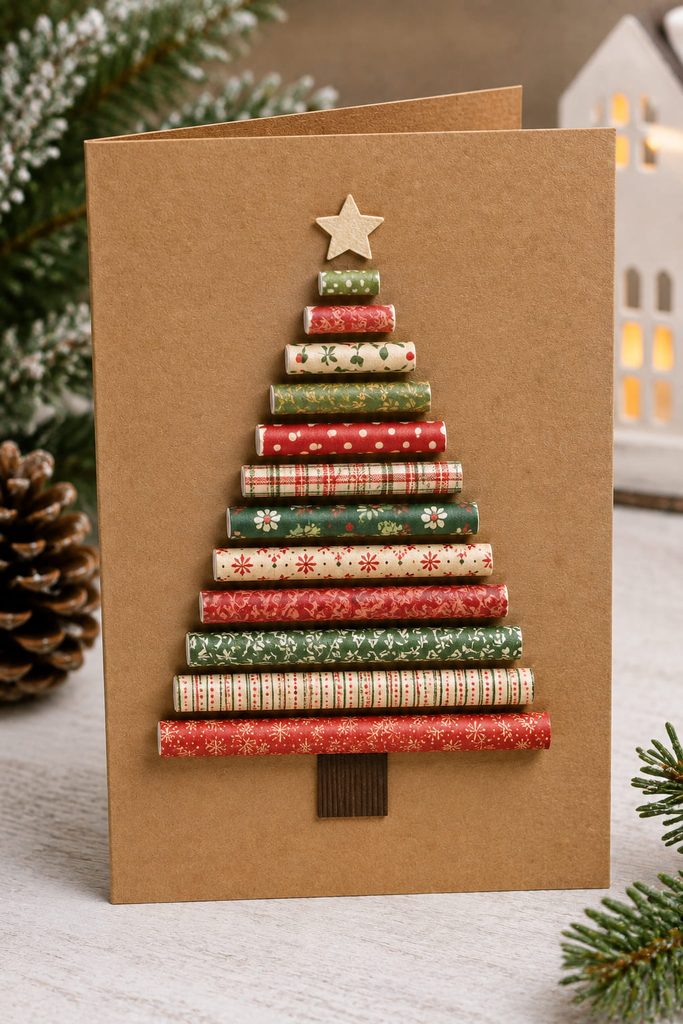
Instead of stacking flat triangles, build the tree from short rolled-paper tubes. Wrap patterned or solid paper strips around a thin pencil, glue the final edge, slide off the tube, and trim several pieces to descending lengths. When the tubes are arranged horizontally from longest to shortest, their rounded edges create a striped tree with real depth.
Keep the tube diameter consistent even if the patterns change:
- Roll every strip around the same pencil or narrow tool.
- Glue the final edge before sliding the tube off.
- Trim the tubes to descending lengths after rolling so the ends stay clean.
- Align their centers closely enough that the row of cylinders still reads as one tree.
Finish with a flat star or trunk so the rolled pieces remain the dominant construction.
12. Pop-Up Present Pile Inside the Card
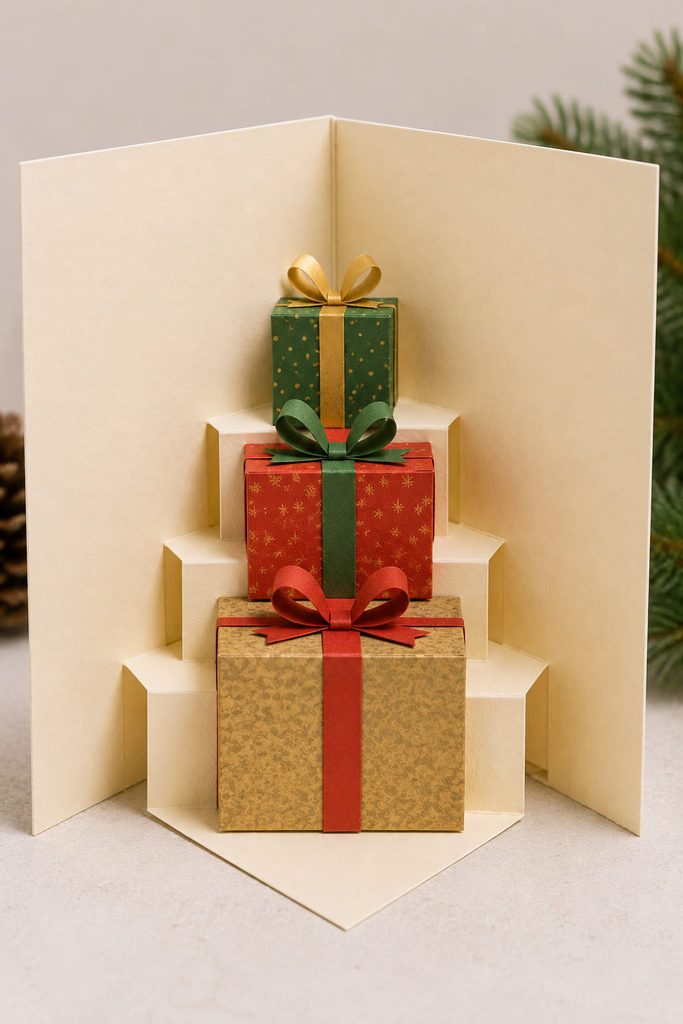
Inside the card, the surprise can sit on a stepped platform instead of competing with the front design. A stepped pop-up platform can carry three small paper presents so they stand forward when the card opens and fold back between the panels when it closes. The mechanism is more important than the bows, so build the support first and decorate only after the movement works.
Score a rectangular strip into alternating panels that form a shallow box-like step. Glue the two outer tabs to the inside of the card with the fold of the mechanism aligned to the card’s center. Add lightweight present shapes to the front faces rather than loading the top with thick embellishments.
Open the card slowly through its full range. The platform should rise without twisting, and every present should clear the opposite panel as the card closes. If the pile catches, shorten the projecting layer or move the decoration closer to the support instead of forcing the fold.
A useful correction path is to test the mechanism with plain scrap paper first. Once a blank platform opens and closes cleanly, trace those folds onto the decorative version. That separates geometry problems from decoration problems and prevents a cute front from hiding a bad pop-up.
13. Lace-Up Paper Ice Skate Card
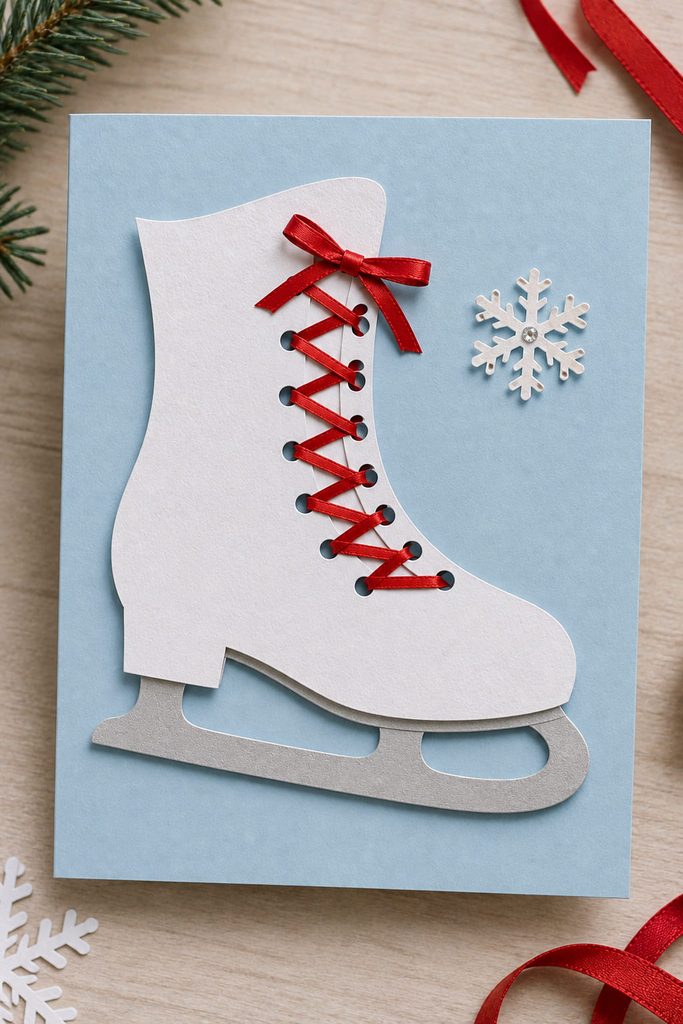
Punched eyelets make an ice skate feel interactive without needing a moving mechanism. Cut one bold skate silhouette from cardstock, punch paired holes along the boot opening, and thread a narrow ribbon, cord, or paper strip through them in a simple crisscross. The lacing should be large enough to read as a design feature rather than a miniature sewing exercise.
Keep the lace ends short and secure them on the back of the skate before mounting it to the card. A silver or pale-gray paper blade and one small snowflake are enough to finish the scene. Thin ribbon gives the softest lace effect; a narrow paper strip keeps the project more paper-focused but needs gentler threading so it does not crease at every hole. If the holes sit too close to the edge, the boot can tear when the lace is tightened, so leave a comfortable paper margin around every punched opening.
14. Santa Suit Belly-Band Gatefold Card
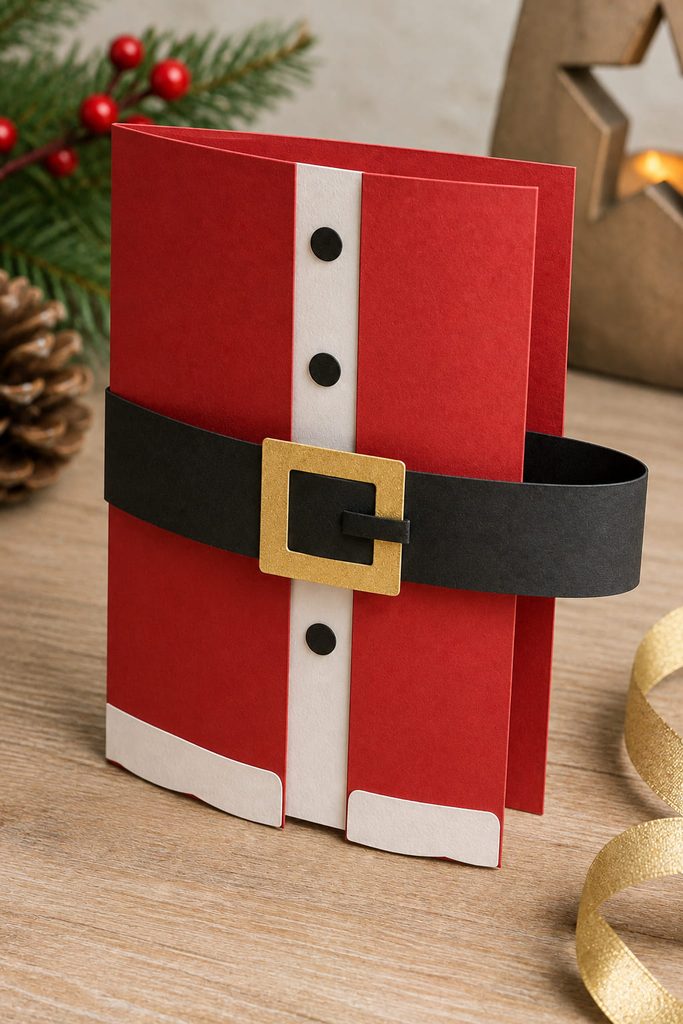
Santa’s belt can do the practical work of closing the card. Fold the left and right sides of a red card base inward so they meet at the center, then slide a separate black paper band around the closed card. A small gold or yellow paper buckle on the front makes the removable band read immediately as Santa’s belt.
| Belly-Band Fit | Advantage | Limitation |
|---|---|---|
| Snug | Keeps the gatefold crisp and closed | Needs enough clearance to slide without scraping decoration |
| Slightly loose | Easier to remove and replace | Can shift position inside the envelope |
Dry-fit the finished folded card inside the band before gluing the band into a loop. The playful moment is functional: the recipient has to “unbuckle” Santa before opening the greeting, so keep the inside relatively flat rather than asking the closure to contain extra bulk.
15. Snowman Easel Display Card
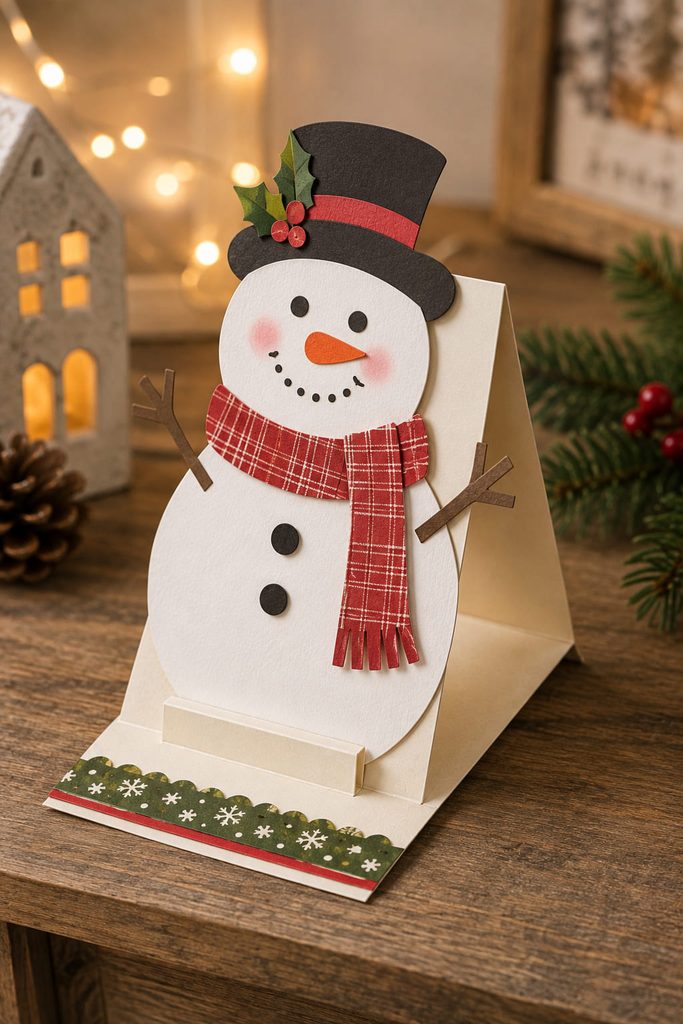
When the recipient is likely to keep the card on a desk or mantel, make the display position part of the design. An easel fold lets a snowman front panel stand upright while the lower section of the card becomes its support. A small raised paper strip or flat button shape on the base acts as the stop that holds the front at an angle.
Useful supplies are simple:
- sturdy folded cardstock for the base;
- a separate snowman panel;
- paper scraps for scarf, hat, nose, and buttons;
- strong paper adhesive;
- an optional low-profile foam square for the easel stop.
Stand Test: Set the finished card on a flat table and tap the surface lightly. If the front slides flat, move the stop slightly forward or give it more height. If the card tips backward, reduce heavy decoration near the top of the snowman.
16. Suspended Wreath Spinner Card
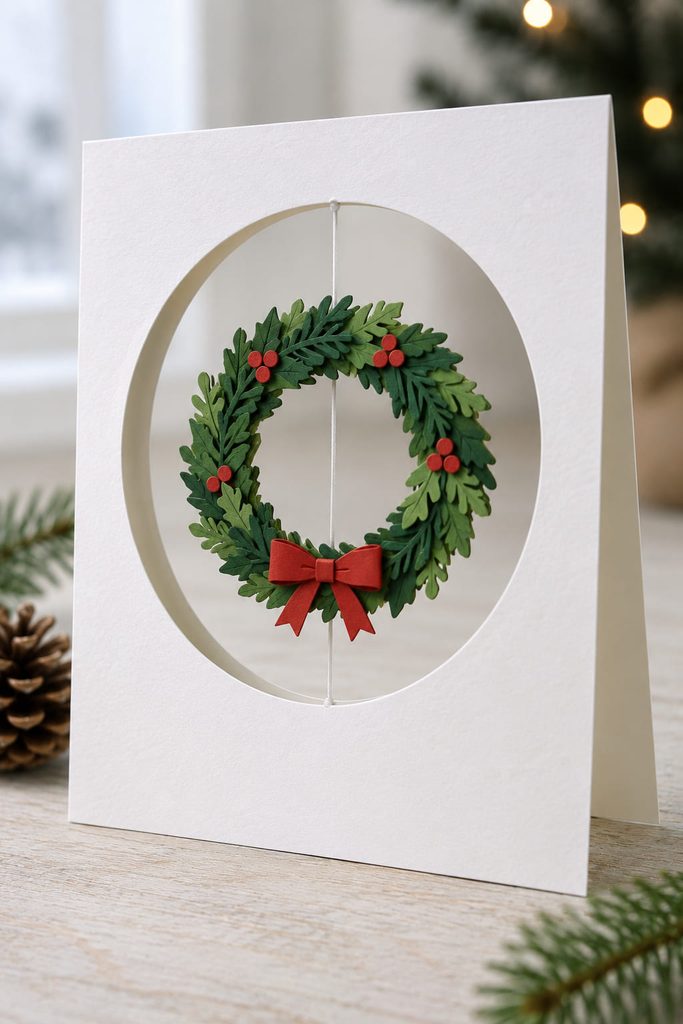
Suspension does the work here: a two-sided paper wreath spins inside an opening on a taut vertical thread. Cut matching wreath shapes, sandwich the thread between them, and trap the line at the top and bottom of a large opening in the card front. The wreath should sit fully inside that opening with clear space around every edge.
For the cleanest build, cut and align the opening first, then use it to judge the wreath diameter. Attach the thread under tension so the ornament does not sag, but avoid pulling so hard that the card front bows. Glue the second wreath face over the first only after the thread is centered; that hides the suspension line inside the paper sandwich.
Twist the wreath a few turns before closing the card. When the recipient opens it, the stored twist can release into a short spin. The effect depends on clearance rather than decoration, so keep bows, berries, and foliage shapes shallow enough that they cannot strike the cut edge.
If the spinner drags on one side, check alignment before trimming the wreath smaller. A crooked thread can shift the whole ornament off-center, and re-anchoring that line may restore the movement without changing the design.
How to Keep Handmade Christmas Cards Playful Without Making Them Bulky
Playful details work best when one interaction or texture carries the card. A swinging figure, one curled element, a laced silhouette, or a fold-flat bow gives the recipient something to notice without forcing every square inch of the front to compete for attention.
For cards that will be mailed, close the finished sample and look at its profile from the side before making multiples. Raised paper curls and flattened loops can compress gently; pom-poms, deep springs, heavy fasteners, and tall pop-ups add more thickness. Hand-delivered cards give you more freedom, especially for easel folds and internal dimensional constructions.
Batch-making also gets easier when you repeat the mechanism rather than the decoration. Prepare all card bases first, then make the moving parts, loops, tubes, or punched pieces in groups. Once one complete sample opens, closes, and handles well, vary the character details and papers without changing the part that makes the card work.
Choose the Detail That Makes Someone Touch the Card
For a quick first project, the peeking mouse, curled antlers, gingerbread icing, or rolled-paper tree adds personality without much engineering. If you want the greeting to invite interaction, choose the swinging penguin, Santa wheel, belly-band closure, or spinner wreath. The pop-up presents and easel snowman are better when the card itself should become a small display.
For more seasonal formats beyond greeting cards, browse Christmas Paper Crafts, Ideas & SVG Projects for ornaments, garlands, villages, paper decor, and other holiday projects.








