
This post contains affiliate links. As an Amazon Associate I earn from qualifying purchases, at no extra cost to you. Thank you for supporting Diynify!
DIY Christmas crackers can do more than fill a place setting with one more festive object. When the paper construction controls rolling, height, texture, seating information, or the way a favor is opened, the crackers become part of the table design instead of an afterthought.
Most of these ideas use cardstock, wrapping paper, tissue or crepe paper, cardboard tubes, scissors or a craft knife, a ruler, adhesive, and ribbon or cord. A few need vellum, a scoring or perforating tool, small favors or paper notes, or commercially made cracker snaps. Most are pullable crackers; a few are cracker-shaped favor alternatives for quiet, reusable, or flat-pack use. If you want the traditional pull-and-pop interaction, use a purpose-made snap according to its package directions.
1. Pleated Pinch-Neck Crackers With Crisp Waists
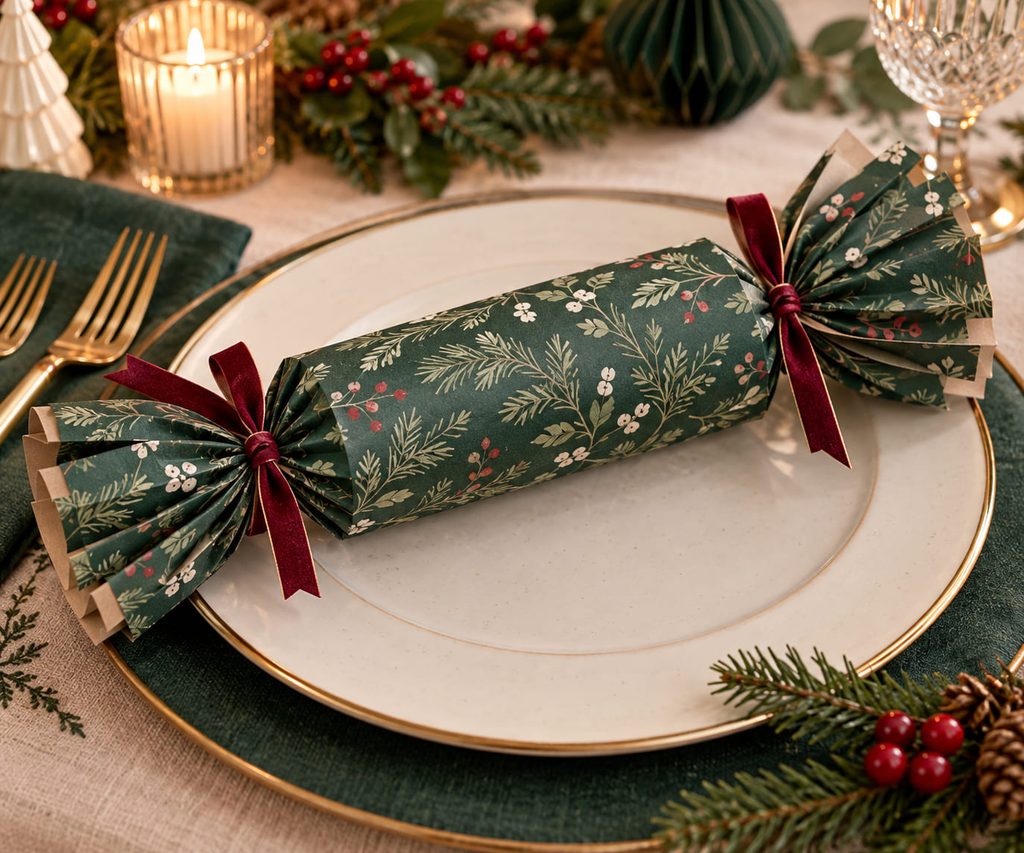
A clean neck is what makes a handmade cracker look deliberate rather than like a wrapped tube. Start with a light-to-medium decorative paper around a rigid center tube, then score narrow bands near both ends before gently compressing those bands into shallow pleats. The pleats give the paper somewhere to fold instead of forcing it into random wrinkles, so the tied waist stays even all the way around. Keep ribbon narrow enough that it does not hide the fold pattern, and leave enough free paper beyond the tie for a small fan of tails rather than a bulky twist.
Neck check: If the paper buckles into one deep crease, the scored band is too stiff or the folds are too far apart. Finer pleats spread the compression more evenly.
2. Hexagonal Cardstock Crackers That Stay Where You Put Them

Round crackers can drift across a smooth charger or roll toward glassware. A scored six-sided shell solves that problem without adding a separate cradle: form six equal cardstock panels with a narrow glue tab, place the favor compartment through the center, then shape the ends. The flat faces also give pattern a fixed front. Align one face toward each guest so stripes, stars, or a slim metallic border repeat in the same direction across the table.
3. Accordion-Collar Crackers for Soft, Full Ends
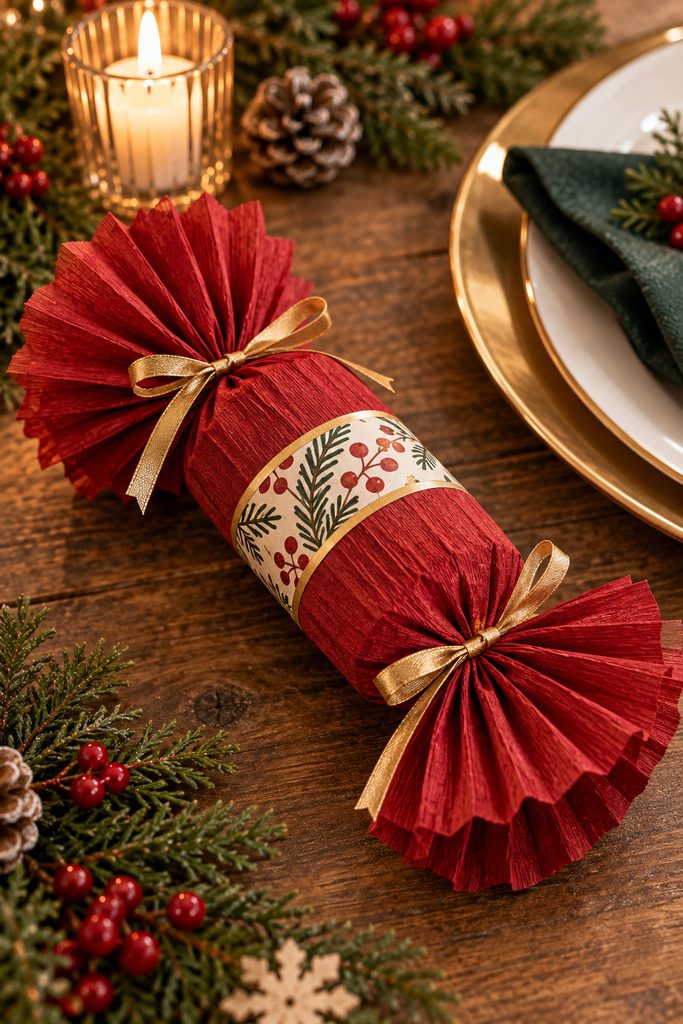
Thin tissue or crepe paper can give a cracker a softer silhouette, but simply twisting it often collapses into a narrow rope. An accordion collar creates volume on purpose while still leaving the center firm enough to hold a small favor.

- Wrap the center tube first and secure only the long seam.
- Fold the exposed paper at each end into narrow back-and-forth pleats.
- Compress the pleats at the base of the tube, tie them, then open the outer edges into a shallow fan.
- Trim the fan tips only after both ends are shaped so the two sides stay visually balanced.
This works best with flexible paper that can fold repeatedly without springing open. Heavy gift wrap fights the pleats and makes the tied area bulky; save that paper for a rigid shell instead.
4. Place-Card Crackers With Removable Name Fins
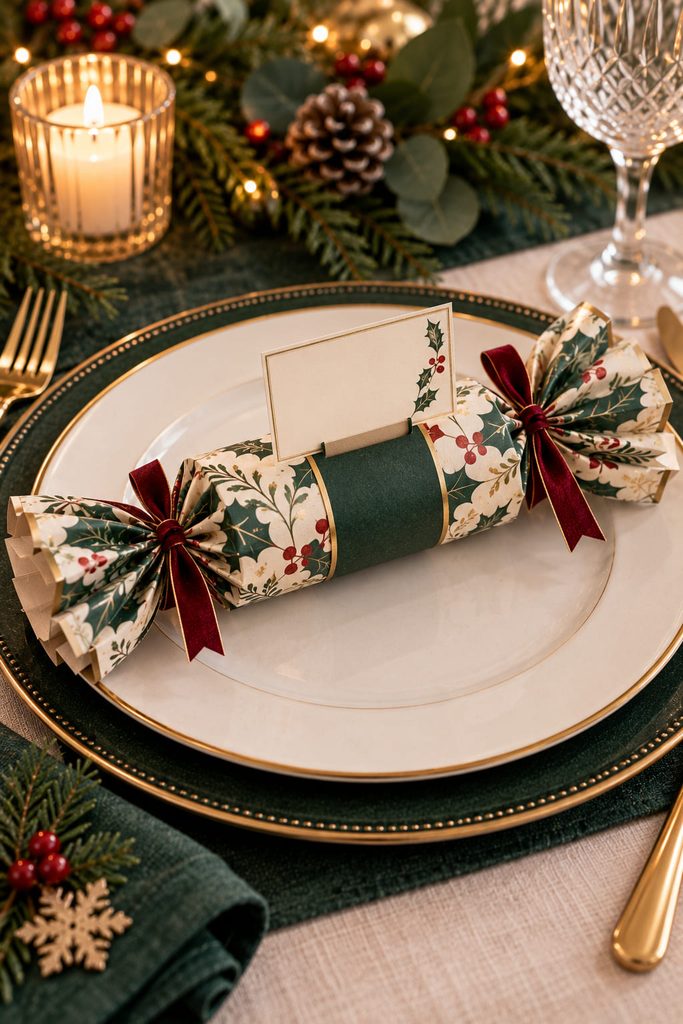
When every place setting needs a name card anyway, the cracker can carry it without covering the decorative paper. A removable cardstock band wraps the center and includes a narrow slot that grips an upright name fin. The fin is easy to read from across the table, while the band slides off before the cracker is pulled so it cannot interfere with the opening action.
There are two sensible routes. A vertical fin is best when plates are close together because the name rises above the setting with a small footprint. A low horizontal flag is less formal but gives more room for long names and can sit beside a small menu note. In either version, keep the seating piece removable rather than gluing it across the wrapper seam; table stationery should not become part of the tear path.
5. Napkin-Band Crackers That Keep a Setting Together
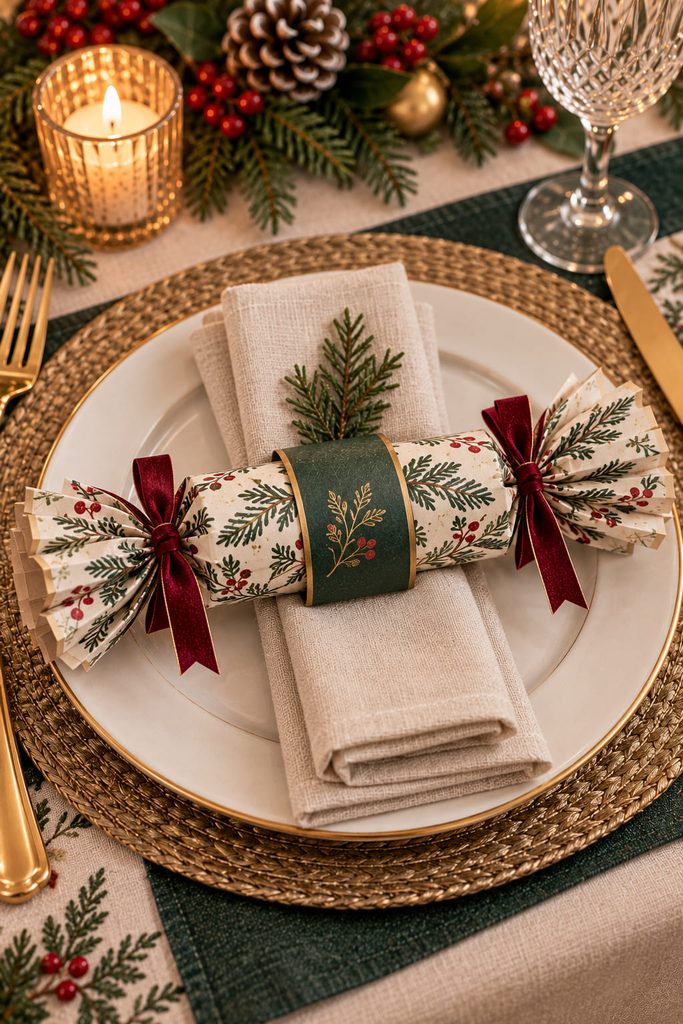
Instead of laying a cracker beside a napkin, connect them with a removable paper cuff. A broad band wraps the rigid center while a second loop slips around the folded napkin underneath, keeping both pieces aligned as the setting is carried.

Make that lower loop releasable with a small tab-and-slot closure rather than permanent glue. Guests can free the napkin first and pull the cracker later, and the underside stays flat enough to sit neatly on the plate.
6. Vellum-Window Crackers With a Controlled Reveal
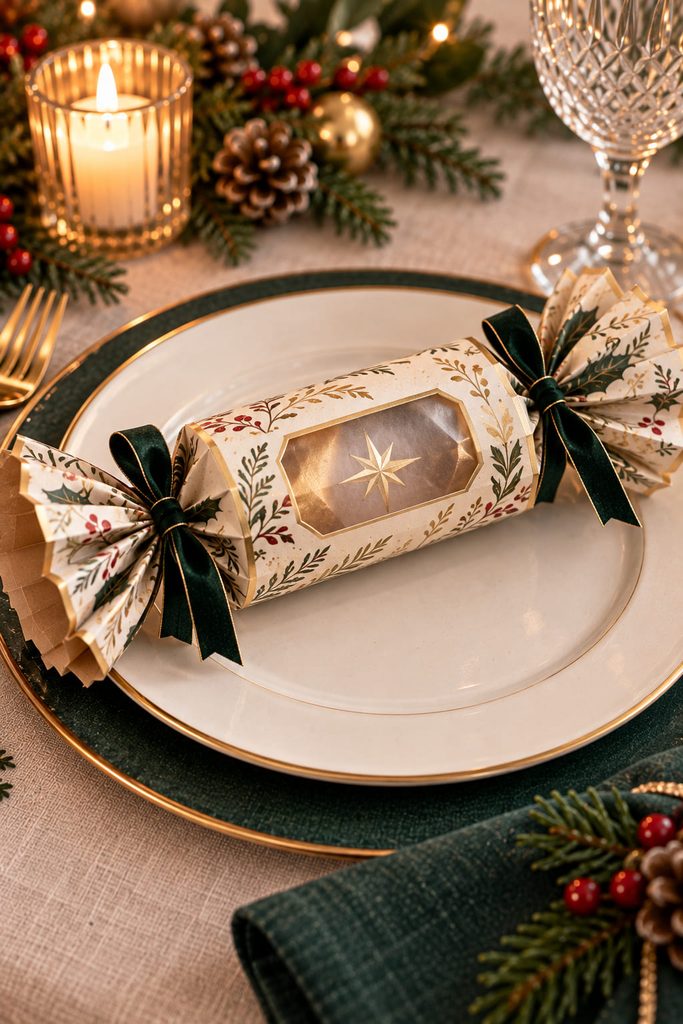
A window makes sense only when it reveals something intentional. Cut a small opening in the outer cardstock sleeve and back it with vellum, then place an inner paper wrap around the center tube so the window shows a printed motif, a metallic paper panel, or the color of the wrapped favor rather than a jumble of loose contents. The translucent layer softens contrast and gives the center a light-catching detail without turning the whole cracker into a shiny object.
If the result looks messy, diagnose the layer rather than adding more trim:
- Window looks cloudy: use cleaner vellum and keep adhesive outside the visible opening.
- Contents create dark lumps: add a smooth inner band between the tube and window.
- Opening feels weak: leave a wider cardstock border around the cutout.
- Window disappears at the table: increase contrast behind it instead of enlarging the cutout until the shell becomes flimsy.
7. Reusable Telescoping Cracker Favors
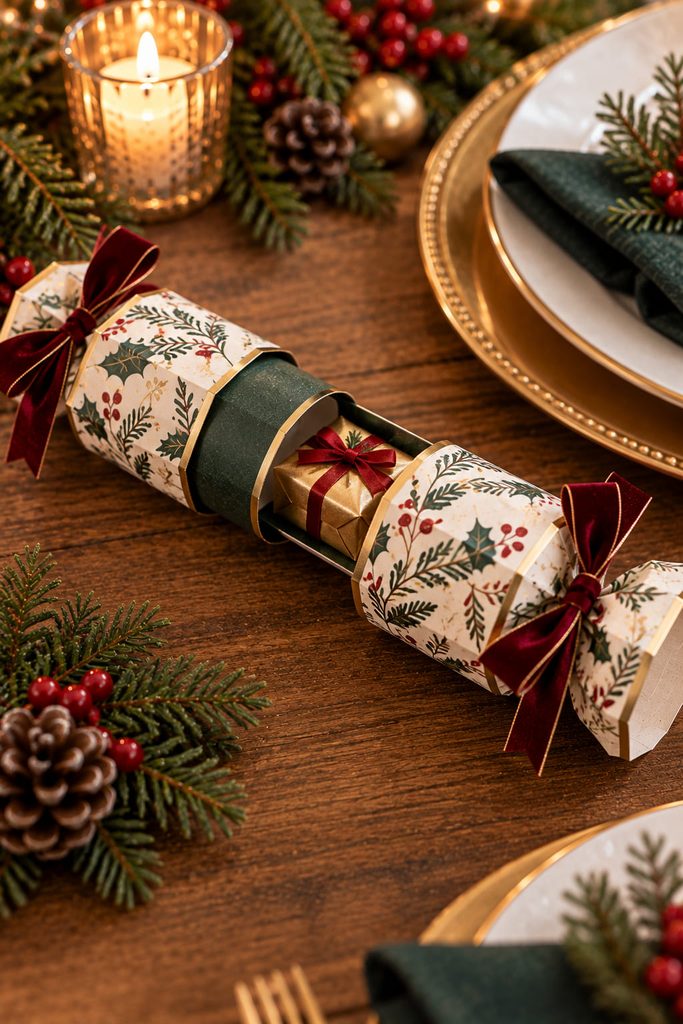
For a cracker-shaped favor that can be opened without tearing the decorative shell, build two short cardstock sleeves that slide over a rigid center collar. One half overlaps the collar from the left and the other from the right, so a gentle pull separates the halves and exposes the gift inside. This is a quiet, reusable alternative to the traditional snap-and-tear version, which makes it useful when the paper itself is worth keeping.

The fit matters more than the decoration. Score each sleeve accurately, keep the center collar straight, and test the overlap before adding any raised embellishment. The two outer halves should resist falling apart when lifted but separate without bending when pulled in opposite directions. If the joint is too tight, reduce the collar thickness or ease the sleeve seam rather than forcing the opening.
A removable ribbon bridge can keep both halves visually connected before dinner: thread ribbon through a small slot in each sleeve and tie it loosely across the seam. Untie it before opening so the ribbon is not asked to carry the pulling load.
Slip-fit test: Hold one end only. The second half should stay attached under its own weight, then release with a deliberate two-handed pull.
8. Woven Paper-Sleeve Crackers for Real Texture
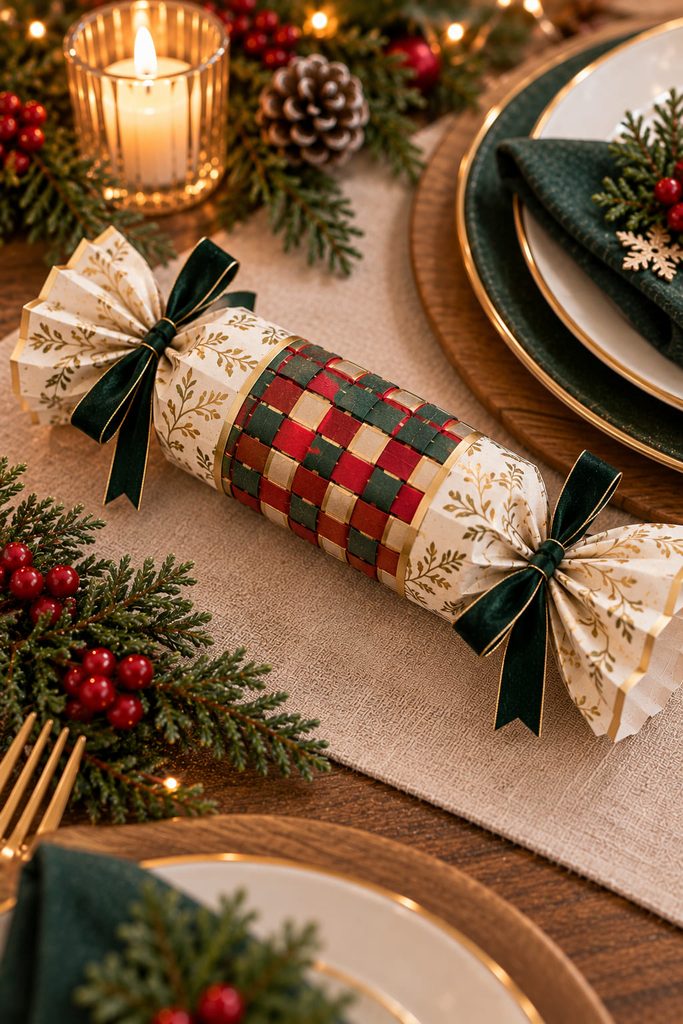
A woven sleeve adds texture without changing the inner cracker. Build a plain, smooth cracker first, weave narrow paper strips in a true over-under path on the work surface, secure the edge crossings, and wrap the finished mat around the middle as a removable band. Sturdier strips can carry the texture while the pull wrapper stays thin enough to open cleanly. Leave base paper visible at both ends so the weave does not swallow the silhouette and guests still have an obvious place to grip.
9. Menu-Pocket Crackers for Small Table Notes
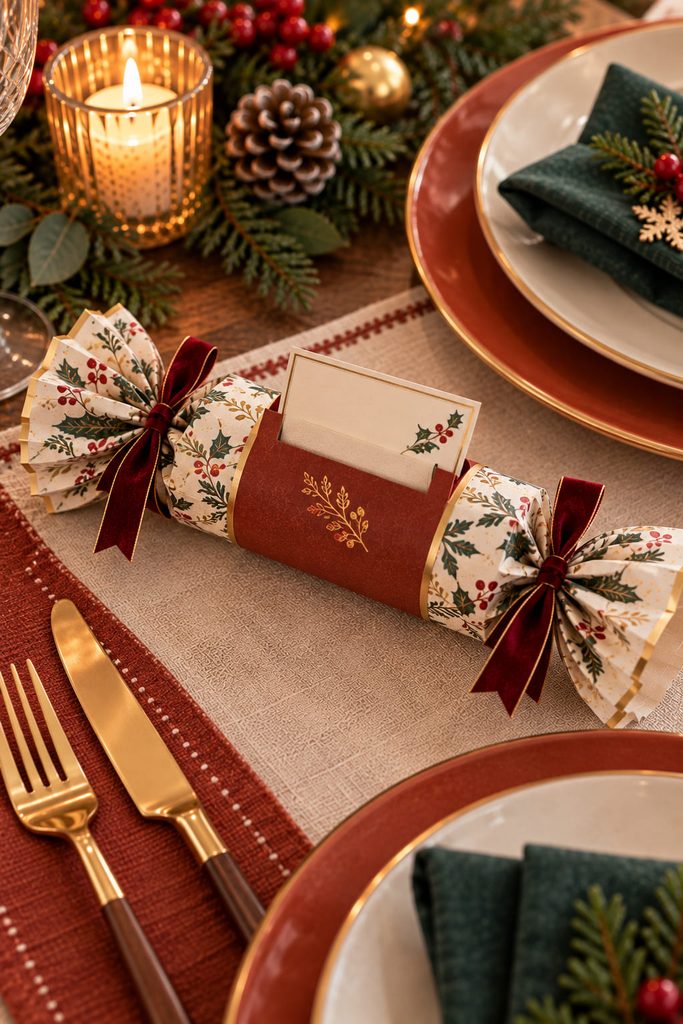
Put table information on the cracker itself instead of adding another loose card. Fold a narrow cardstock strip into a belly band, add a second layer with three closed edges, and slide in a miniature menu, a toast prompt, or a short note for the guest. Keep the pocket entirely within the rigid center zone so it does not cross either pinched neck.

Before making a batch, check four things:
- the card can be removed without bending the cracker;
- the pocket opening is visible from the seated side;
- the extra cardstock does not make the center too thick to grip;
- the card is short enough that it cannot slide into the pull area.
A repeated pocket shape also gives the table a consistent stationery system even if the underlying cracker papers vary.
10. Flat-Back Crackers for Narrow Place Settings
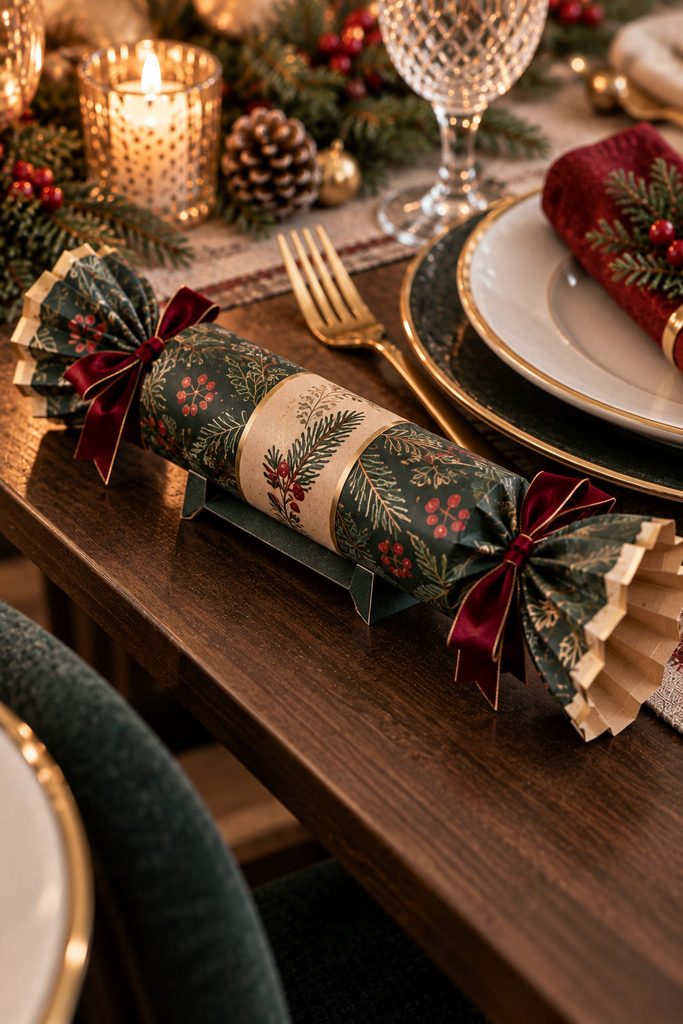
When charger, glassware, cutlery, and napkin already occupy most of the setting, a full round cracker can feel oversized. Add a narrow folded cardstock skid under the center tube so the cracker presents a curved top but rests on a flat base. The support can be hidden by the center band, and its two folded feet prevent the cylinder from rolling without changing the pull ends.
This construction is especially useful when crackers need to line up along the outer edge of a plate. Keep the skid shorter than the rigid center tube; if it extends into the pinched paper, it will resist the movement needed when the cracker is pulled.
11. Tear-Strip Cracker Favors for a Quiet Table
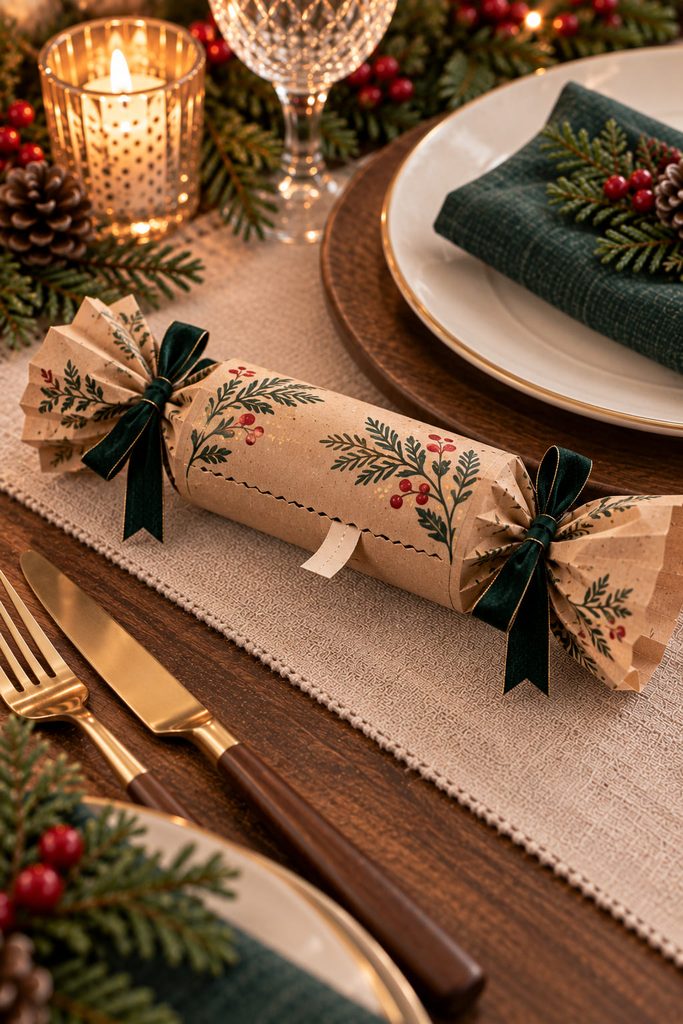
Not every holiday table needs a snap. A tear-strip version keeps the familiar wrapped-cracker silhouette but opens through a controlled paper seam. Build the center as a light cardstock tube or folded shell, add a narrow perforated or pre-scored strip along the underside, and attach a paper pull tab that is easy to find without turning the whole favor over.
The opening sequence matters:
- Make and test the tear strip before the wrapper is decorated.
- Load the favor through one end and close that end with a tuck or tie.
- Seal the opposite end without gluing across the tear line.
- Pull the tab once to confirm the strip opens the body rather than shredding the decorative outer layer.
Batch shortcut: Cut and score every tear strip first, then test one completed sample before assembling the rest. A weak perforation repeated fourteen times is much harder to fix than one failed prototype.
12. Fold-Flat Cracker-Style Favors for Easier Storage
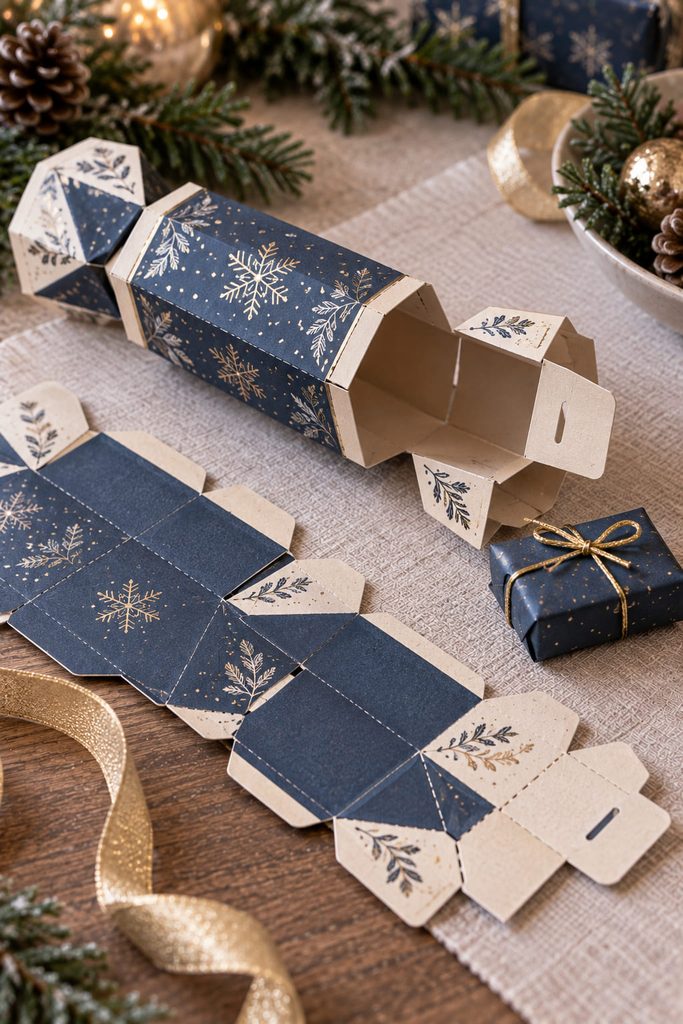
If you are making crackers well before the meal, storage volume can become a bigger problem than the craft itself. A fold-flat design uses a scored polygon shell with a glue tab along one long edge and small locking tabs at the ends. The empty shell collapses along two opposite score lines, then pops back into shape when the center compartment is loaded.
The geometry needs a deliberate closed-state check. Fold the shell flat before decorating and confirm that no raised layer crosses the collapsing scores. When it is time to use the cracker, press the shell open, insert the small favor packet, and engage the end tabs in their matching slots. If the shell bows outward, the tabs are pulling too hard; enlarge the receiving slot slightly or reduce the thickness of the inner packet.
Unlike a traditional twisted-paper cracker, this version gets its silhouette from scored faces and locked ends, so it looks crisp beside folded napkins and stacked plates. It can also be transported flat to a host’s house and filled shortly before dinner.
Storage test: Collapse one finished, empty shell and stack five together. If the pile rocks or springs open, reduce bulky surface layers before committing to the batch.
13. Ornament-Tag Crackers With a Take-Home Detail
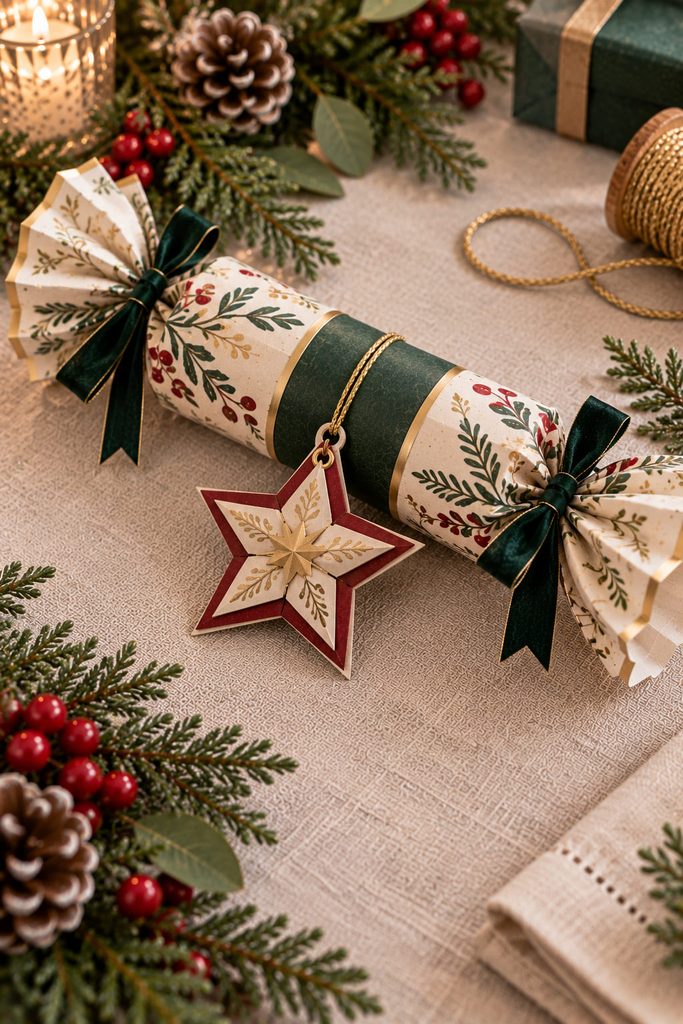
Give the guest a keepsake before the cracker is even opened by attaching a flat paper ornament with a small removable loop. A layered star, folded medallion, or sturdy cut-paper bauble reads clearly at place-setting scale and lifts away before the cracker is pulled. Reinforce the ornament’s hanging hole instead of threading through a delicate decorative cut, so it can move to a tree, garland, or gift later without taking the cracker shell with it.
14. Oversized Shared Crackers as a Low Centerpiece
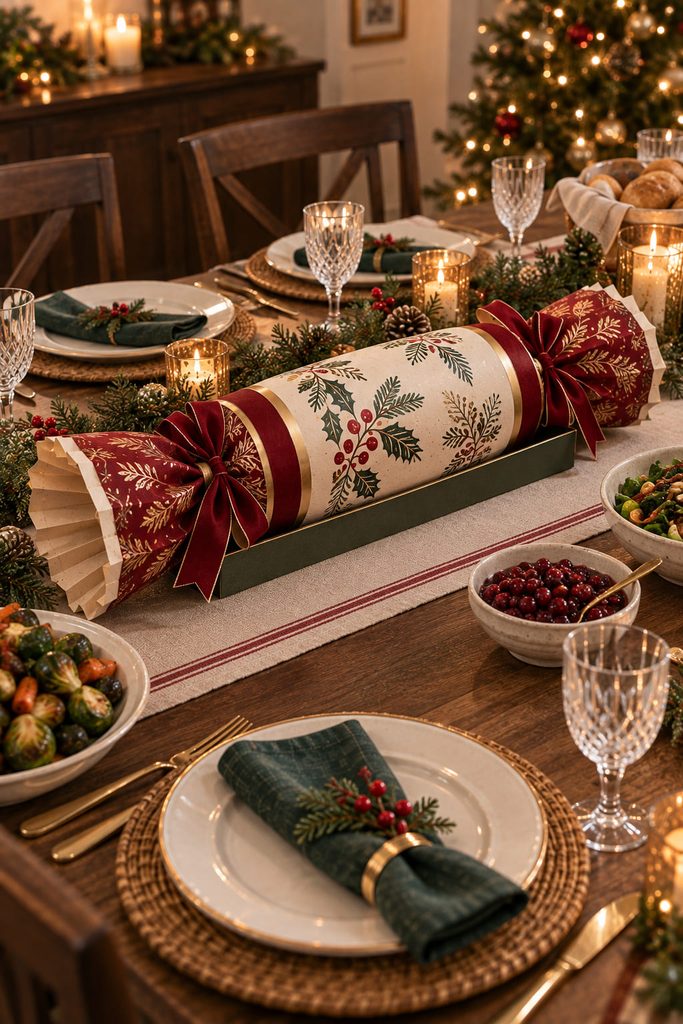
One large cracker placed along the centerline can replace several small decorative objects, but scale changes the construction. Use a wider rigid core or folded cardstock body, keep the ends proportionally shorter than on a personal cracker, and support it in a shallow folded-paper tray so it cannot roll between serving dishes. Fill it with several individually wrapped paper notes or lightweight favors rather than one heavy object that pulls the center off balance.
A shared cracker works differently from a personal one. The pull-apart route turns it into an after-dinner activity for two people, so the shell needs a real central pull zone and enough clearance from glasses or candles. The lift-open route uses a removable end cap or sleeve and is better when you want the centerpiece to survive the meal intact. Choose the interaction first; trying to make one oversized shell behave as both usually produces a fussy closure.
How to Make DIY Christmas Crackers Look Intentional
The fastest way to make a mixed set look planned is to repeat one structural choice across the table. Keep the same center-band width, the same ribbon thickness, or the same paper family, then let one other feature vary. Six different patterns can still feel coherent if every cracker has the same silhouette and tie placement; six identical papers can feel more interesting if the place cards, windows, and woven sleeves change the function.
Also watch height. Crackers sit close to plates, cutlery, and glass stems, so tall fins, large bows, and fan ends should stay below the line where they start blocking faces or tangling with stemware. A table looks better when the cracker supports the place setting rather than competing with it.
Choose the Cracker by What the Place Setting Needs
Start with the practical problem you actually have. Use a faceted or flat-back version if rolling is annoying, a place-card or menu-pocket version if the table needs stationery, a fold-flat shell if you are transporting a batch, or a telescoping design when you want the paper to survive opening. The decoration can follow after the interaction is settled.
If you are saving cardboard tubes for the center cores, 14 Creative Toilet Paper Roll Christmas Crafts to Make has more ways to turn the same material into ornaments, holders, and holiday table pieces.








