
This post contains affiliate links. As an Amazon Associate I earn from qualifying purchases, at no extra cost to you. Thank you for supporting Diynify!
Cardboard Christmas crafts get more interesting when the box itself does real work. Corrugated flutes can stiffen a tabletop tree, thin packaging board can crease into a gift wallet, and broad shipping-box panels can become trays, games, organizers, or moving holiday projects instead of simply acting as a surface to paint.
Most ideas here use clean, dry cardboard, a metal ruler, a cutting mat, a sharp craft knife or sturdy scissors, and paper-safe glue. Some projects also need a paper fastener, twine, paint, parchment, ribbon, tracing paper or vellum, a cool battery-powered LED, small gifts, or lightweight game pieces. Save flat single-wall panels for structures and dividers; thinner cereal-box board is better anywhere you need tight folds.
1. Cross-Slot Tabletop Christmas Tree
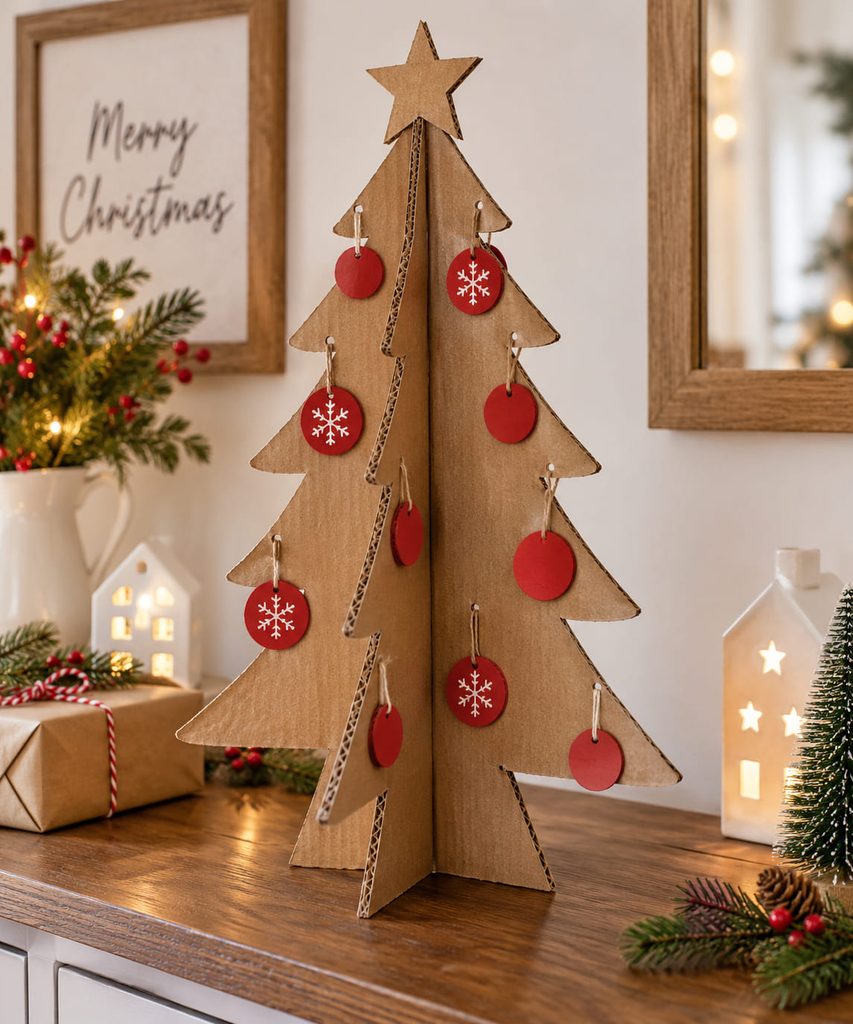
A shipping box panel is stiff enough to make a small tree stand without a hidden bottle, cone, or wood block. Cut two matching tree silhouettes, then run a slot from the top to the midpoint on one piece and from the base to the midpoint on the other. When the slots meet, the panels cross at right angles and create four feet instead of one narrow edge.
The slot width matters more than decorative detail. Match it to the actual thickness of the cardboard so the pieces slide together with light resistance; a loose slot lets the tree twist, while an overly tight one crushes the corrugation. Leave the lower branches broad and fairly flat so they widen the footprint, then add paint, paper dots, or punched stars only after the tree stands square on its own.
2. Gingerbread House Gift Box With a Lift-Off Roof
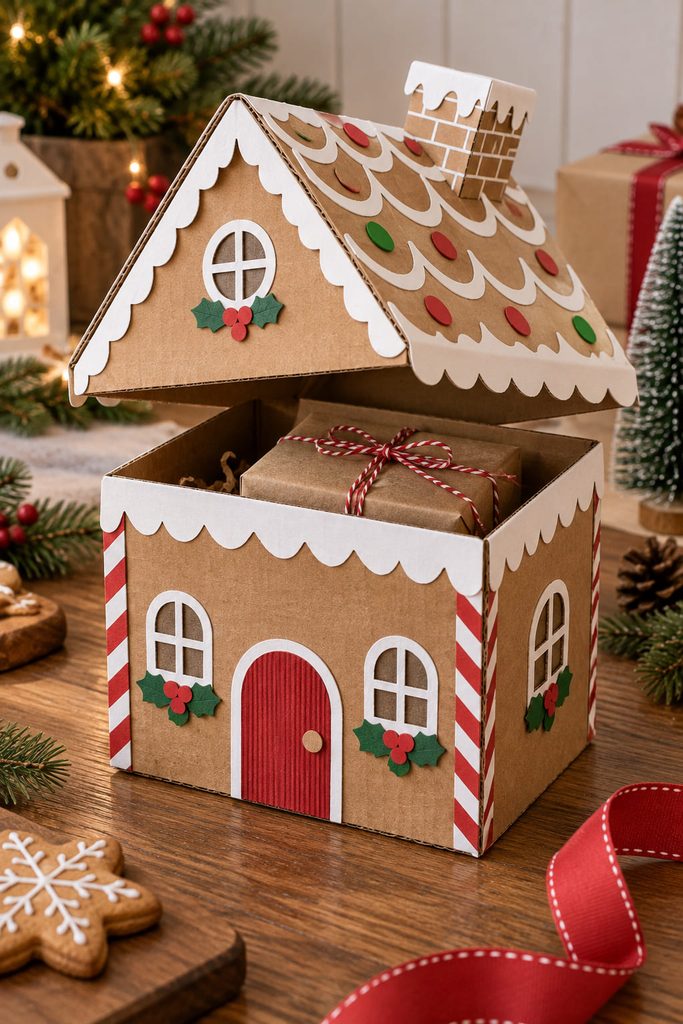
Treat the roof as a removable lid, and the gingerbread-house shape stops being merely decorative. Build the house body as a rectangular box with a closed bottom, then make the roof as a shallow inverted tray that overlaps the upper walls. That overlap keeps the lid aligned and gives you enough clearance to lift it away without tearing icing-like paper trim.

For the body, score folds instead of forcing corrugated board around sharp corners. Keep the loading opening at the top, and make the base from a separate panel with glued tabs inside the walls so a small wrapped gift cannot push straight through. If the present is dense, use double-wall cardboard for the base even if the walls are thinner.
Lid Clearance Check: Dry-fit the roof before decorating it. If it catches on window frames, roof trim, or chimney pieces, either reduce those raised details near the eaves or increase the lid overlap slightly.
A simple build order prevents most problems:
- Cut and score the four-wall body, including glue tabs.
- Attach the reinforced base and let it set flat.
- Build the roof as a separate shallow cap.
- Test loading, closure, and removal before adding exterior details.
3. Letters to Santa Mailbox From One Small Box
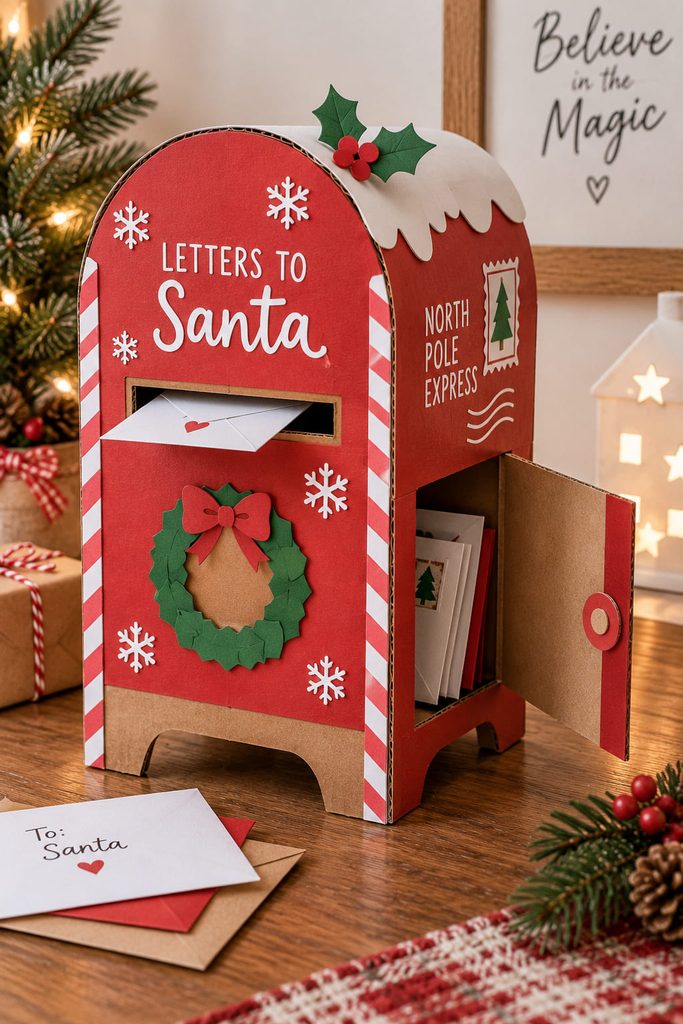
A small shipping box already has the volume a holiday mailbox needs; the useful work is turning that volume into controlled access. Keep the original bottom closed, cut a narrow posting slot high on the front, and convert one back panel into a hinged retrieval door so letters can come out without shaking the box upside down.
Reinforce the slot with a second strip of cardboard around its inside edge. That keeps repeated use from softening the opening, especially if children are feeding in folded notes. The rear door can use the box’s existing fold as a hinge, but it still needs a simple closure: a tab-and-slot latch, two punched holes with ribbon, or a small paper fastener and rotating catch.
Build in this order:
- Mark the posting slot and retrieval door while the box is still flat enough to measure.
- Cut openings before gluing on decorative panels.
- Add the slot reinforcement and door closure.
- Re-square the box and check that the door swings without scraping the floor.
Retrieval Door Check: Set the finished mailbox upright, post several folded sheets, then remove them through the rear door. If the lowest letters catch, raise the door opening or trim the inside lip rather than widening the front slot.
4. Jointed Cardboard Nutcracker Puppet
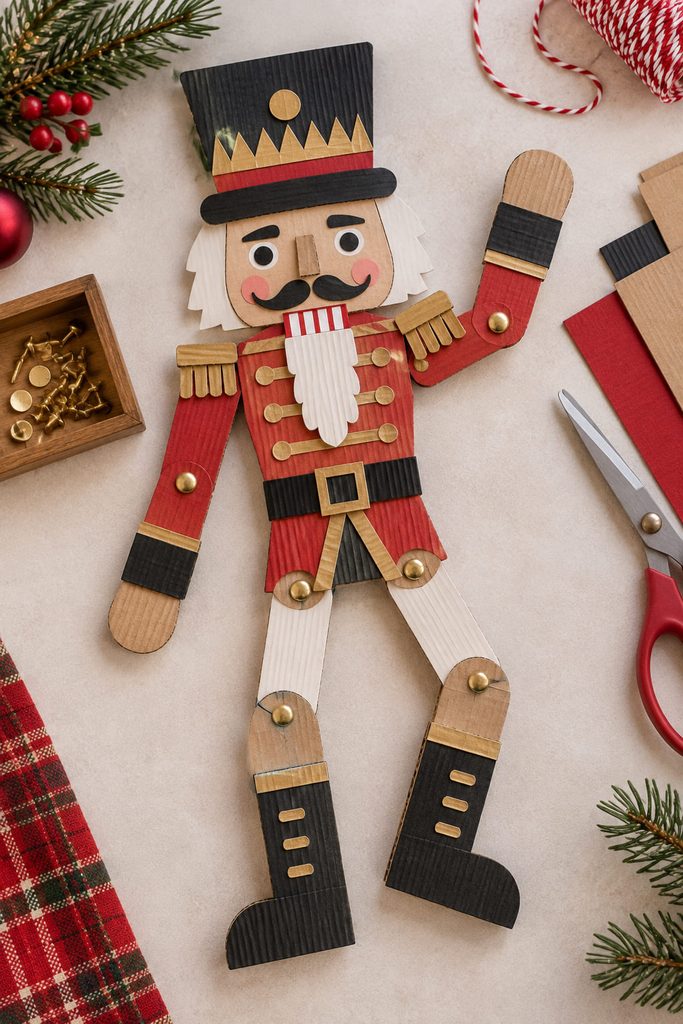
The puppet effect comes from small pivots at the shoulders and hips, not from extra surface detail. Cut the torso from one sturdy panel, make each limb separately, and join the shoulders, elbows, hips, or knees with small paper fasteners. The fastener becomes the pivot, so the surrounding cardboard needs enough material around the hole to resist tearing.
Keep the silhouette bold: tall hat, square jacket, straight boots, and simple hands read better than narrow decorative cutouts. If corrugation makes the limbs bulky, use thinner packaging board for the moving pieces while keeping the torso rigid.

Lay the finished puppet flat and move every joint through its intended arc before adding surface details. Paint or paper trim placed across a pivot can lock a limb accidentally, so leave a small clear circle around each fastener.
5. Snowflake Printing Blocks for Handmade Gift Wrap
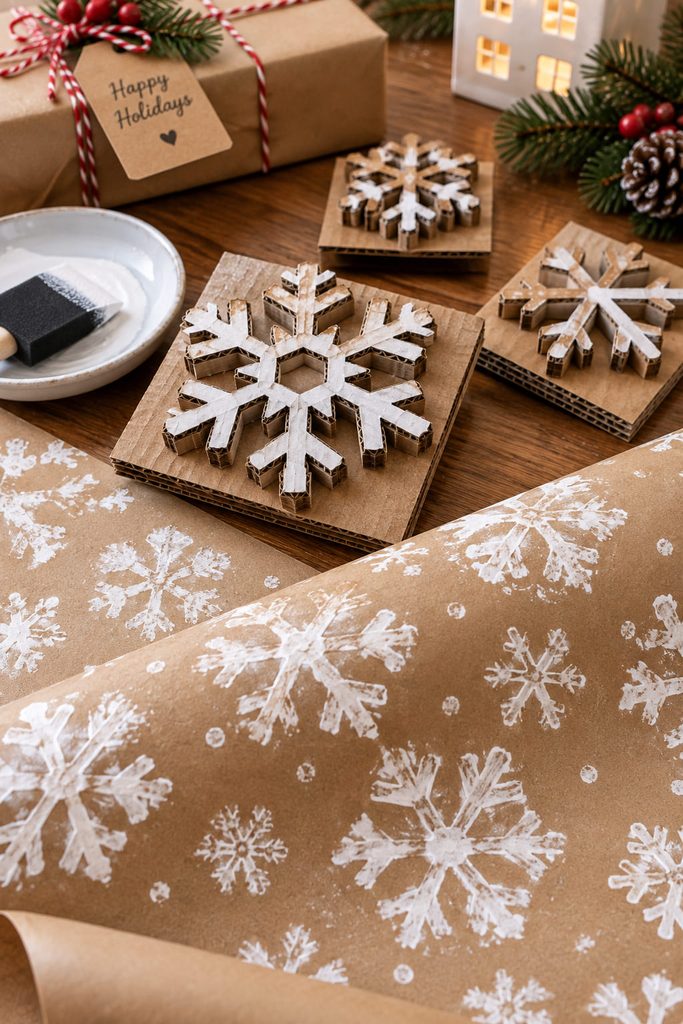
Instead of cutting another hanging snowflake, turn box scraps into reusable printing tools. A simple cardboard block can stamp kraft paper, tissue, tags, or plain gift bags with a repeated Christmas pattern, and the raised corrugated edges can produce deliberately imperfect texture.
For the cleanest block:

- Glue the snowflake shape onto a second flat cardboard square as a handle.
- Keep branches broad enough that they will not bend when pressed.
- Use a thin, even coat of craft paint rather than flooding the surface.
- Test the first impression on scrap paper and trim any corner that prints unintentionally.
A set of two or three differently scaled blocks gives you more useful variation than one highly intricate snowflake. Large motifs can establish rhythm across wrapping paper; a smaller block can fill gaps without making the pattern look mechanically tiled.
6. Reindeer Gift Card Wallet
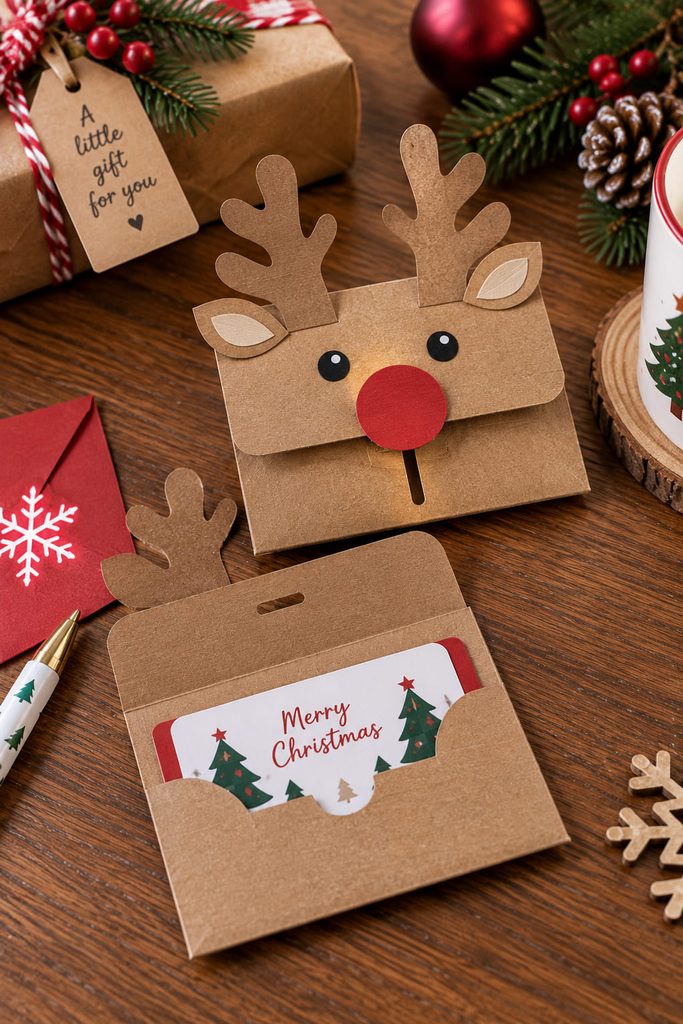
Thin packaging board can fold into a compact gift card wallet without needing a separate box. Cut one long strip with three sections: a front flap, a card pocket, and a back panel. Fold the pocket upward, glue only its side edges, then bring the front flap over it like a small envelope.
The reindeer detail should support the closure instead of getting in its way. A round nose tab can tuck into a short slit on the front, while antlers stay on the upper flap where they are not bent every time the wallet opens. Test the pocket with an actual gift card before gluing; a few extra millimeters of side clearance matter more than a perfectly tight fit.
7. Corrugated Star Napkin Rings
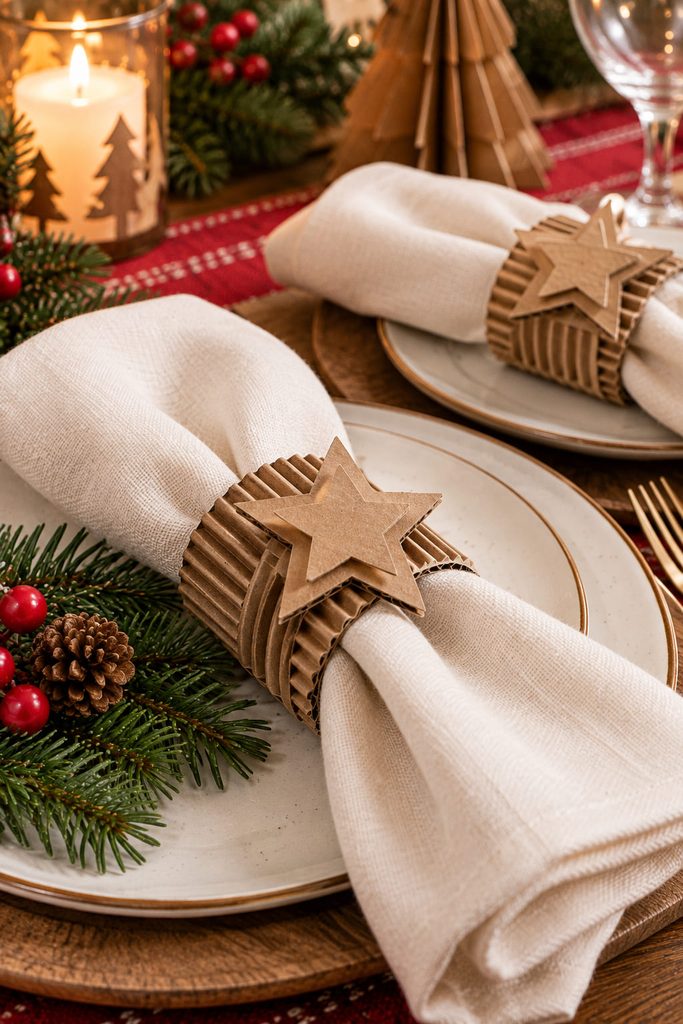
For a table craft, corrugated cardboard works best when the flutes become the texture rather than bulk you have to hide. Cut narrow bands across the board, curve each band into a ring, and overlap the ends enough to create a broad glue joint. A small layered star can cover that seam and turn the structural overlap into the focal point.
There are two sensible routes. Use single-layer bands for lighter napkins and a slimmer profile, or laminate two thin strips together if the rings need to hold a thick fabric napkin without springing open. The second route is sturdier, but the extra thickness makes tight curves harder, so form the ring around a bottle or cardboard tube before the glue sets.

Keep the star shallow. A deep stacked ornament on top of the ring can make place settings tip sideways or snag on glassware.
8. Sliding Christmas Countdown Tree
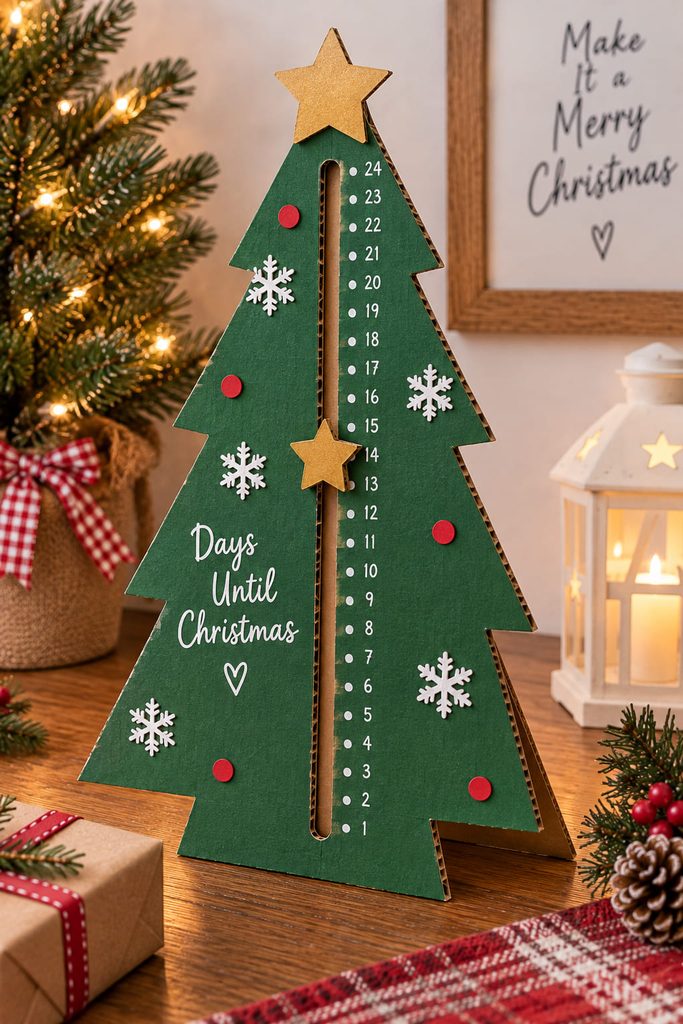
A countdown does not need 24 doors or pockets to feel interactive. One tall tree-shaped panel can act as a track for a movable star marker, giving you a reusable way to count down the final days before Christmas without building a full advent cabinet.
Cut two narrow vertical slots in the tree panel and join them at the back with a small slider made from thinner board. The star attaches to the front of that slider; a wider hidden backing piece keeps it from pulling through. Mark dates or simple dots beside the track only after the mechanism moves freely.
A reliable sequence is:
- Cut the tree silhouette and the two parallel slots.
- Make the slider narrower than the space between the outer edges but wider than each slot.
- Attach the front star through the slot area, leaving enough play for movement.
- Add a rear stop at the top and bottom so the marker cannot leave the track.
Slider Clearance: Paint adds thickness along cut edges. If you plan to paint the tree, finish the slot edges first and test the dry mechanism again before final assembly.
Use a fold-out triangular easel or a cross-slot base behind the tree so the countdown stands securely while the marker is moved. A broad footprint matters more here than extra front decoration because the user will be touching the piece every day.
9. Christmas Memory Matching Tiles
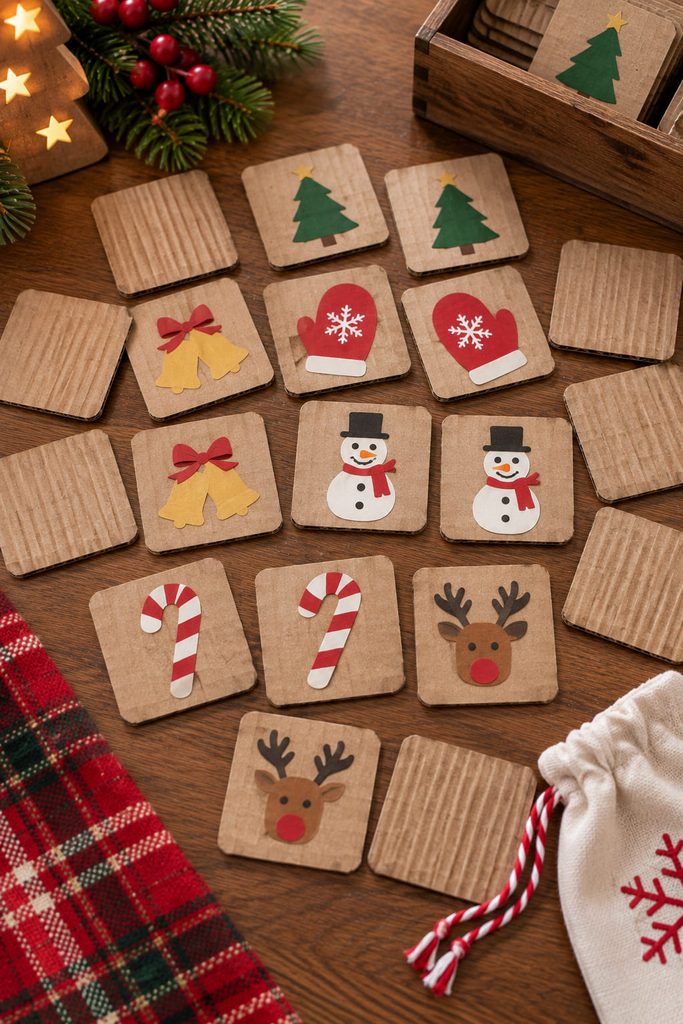
Box panels can become a durable set of matching-game tiles if consistency comes before decoration. Cut an even number of squares with the corrugation running the same direction, then cover every back with the same paper or paint treatment so no pair can be identified before it is turned over.
Batch the fronts as pairs rather than making one finished tile at a time:
- Cut and square all blanks.
- Group them into pairs.
- Add one bold Christmas symbol to each pair—tree, mitten, bell, star, stocking, candy cane.
- Seal or edge the tiles only after confirming every image appears exactly twice.
Avoid thin antlers, tiny snowflakes, or text. A memory game is handled repeatedly and seen quickly; broad shapes survive both use and imperfect hand-cutting better than intricate motifs.
10. Slot-Locked Cookie Gift Tray
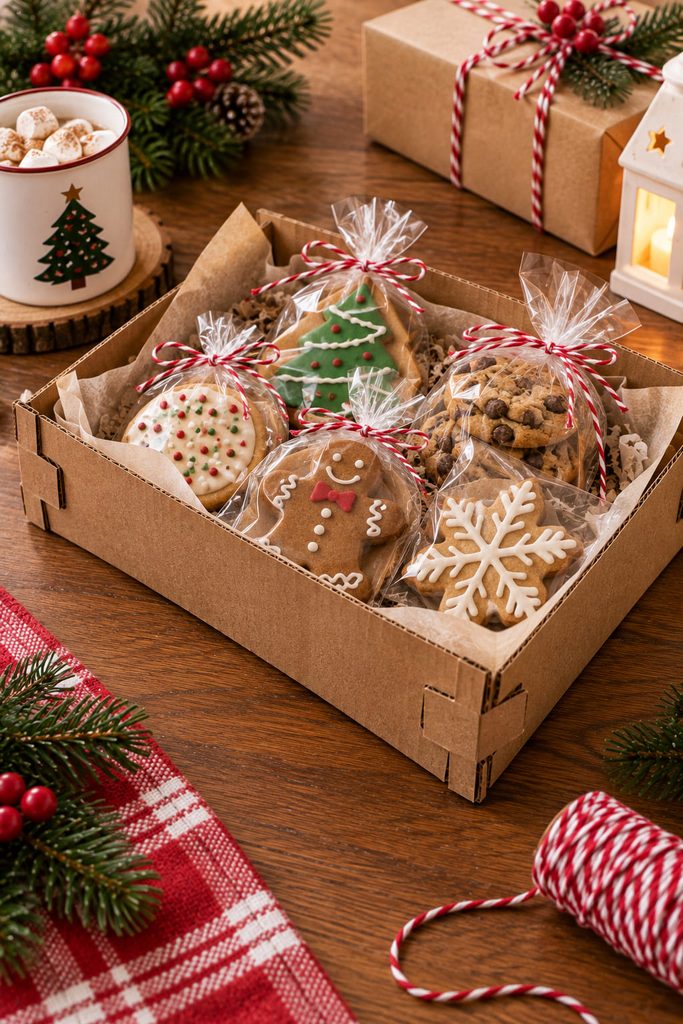
A shallow tray made from clean box board can hold wrapped cookies or other packaged treats without needing a deep carton. The useful detail is a rim that locks at the corners, because simply folding four walls upward leaves them dependent on glue joints that can peel under outward pressure.
Cut a rectangular base with wall flaps on all four sides. Give the short-end flaps narrow locking tabs and cut matching slots near the corners of the long sides. Fold the long sides first, bring the ends up, and feed each tab through its slot so the walls brace one another.
If a corner bows outward, the likely causes are easy to isolate:
- Tab slips back out: lengthen the tab or shorten the slot.
- Tray rocks: one score line is offset; re-score rather than forcing the base flat.
- Walls lean outward: move the slot slightly inward so the corner closes at a true right angle.
Use parchment or packaged treats as a food barrier rather than placing food directly against recycled shipping cardboard. A paper band around the loaded tray can add a gift-ready finish without taking over the structural job of the corner locks.
11. Cardboard Snowman Ring-Toss Game
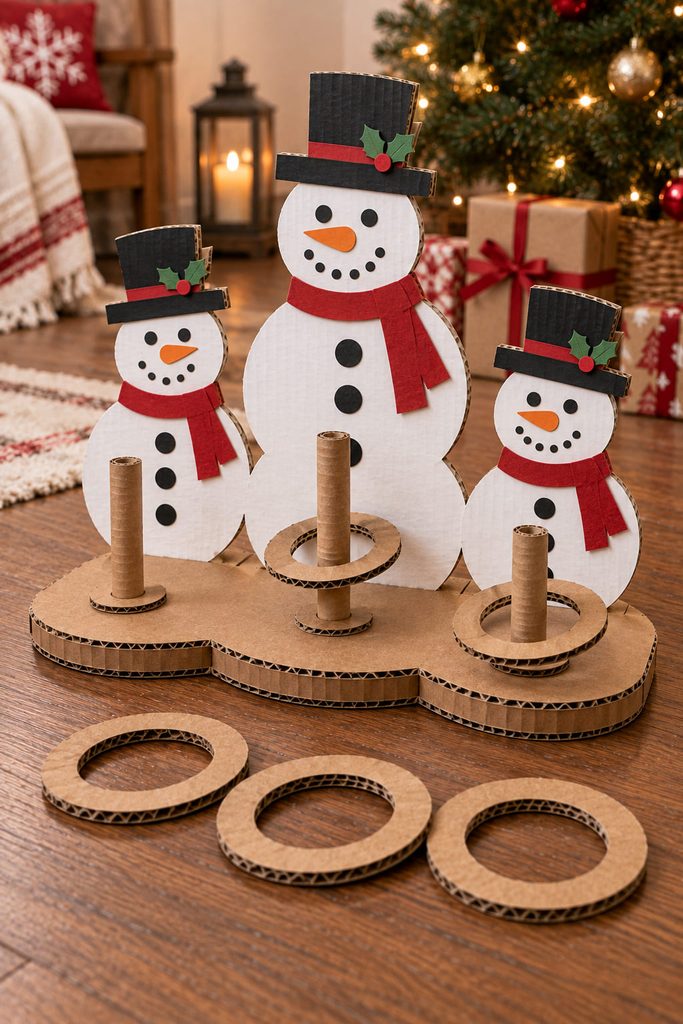
Anchor the target posts through the base instead of merely gluing them on top, and a box panel can handle the repeated knocks of a simple Christmas party game. Cut a wide snowman-shaped backboard or three separate snowball circles, then slot short cardboard uprights through the base so each post has a tab extending underneath.
Glue those hidden tabs flat under the base and add a second base layer over them. That sandwich spreads the load when a ring hits a post. Make the rings from doubled corrugated strips or tightly rolled kraft paper; they need enough diameter to clear the targets without being so large that every throw lands.
Keep the game low and broad. Tall narrow posts may look dramatic, but they increase leverage at the slot and make the whole target easier to tip.
12. Ornament Storage Divider Grid
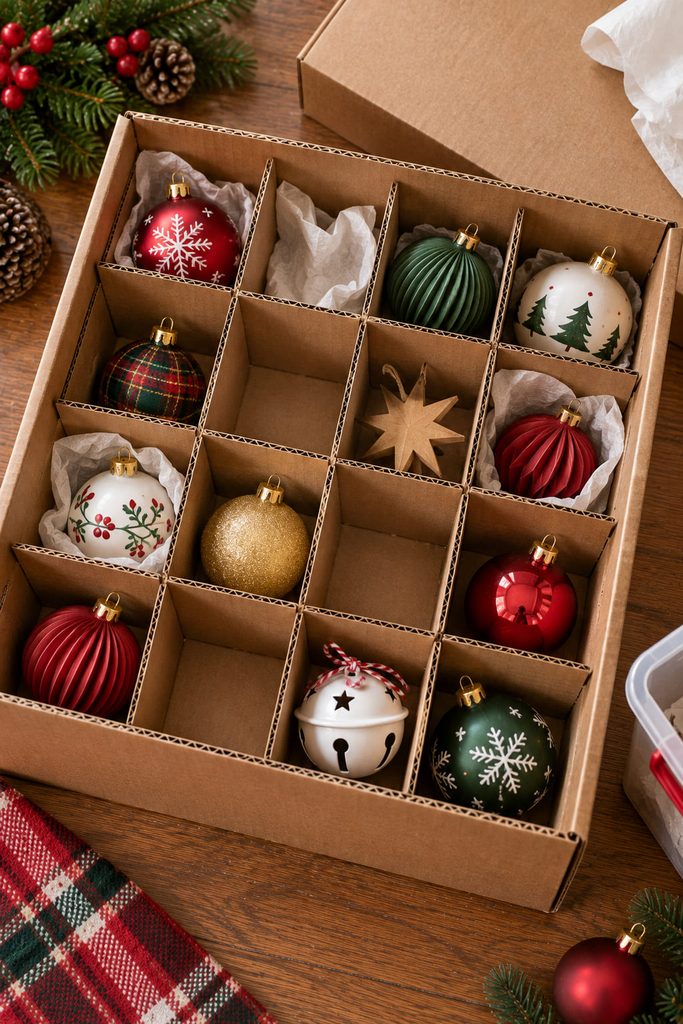
One of the least decorative projects is also one of the reasons worth saving a sturdy box. Interlocking divider strips can turn a plain carton into individual cells for lightweight ornaments, helping prevent pieces from knocking directly into one another during storage.
Before cutting anything, check three dimensions:
- interior box length and width;
- tallest ornament height;
- widest ornament diameter, including hooks or protruding details.
Cut one set of long dividers and one set of cross dividers. Each strip gets slots halfway through its height; opposing slots slide together to form a grid without glue. Make the cells slightly larger than the ornaments rather than forcing a snug fit, and add tissue only where a fragile surface needs cushioning.
Cell Fit: If the grid bows upward after assembly, the slots are probably too shallow or too narrow. Deepen them incrementally until every strip sits at the same height.
13. Christmas Shadow-Puppet Theater From a Shipping Box
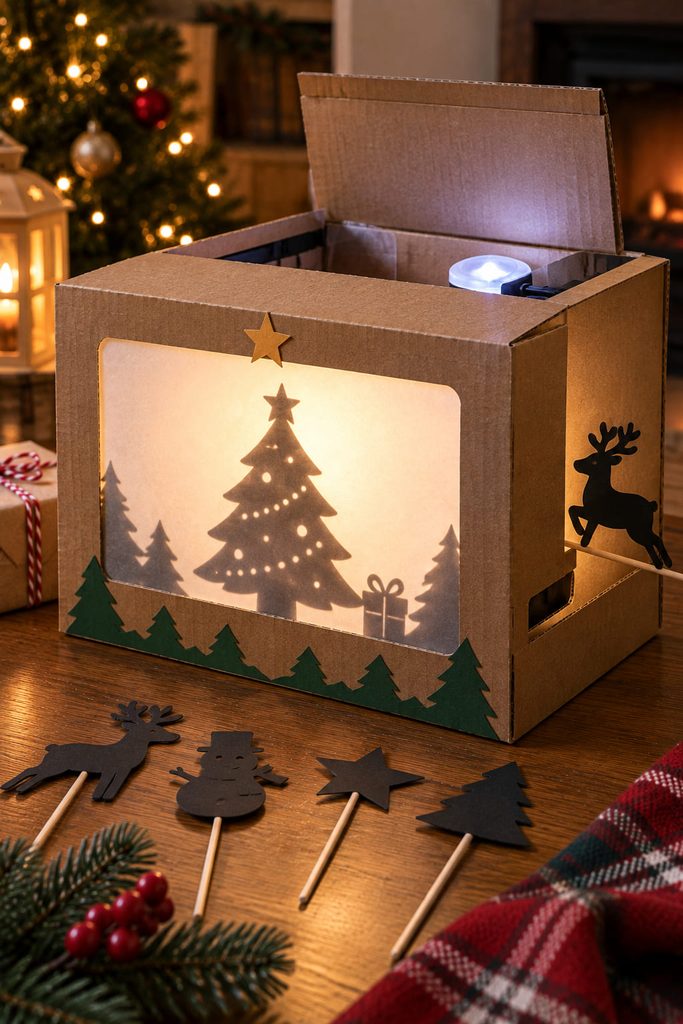
A medium box can become a small shadow theater by using its front wall as a frame and its depth as the light-control chamber. Cut a wide viewing opening in the front, line that opening with white tracing paper or vellum, and keep enough cardboard around the perimeter that the box does not rack sideways.
The puppet track is the part that makes the theater usable. Cut a narrow horizontal access slot along one side or the bottom so simple black-card silhouettes on sticks can move behind the screen. Keep the figures between the light source and the screen, with enough clearance that they do not scrape the paper.
Use only a cool battery-powered LED placed at the back of the box. The light needs a clear path to the screen, so avoid interior decorations that cast unwanted shadows. An openable back flap lets you position the LED and remove it without reaching through the puppet slot.
Before decorating the exterior, test three things:
- The screen stays taut without tearing at the corners.
- A puppet can cross the full visible width without hitting internal tabs.
- The LED can be inserted and removed while the box remains stable.
If the shadows look fuzzy, move the puppet closer to the screen rather than moving the LED closer to the paper. That changes the silhouette edge without adding heat or complicating the box.
14. Cardboard Bow-Making Jig
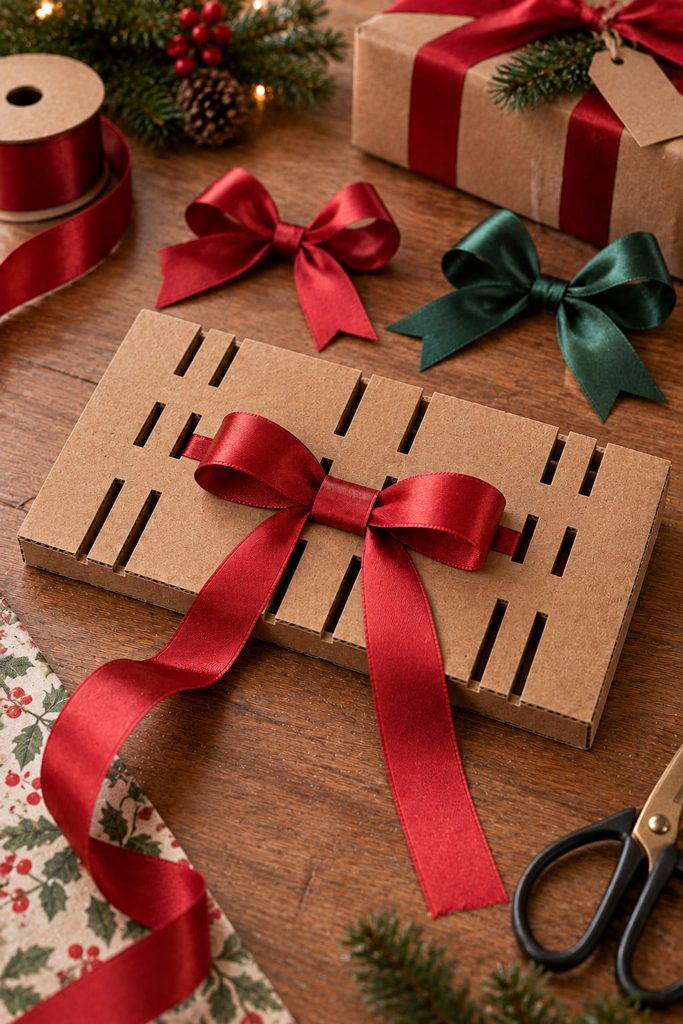
When gift wrapping turns repetitive, a dense, flat box-panel scrap makes a useful bow-making jig for producing several bows at the same size. Cut a rectangular base and two parallel slots or notches that hold ribbon loops at the same width while you tie or wire the center.
The spacing between the slots sets the bow size, so mark a few pairs for narrow, medium, and wide loops on the same board. Keep at least an inch of solid cardboard around each cut so repeated tension does not split the jig. This is a good use for dense, flat box panels that are too plain for display crafts but too useful to recycle immediately.
15. Gusseted Cardboard Stocking Gift Envelope
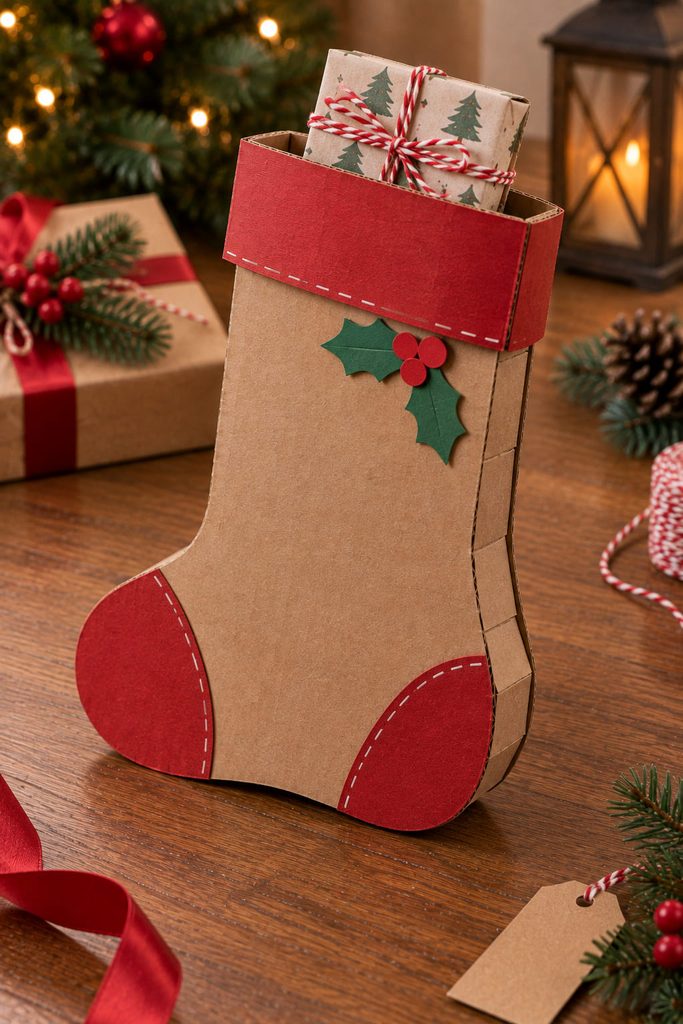
Add a shallow side gusset to a stocking silhouette and it can hold more than a flat note. Cut matching front and back stocking shapes from thin box board, then join them with a narrow strip that runs around the toe, foot, and outer edge. Score that strip at each curve change so it bends in controlled segments instead of buckling.
For a slimmer gift, glue the gusset permanently along the back and use a tuck flap at the top. For thicker contents, stop the gusset below the cuff and add a separate folded paper band around the opening; that gives the package a little expansion room without distorting the stocking shape.
Whichever closure you choose, load the envelope before adding ribbon or layered trim. The finished stocking should lie reasonably flat when empty, open wide enough to remove the gift, and keep the contents from sliding out when lifted by the cuff.
Which Cardboard Christmas Crafts Should You Make First?
Start with the job you want the finished project to do. The cross-slot tree, printing blocks, napkin rings, or bow jig are good choices when you want straightforward construction and visible cardboard texture. Move to the gift box, countdown slider, mailbox, or shadow theater when you want the box material to handle closure, motion, repeated access, or light control.
If you still have clean cardboard tubes after the boxes are gone, 14 Toilet Paper Roll Christmas Crafts Worth Saving Tubes For is a natural next collection because the tube shape creates a completely different set of pockets, rings, ornaments, and small structures.








