

This post contains affiliate links. As an Amazon Associate I earn from qualifying purchases, at no extra cost to you. Thank you for supporting Diynify!
Paper Christmas tree ideas can cover much more than a row of folded tabletop trees. Paper can become a sculptural centerpiece, a hanging ornament, a glowing lantern, a wall installation, a place-setting detail, or a gift topper, which makes it easy to match the project to the space you actually want to decorate.
Most of these projects use cardstock, decorative paper, scissors or a craft knife, a scoring tool, and paper-safe adhesive. A few need thread, a skewer or narrow dowel, a frame or backing board, vellum or tissue paper, paper-mâché paste, or a cool battery-powered LED. Start with the display location first: flat work suits walls and gifts, freestanding structures need a stable footprint, and hanging pieces need a reinforced attachment point.

1. Accordion-Fold Tabletop Paper Christmas Tree

An accordion tree gets its volume from repeated parallel folds, so it can look surprisingly full without a separate internal frame. Use a long sheet of medium-weight paper, score even pleats, then compress the strip and trim the outer edge into a stepped or gently tapered tree profile. When the pleats open, the cut edge repeats around the body and creates the branch rhythm.
A simple build order keeps the shape even:

- Score and fold the full sheet before cutting the silhouette.
- Compress the pleats and trim the outer edge while the layers are aligned.
- Join the first and last pleats to form a standing ring or half-ring, depending on the display.
- Open the base until the tree stands without leaning, then add a lightweight paper star if you want one.
2. Fringe-Wrapped Cone Tree for a Cozy Mantel

Fringe is useful when you want a soft, dense tree silhouette without cutting dozens of individual branches. Form a sturdy cardstock cone first, then wrap it from the bottom upward with narrow fringed strips so every new row overlaps the uncut band of the row below. Curling or lifting just the fringe tips gives the surface movement while the cone carries the actual load.
The trade-off is between texture and clarity. Deep, tightly packed fringe creates a plush look but can swallow small ornaments; wider spacing keeps the tree silhouette cleaner and works better with paper berries, tiny stars, or a restrained garland. Keep embellishments light near the top so the cone does not become top-heavy.
3. Slot-Fit Cardstock Tree Sculpture
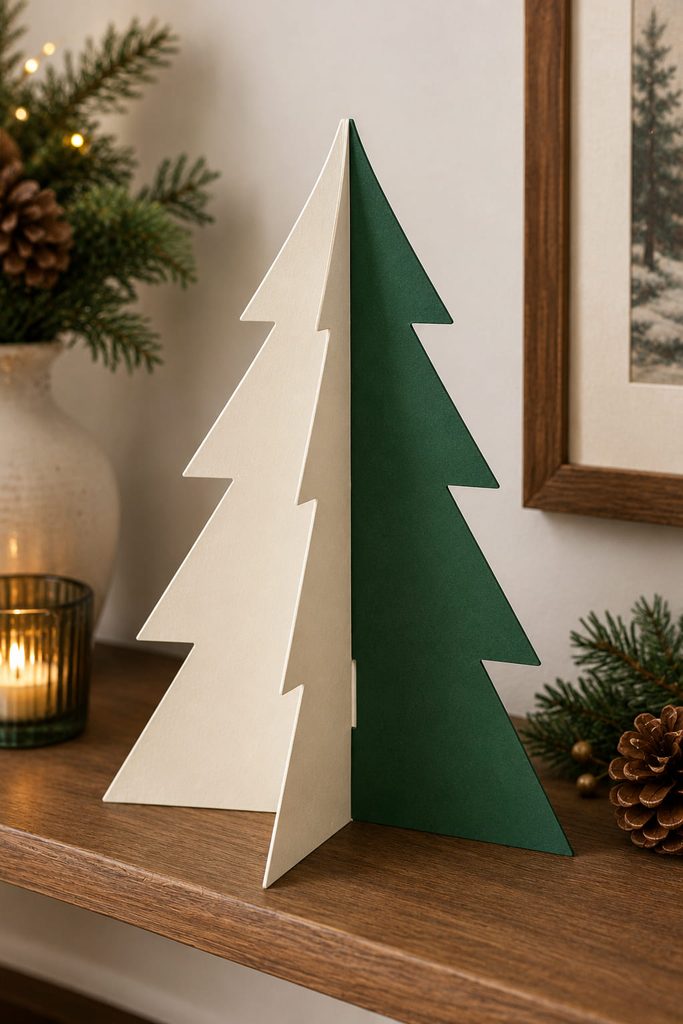
Two intersecting tree panels can stand without glue when each receives a centered slot: one cut from the top toward the middle and the other from the bottom toward the middle. Slide the panels together at right angles and the crossing planes create both the tree silhouette and its footprint.
If the sculpture wobbles, diagnose the joint before adding decoration:
- The panels lean: one slot is off the centerline; recut or widen only enough to realign the crossing.
- The joint bows: the slot is too narrow for the paper thickness; ease it slightly rather than forcing the sheets.
- The base rocks: the lower edges are not level; trim the contact points together after assembly.
- The top twists: the slots are too loose; add a tiny hidden paper shim inside the joint.
4. Honeycomb Paper Christmas Tree Ornament

Honeycomb construction turns many identical half-tree layers into one lightweight ornament. Stack thin paper shapes, adding narrow glue lines in alternating positions from layer to layer. When the stack is opened around its spine, those alternating bonds pull the paper into repeating cells instead of letting the sheets simply fan apart.
The closure matters as much as the cells. Trap a thread loop along the central spine before the final sides are joined, then open the ornament fully and bring the first and last layers together. The hanger should load the spine rather than one delicate outer layer.
Honeycomb Closure Check: Open the ornament over a table and look from above. The cells should spread evenly around the center, and the top should stay closed when lifted by the loop. If one side collapses, reopen the seam and check for a missed or misplaced glue line before adding more adhesive.
5. Rolled Paper Tube Tree Centerpiece

Rolled paper tubes can build a graphic Christmas tree with strong horizontal rhythm. Roll decorative paper into narrow tubes, cut them into graduated lengths, and stack them from longest to shortest against a vertical cardstock spine or low triangular backing. The visible tube ends add texture, while the backing keeps the rows from sliding out of alignment. As a low centerpiece, the tree can stay broad without becoming bulky front to back. Give the backing a short folded easel or wide paper base instead of asking one tiny bottom tube to support the piece.

6. Quilled Christmas Tree Frame Art

Quilling shifts the tree from freestanding decor to detailed framed art. Build the outer triangular silhouette first with larger coils, teardrops, or scrolls, then use smaller shapes only where they create branch direction or ornament-like focal points. Leaving some backing visible between the coils keeps the tree readable instead of turning the frame into one dense block of paper.
Adhesive control matters here more than paper weight. Secure each quilled unit at the points that actually touch the backing and avoid flooding the coil edges, which can flatten the shadow lines that make quilling interesting. Before framing, hold the piece upright; any coil that drops or rotates needs another tiny contact point.
7. Woven Paper Strip Tree Wall Hanging
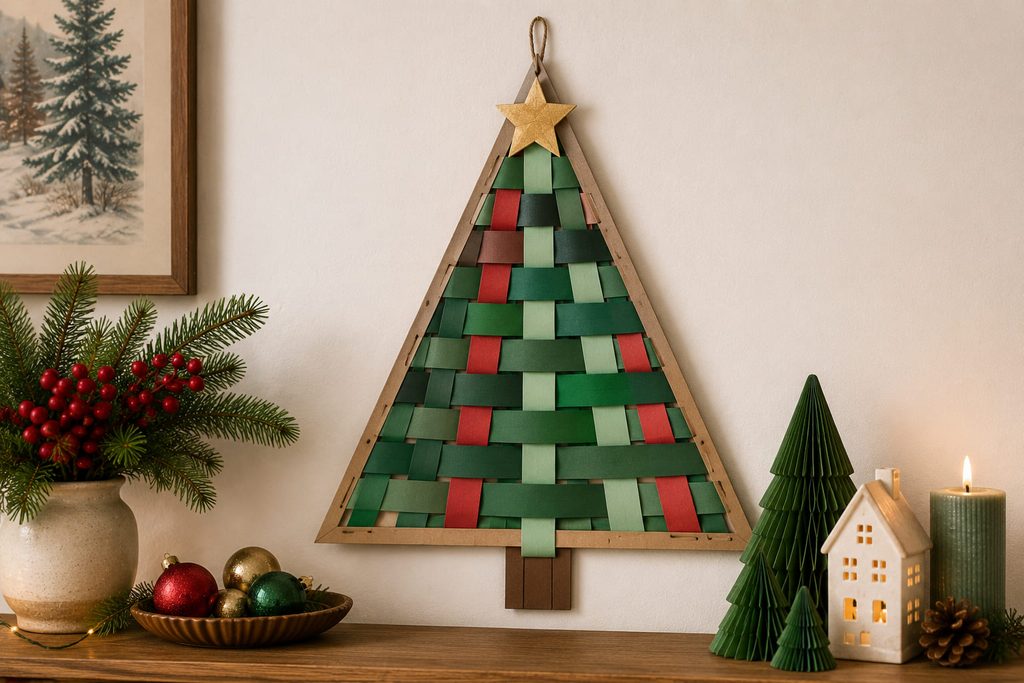
A woven tree needs a real over-under path, not strips simply glued in parallel. Start with a triangular paper or lightweight chipboard frame, anchor vertical warp strips across the opening, then pass contrasting paper strips over and under them to create the fill. The frame carries the tension, while the weaving creates the surface pattern.
Work from the widest part of the triangle toward the point:
- Fix the warp strips with even spacing and enough tension to stay straight.
- Weave the first horizontal strip over-under across the full width.
- Reverse the sequence on the next row so the intersections lock visually.
- Trim each row at the frame edge and secure it before the opening becomes narrower.
- Add the hanging loop to the frame, not to the woven strips.
8. Stacked Rosette Christmas Tree Mantel Display

Pleated paper rosettes make a tree by stacking flat radial discs rather than building a continuous cone. Use several rosettes in decreasing diameters and separate them with small folded paper collars or short spacer beads on a skewer or narrow dowel. The gaps let each tier cast its own shadow and keep the tree from reading as one compressed stack.
Before final assembly, check:
- the largest rosette lies flat;
- center holes align;
- spacers keep neighboring tiers apart;
- the bottom support is broader than the dowel.
9. Pop-Up Paper Christmas Tree Card

A pop-up tree works only when the tree and the card agree on how they will close. One practical route uses nested V-fold branches attached across the card’s center crease. Each branch opens toward the viewer when the card spreads, but its attachment tabs must remain clear of the next branch so the layers can collapse back into the fold without collision.
Build the mechanism before decorating the cover:

- Mark the card centerline and the attachment positions.
- Fold each tree tier on its own center and test it flat.
- Attach the lowest tier first, keeping both tabs symmetrical across the card crease.
- Add higher tiers with enough vertical clearance that their edges do not catch during closing.
- Close the card slowly after every new tier rather than waiting until the whole tree is glued.
The closed-state test is the proof. The card should shut without a hard bump, forced bend, or branch tip protruding beyond the edges. If one tier buckles, do not trim it immediately; first check whether its tabs are too close together or whether it overlaps the tier below.
Once the mechanism works, decorate the open negative spaces rather than loading every branch with extra layers. Flat punched circles, tiny stars, or a slim paper garland preserve the motion better than thick embellishments.
10. Vellum-Window Paper Tree LED Lantern
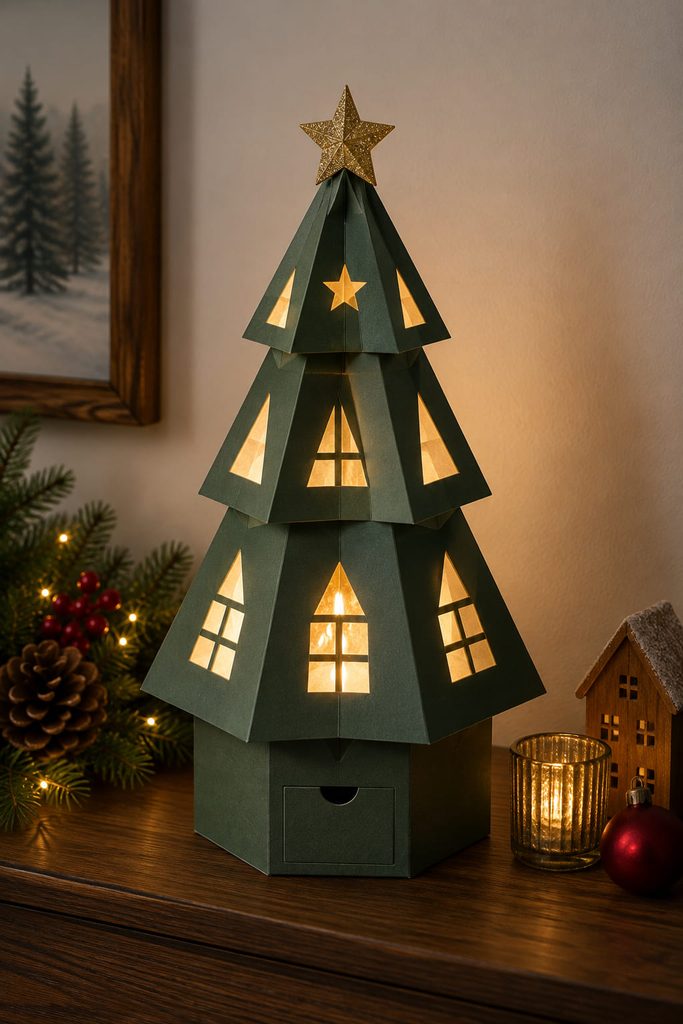
For a paper tree that actually glows, the light path has to be designed into the structure. Build a stable faceted lantern body from cardstock panels shaped into a simplified tree, then cut openings in those panels and back them with vellum. The cardstock becomes the frame, the vellum diffuses the light, and the open interior keeps a cool battery-powered LED from pressing directly against the paper walls.
A removable bottom flap or wide access panel makes the light safer and easier to use than sealing the lantern permanently. Keep the LED centered on a flat base, maintain air space around it, and never substitute a candle, flame, or heat-producing bulb.
Light-Path and Access Check:
- Openings should remain visible from several angles instead of being blocked by inner tabs.
- The lantern should stand level before the light is inserted.
- The LED must be removable without tearing the structure.
- If one panel bows inward, reinforce its fold or reduce the opening size rather than pushing the light against it.
11. Hanging Spiral Paper Christmas Tree Mobile

A spiral-cut tree creates movement from one continuous sheet. Cut a broad spiral inside a tree-shaped or circular paper blank, then lift the center while the outer edge hangs below; gravity stretches the spiral into a tapering three-dimensional form. The hanger belongs at the strong central area, not at a thin outer tip.
If the mobile hangs badly, the symptom points to the fix:

- It tilts to one side: the cut path or added decorations carry more weight on that side; reduce the heavier area or shift the suspension point slightly.
- The spiral barely opens: the paper may be too stiff or the bands too wide; use a lighter sheet or cut a longer spiral path.
- The bottom twists into the wall: give the mobile more clearance or shorten the lowest tail.
- The center tears: reinforce the hanging point with a small paper patch on both sides before rethreading.
Suspend it where air movement is gentle and where the lowest turn cannot catch on nearby garland, curtains, or branches.
12. Tissue Paper Mosaic Tree Window Decoration
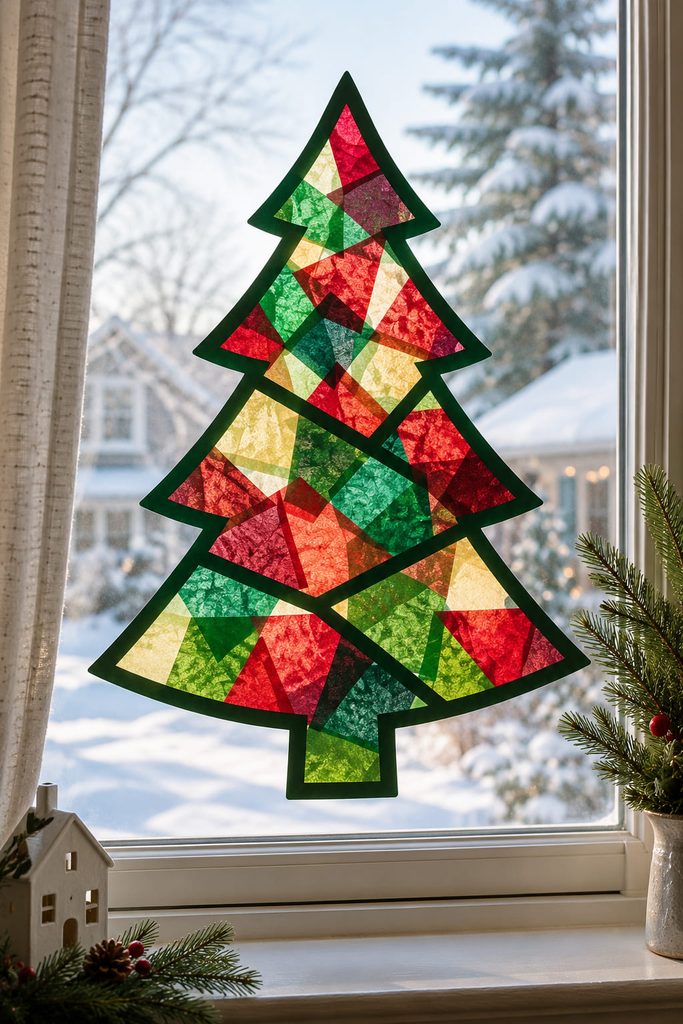
Daylight supplies the visual effect in a tissue-paper mosaic tree, so the construction can stay flat and lightweight. Use a thin cardstock outline as the tree frame, bridge the openings with overlapping tissue pieces, and keep the overlaps deliberate so some areas glow more deeply than others. A second matching outline placed over the back can hide the glue edges and strengthen the perimeter. The design reads best when the trunk, outer tree shape, and a few larger color zones survive the brightness of the window. Tiny confetti-like pieces may look detailed on the table but can disappear into a muddy patch once daylight passes through them.
13. Pleated Fan Christmas Tree Place Cards

Half-circle paper fans can form a small standing tree that also carries a guest name. Pleat two or three semicircular pieces, pinch each at the center, and stack them vertically so the curved edges create layered branches. A folded cardstock tent behind the lowest fan gives the project a stable base and a clean surface for the name strip.
For batch-making:
- Cut all fan blanks and bases first.
- Score every pleat before completing one tree.
- Assemble one sample and view it from seated eye level.
- Match the remaining fan heights and name-strip positions to that sample.
14. Torn Paper Collage Christmas Tree Art
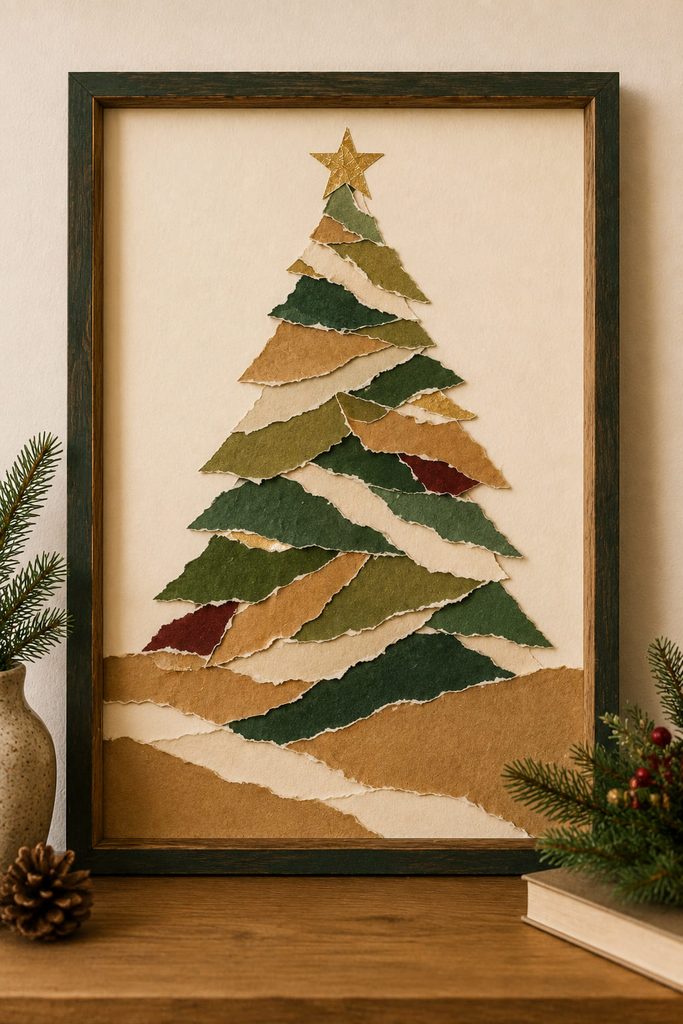
Torn edges can make a flat paper tree feel tactile without introducing complicated construction. Layer irregular strips or chunks from the bottom upward so the exposed deckled edges suggest branch tiers, but keep the outer silhouette controlled enough to read clearly at a distance. This is especially effective with handmade, kraft, painted, or recycled papers because variation in fiber and surface becomes part of the composition.
The useful restraint is negative space. Leave breathing room around the tree and between selected layers instead of filling every gap with stars or ornaments. In a gallery-wall frame, a bold triangular mass with a few intentional breaks often reads more strongly than a fully packed collage.
15. Modular Origami Christmas Tree
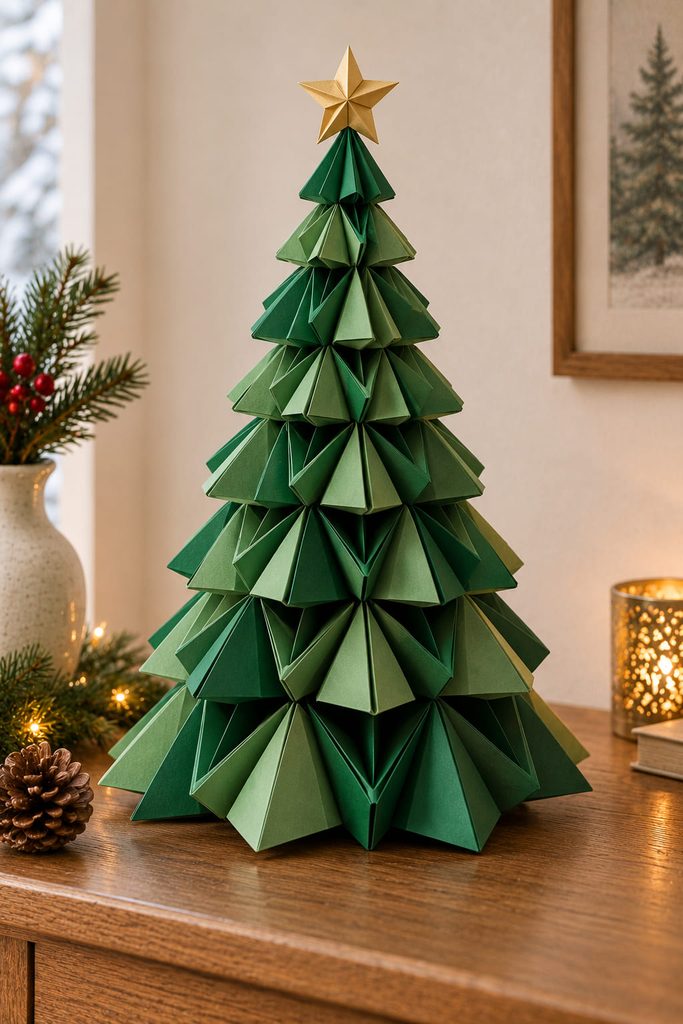
Choose modular origami when the folded geometry itself should become the tree’s decoration. Build repeated units at several sizes, then nest or interlock them so the lower modules create a broad base and the upper units step inward. Because each module has its own creases and pockets, the finished tree gains facets and shadow without needing glued-on branches.
The project becomes easier if you treat scale as a system rather than improvising every tier. Fold all units for one tier together, compare them before assembly, and reject any piece with a noticeably different angle. When modules are meant to interlock, keep insertion depth consistent so the tree does not corkscrew as it rises.
For a freestanding version, the lowest tier must spread farther than the upper mass. If the tree leans after assembly, correct the base or the interlock sequence rather than adding weight to one side.
16. Paper-Mâché Christmas Tree Sculpture

Paper-mâché suits a tree when you want a substantial, matte sculptural surface for seasonal display. Build a lightweight cone or faceted paper armature, cover it with small overlapping paper pieces and paste, and let the shell dry completely before adding another layer or surface finish. The armature controls the silhouette; the dried shell supplies stiffness.
Before decorating, check that it:
- sits flat without rocking;
- feels fully dry and firm;
- has no wet ridge pulling one side inward;
- lifts from the base without the shell flexing.
17. Paper Chain Christmas Tree Wall Installation

Paper chains can become a tree without pretending to be branches. Make loops in a limited set of sizes, then hang the chains in horizontal swags that grow wider toward the bottom, using a few discreet wall-safe anchor points or a paper backing shape to define the triangle. The loops supply volume and rhythm; the stepped swag lengths create the tree silhouette when viewed from across the room. Because the structure stays lightweight, it can cover a generous wall area. Keep the lowest chains clear of furniture and door movement, and avoid packing every row at identical density.
18. Layered Paper Christmas Tree Gift Topper

Keep a layered gift topper flatter than the bow or ribbon around it so the package can still stack neatly. Stack two or three tree silhouettes with progressively smaller cutouts, offsetting the edges just enough to show color and shadow, then attach the finished piece at a ribbon crossing or to a removable gift tag. The layered edge gives dimension without creating a fragile object that is easily crushed in a pile of presents.
Use cardstock for the base layer and lighter decorative paper for upper details so the topper does not curl away from the package. If you want more texture, add shallow fringe or punched openings to one layer instead of building a tall stack. The package should still sit flat and the topper should remain readable from directly above.
How to Choose Among These Paper Christmas Tree Ideas
Match the construction to the way the decoration will be handled. For a mantel or table, choose a tree with a real footprint such as the accordion, slot-fit, rosette, modular origami, or paper-mâché version. For walls and windows, prioritize silhouette and distance readability with weaving, collage, tissue mosaic, or paper chains. Hanging ornaments and mobiles need a reinforced load point, while the lantern and pop-up card need the most careful functional testing because light access and folding clearance are part of the finished result.
If you want a quick first project, the layered gift topper, torn-paper collage, or tabletop accordion tree keeps the mechanism simple. The pop-up card, honeycomb ornament, woven wall hanging, and LED lantern are better choices when you want the construction itself to be part of the challenge.
Pick the Tree That Fits the Space
The most useful starting point is not a color palette but a location. A narrow shelf favors a shallow sculptural tree, a dinner table needs a stable low-footprint piece, a bright window rewards translucent paper, and a blank wall can handle a larger woven or chain-based silhouette. Once the function is fixed, paper weight, join type, and decoration become much easier decisions.
If folding is the part you enjoy most, Diynify’s 20 Christmas Origami Ideas to Fold This Holiday Season offers a separate collection built around origami models rather than assembled paper-tree structures.








